
 Pin it
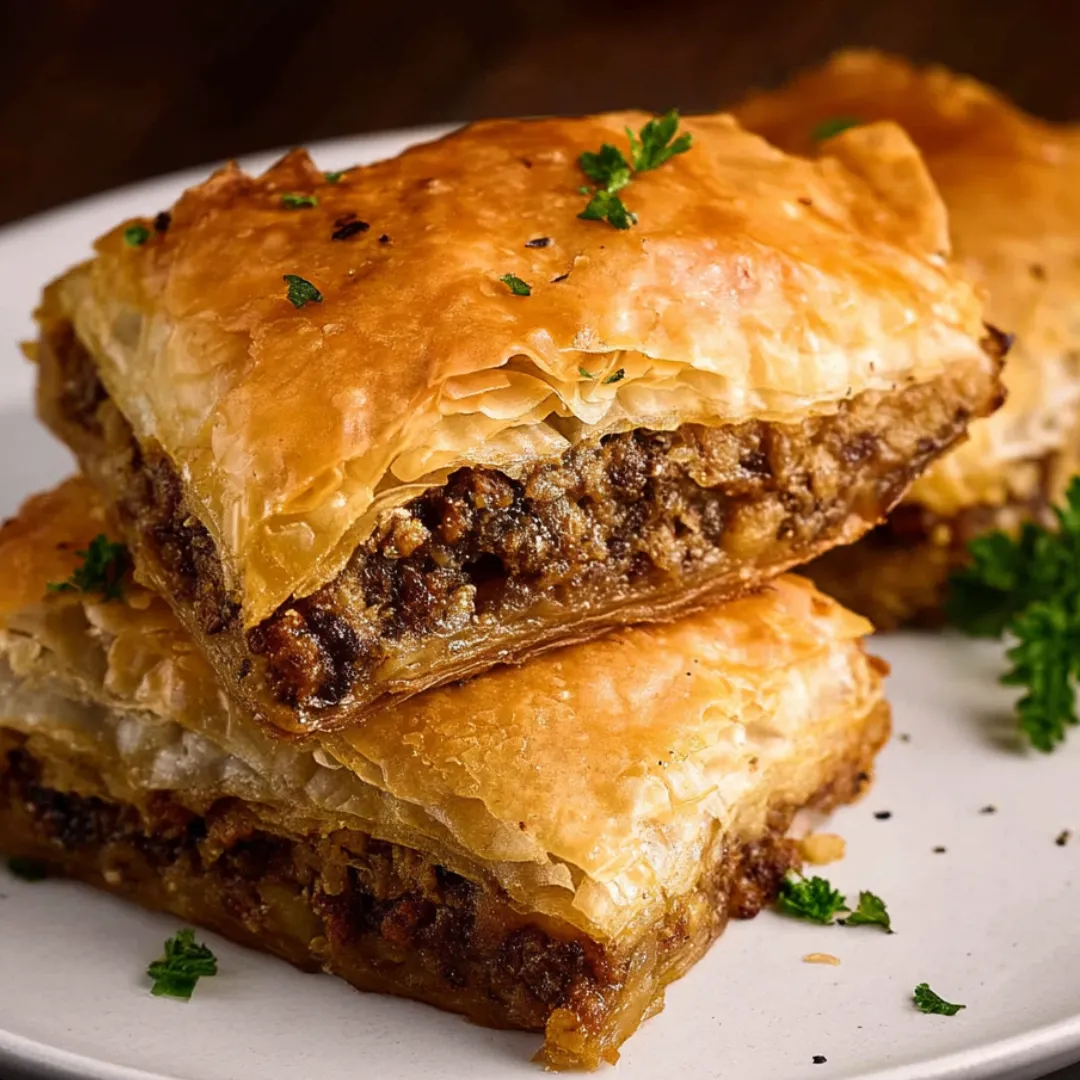
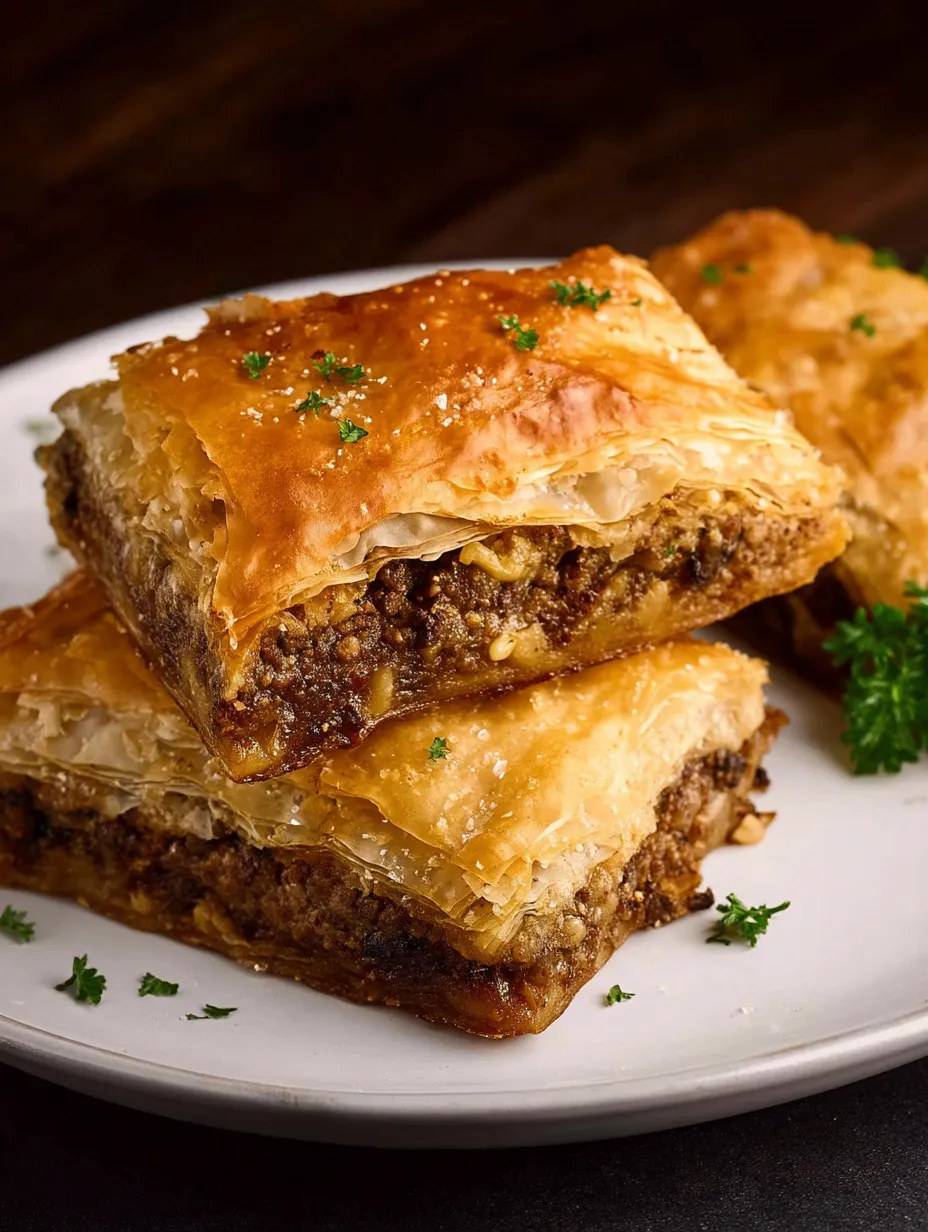
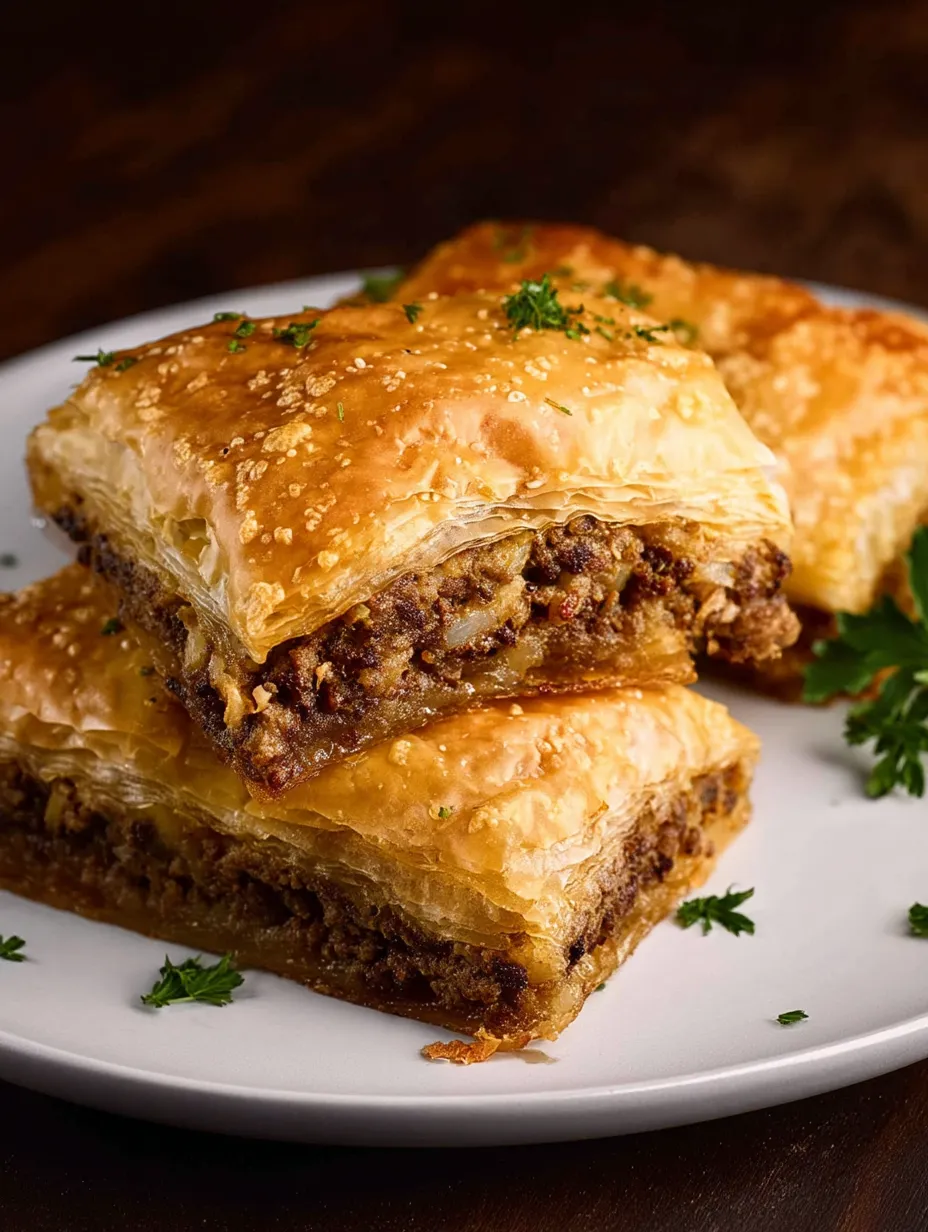
This mouthwatering Greek Phyllo Meat Pie transforms simple ingredients into an incredibly satisfying meal that brings Mediterranean flavors right to your table. The combination of seasoned ground beef nestled between layers of impossibly crispy phyllo creates a textural masterpiece that's both comforting and impressive. The natural sweetness from leeks and onions balances perfectly with warming spices like cinnamon, nutmeg, and allspice, creating a complex flavor profile that makes this dish utterly irresistible.
The first time I made Kimadopita was for a dinner party where I wanted something different from the usual lasagna or casserole. I was nervous about working with phyllo dough, but followed the technique exactly. When I pulled that golden, crackling pie from the oven, the aroma filled the kitchen with promises of something special. My guests were instantly intrigued by the unusual presentation, but after the first bite, conversation stopped completely as everyone focused on savoring this unexpected delight. Even my brother-in-law, who typically sticks to meat and potatoes, asked for the recipe!
Ingredients
- 1 pound ground beef: The foundation of our filling. Look for beef with about 15% fat content for the best flavor without excessive greasiness. The meat should have a bright red color and feel slightly firm but not hard. Grass-fed beef will provide a more complex flavor profile, but any good quality ground beef works beautifully.
- 2 large leeks: Provides natural sweetness and unique flavor. Choose leeks with firm white parts and vibrant green tops. The white and light green portions should be crisp and free from blemishes. Smaller leeks tend to be more tender and less fibrous than larger ones.
- 1 large onion: Adds depth and sweetness when cooked slowly. Select an onion that feels heavy for its size with dry, papery skin and no soft spots. Yellow or sweet onions work best in this recipe as they caramelize beautifully during cooking.
- 3 tablespoons olive oil: Used for sautéing and in the batter mixture. Extra virgin olive oil brings a distinct Mediterranean flavor, but a lighter olive oil works well too. The oil should have a fresh, fruity aroma without any rancid notes.
- 1 teaspoon ground cinnamon: A signature Greek spice that adds warmth. Quality cinnamon should have a sweet, woody aroma that's instantly recognizable. Ceylon cinnamon offers a more delicate flavor than Cassia cinnamon, but either works in this recipe.
- 1/2 teaspoon ground nutmeg: Contributes subtle warmth and complexity. Freshly grated nutmeg provides the most vibrant flavor, but pre-ground is convenient and works well. The spice should have a strong, sweet-spicy aroma when you open the container.
- 1/2 teaspoon ground allspice: Rounds out the warm spice profile. Good allspice berries should be round, brown, and aromatic with notes of cinnamon, nutmeg, and cloves. Ground allspice loses potency quickly, so check that yours still has a strong scent.
- 1 teaspoon salt: Enhances all the other flavors in the dish. Sea salt or kosher salt provides cleaner flavor than iodized table salt. The amount can be adjusted based on personal preference.
- 1/2 teaspoon black pepper: Adds a subtle heat that balances the sweet spices. Freshly ground pepper provides significantly more flavor than pre-ground. The pepper should have a sharp, pungent aroma when freshly ground.
- 1 package phyllo dough (450g/16oz): Creates the signature crispy layers. Look for dough in the freezer section, properly sealed without any tears or signs of freezer burn. The sheets should separate easily when properly thawed.
- 3 eggs: Binds the batter and helps create golden, crispy layers. Farm-fresh eggs with bright yellow-orange yolks provide the best color and flavor. They should be at room temperature for optimal incorporation into the batter.
- 1 cup milk: Forms part of the moistening batter. Whole milk provides the richest flavor and helps brown the top beautifully, but 2% can work in a pinch. The milk should be fresh with a clean, sweet smell.
- 1/2 cup Greek yogurt: Adds tanginess and helps create tender layers. Traditional Greek yogurt with at least 5% fat content works best for flavor and texture. It should have a thick, creamy consistency without excessive whey separation.
- 1/2 cup water: Thins the batter to the perfect consistency. Filtered water is ideal but tap water is perfectly fine for this purpose. The water should be at room temperature to avoid curdling the yogurt when mixed.
- 1/3 cup olive oil (for batter): Helps create crispy golden layers. The same quality considerations apply as for the cooking olive oil mentioned above.
 Pin it
Step-by-Step Instructions
- Step 1:
- Prepare the phyllo dough properly - Begin by removing the phyllo package from the freezer the night before and placing it in the refrigerator to thaw slowly and evenly. This patient approach prevents the sheets from sticking together or tearing when you work with them. About an hour before you plan to assemble the pie, take the package out of the refrigerator and let it come to room temperature while still wrapped. When you're ready to start, unroll the phyllo on a clean, dry surface and immediately cover it with a slightly damp kitchen towel. This prevents the delicate sheets from drying out and becoming brittle while you prepare the filling. Remember to keep the phyllo covered whenever you're not actively working with it. If your phyllo sheets are larger than your baking pan, measure and cut the entire stack to fit before you begin assembly. For this recipe, using a 9x13 inch (23x33 cm) baking dish is ideal, creating perfect proportions of filling to pastry.
- Step 2:
- Prepare the leeks with special attention - Leeks often harbor hidden grit between their layers, so proper cleaning is essential. Begin by trimming off the dark green tops and the root ends, saving only the white and light green portions. Slice these portions in half lengthwise, then rinse thoroughly under cold running water, fanning the layers to remove any soil hiding inside. Once clean, slice the leeks into thin half-moons about 1/4 inch thick. If you notice any tough outer layers, remove them before slicing. The leeks should yield about 2 cups when properly prepared. Their natural sweetness is crucial to the flavor profile of this dish, so don't be tempted to substitute with just onions.
- Step 3:
- Create the perfect meat mixture - Heat a large, heavy-bottomed skillet over high heat until quite hot, then add 3 tablespoons of olive oil. When the oil is shimmering but not smoking, add the ground beef, breaking it up with a wooden spoon into very small pieces - smaller than you would for tacos or meat sauce. Keep breaking the meat and stirring constantly as it browns. You're aiming for well-browned, almost crispy bits rather than just gray, steamed meat. This browning process should take about 7-8 minutes and is absolutely critical for developing deep flavor. Once the meat is properly browned, add the cinnamon, nutmeg, allspice, salt, and pepper, stirring vigorously to coat the meat evenly with the spices. The heat activates the essential oils in the spices, creating an intoxicating aroma that's the signature of this dish. If there's excessive fat in the pan, carefully tilt the pan and spoon off most of it before proceeding.
- Step 4:
- Add vegetables for sweetness and depth - Reduce the heat to medium and add the prepared leeks and finely diced onion to the seasoned meat. Stir everything together thoroughly, allowing the vegetables to begin releasing their moisture. Continue cooking for about 8-10 minutes, stirring occasionally, until the leeks and onions have softened completely and reduced in volume by about half. They should almost melt into the meat mixture, creating a cohesive filling rather than distinct pieces of meat and vegetables. The natural sugars in the vegetables will caramelize slightly, adding complexity to the filling. Taste the mixture and adjust the seasoning if necessary, remembering that the phyllo layers will be relatively neutral in flavor. Remove the pan from heat and allow the filling to cool for at least 15 minutes - a hot filling can make the phyllo soggy during assembly.
- Step 5:
- Prepare the special phyllo batter - While the filling cools, make the batter that transforms this dish from good to exceptional. In a large bowl, whisk the 3 eggs until well blended, then add the milk, Greek yogurt, water, and 1/3 cup olive oil. Whisk vigorously until everything is thoroughly combined into a smooth, pourable mixture with no streaks of yogurt remaining. This batter serves three important functions: it helps the phyllo layers stick together, it creates an incredibly crispy texture as it bakes, and it adds rich flavor throughout the pie. The consistency should be similar to crepe batter - thin enough to pour but not watery. Set aside about 1/3 of this mixture specifically for the top of the pie; the remainder will be used between the phyllo layers.
- Step 6:
- Begin the crucial layering process - Preheat your oven to 350°F (175°C) and lightly oil a 9x13 inch (23x33 cm) baking dish. Take your first two sheets of phyllo and place them in the bottom of the pan. Don't worry about perfect placement - slight wrinkles and folds add texture to the finished dish. Drizzle about 3 tablespoons of the batter mixture over these sheets, spreading it with the back of a spoon to lightly coat the surface. Continue this process - two sheets of phyllo, followed by a drizzle of batter - until you've used half of your phyllo sheets (about 10-12 sheets). Work confidently but without rushing, keeping the unused phyllo covered with the damp towel. This bottom layer creates the foundation of your pie and needs to be substantial enough to support the filling without becoming soggy.
- Step 7:
- Add the filling with proper technique - Once you've built your base layer of phyllo, spread the cooled meat filling evenly across the surface, pressing it gently with the back of a spoon to create a level layer that reaches all the way to the edges of the pan. The filling should be about 1/2 inch thick throughout, without any bare spots or overly thick areas that would cook unevenly. The careful cooling of the filling in step 4 is crucial here - if it's too hot, it will create steam that makes the bottom phyllo soggy before it has a chance to crisp in the oven.
- Step 8:
- Complete the top phyllo layers - Continue the layering process with the remaining phyllo sheets, again working with two sheets at a time and drizzling with batter between each pair. For the final two sheets, place them on top but don't add batter yet. Instead, take a sharp knife and score the top layer of the pie into your desired portion sizes, cutting just through the top few layers of phyllo without disturbing the filling. This pre-cutting makes serving much easier after baking and allows the batter to penetrate throughout the layers. Now, pour the reserved 1/3 of batter mixture evenly over the entire top of the pie, ensuring it seeps into the score marks and edges. This final batter coat ensures a beautifully golden, crispy top crust.
- Step 9:
- Bake with attention to detail - Place the assembled pie in the preheated oven on the middle rack. Bake for 45-50 minutes, rotating the pan halfway through cooking time for even browning. Watch for visual cues of doneness: the top should be deeply golden brown with some darker edges, and the batter should be completely set. If the top is browning too quickly, loosely cover with aluminum foil for the remaining baking time. The pie is done when a knife inserted into the center comes out clean and the phyllo makes a hollow sound when tapped lightly. Proper baking ensures that every layer of phyllo crisps properly while the filling remains moist and flavorful.
- Step 10:
- Rest and serve properly - Once baked to perfection, remove the pie from the oven and let it rest for at least 15-20 minutes before serving. This resting period is non-negotiable - it allows the layers to set and the flavors to meld, resulting in clean slices and enhanced taste. The pie will still be warm after this rest but won't fall apart when cut. Serve generous pieces, making sure each portion includes the full depth of crispy top and bottom layers with the savory filling in between. A simple Greek salad with tomatoes, cucumbers, feta, and olives makes the perfect accompaniment, balancing the richness of the pie with fresh vegetables and tangy dressing.
The finished Kimadopita should have a gloriously golden, shatteringly crisp top that gives way to layers of flavor-packed meat studded with sweet leeks and onions, all infused with warm Mediterranean spices. Each bite offers a perfect contrast of textures and a harmonious blend of flavors that transport you straight to a seaside taverna in Greece.
The Magic of Greek Spices
What truly sets Kimadopita apart from other meat pies is its distinctive spice profile. The combination of cinnamon, nutmeg, and allspice might seem unusual in a savory dish to those unfamiliar with Greek cuisine, but it creates a remarkable depth of flavor that's both comforting and sophisticated.
I learned the importance of these spices from my neighbor Eleni, who grew up in a small village outside Thessaloniki. She explained that these warming spices aren't just for flavor - they're part of a culinary tradition that stretches back centuries. In Greek cooking, the line between sweet and savory is beautifully blurred, with spices serving as the bridge between worlds.
When I first attempted this recipe, I was tempted to reduce the amount of cinnamon, concerned it would taste too much like a dessert. Eleni encouraged me to trust the traditional measurements, explaining that the meat, onions, and leeks would balance everything perfectly. She was right - the finished pie had a complex, layered flavor that was entirely savory despite its sweet spice notes. The cinnamon provides warmth without dominating, the nutmeg adds an earthy complexity, and the allspice ties everything together with its subtle peppery notes.
Versatile Serving Suggestions
While Kimadopita is substantial enough to serve as a complete meal, I've found several wonderful ways to incorporate it into different dining occasions. For a simple family dinner, I serve generous slices alongside a Greek salad with plenty of feta cheese and kalamata olives. The bright, acidic flavors of the salad provide the perfect counterpoint to the rich, spiced meat pie.
For more formal gatherings, I often cut the pie into smaller squares and serve it as part of a Mediterranean mezze spread. Alongside tzatziki, hummus, olives, and grilled vegetables, the meat pie becomes a standout component of a feast that encourages conversation and communal dining. A glass of medium-bodied red wine, particularly a Greek Xinomavro or Agiorgitiko, complements the spiced meat beautifully.
During cooler months, I serve Kimadopita with a simple avgolemono soup (Greek lemon-egg soup) for a truly comforting meal that honors its Mediterranean roots. The bright citrus notes of the soup refresh the palate between bites of the rich pie, creating a perfectly balanced dining experience.
For casual lunch gatherings, I sometimes prepare the pie a day ahead, refrigerate it after baking, and serve it at room temperature. The flavors actually develop beautifully overnight, and the convenience of a make-ahead dish that doesn't require reheating makes entertaining effortless.
My own revelation with this recipe came during a particularly hectic holiday season when I was searching for make-ahead dishes that could feed a crowd without hours of last-minute preparation. I discovered that fully assembled but unbaked Kimadopita freezes beautifully for up to a month. I now prepare several pies when I have a free afternoon, freeze them before the final batter topping, and have impressive homemade meals ready to finish with minimal effort. When unexpected guests announced they were in the neighborhood one snowy evening, I simply added the final batter layer to a frozen pie and popped it in the oven. By the time we finished our first glass of wine, a golden, fragrant masterpiece emerged from the oven, and my reputation as an effortless host was secured.
 Pin it
Creative Variations to Explore
While traditional Kimadopita is perfect in its simplicity, I've discovered several delicious variations that respect the original concept while introducing new flavors. For a festive autumn version, I sometimes add 1 cup of roasted butternut squash cubes to the meat mixture along with a pinch of ground cloves. The subtle sweetness of the squash amplifies the warm spices beautifully, creating a seasonal adaptation that's perfect for holiday gatherings.
For those who enjoy cheese, adding 1 cup of crumbled feta to the meat mixture just before filling the pie creates pockets of tangy saltiness that contrast wonderfully with the sweet notes of the onions and spices. The feta doesn't melt completely but softens into creamy morsels throughout the filling.
A springtime variation I particularly enjoy incorporates 2 cups of baby spinach, wilted and squeezed dry, into the meat mixture along with 2 tablespoons of fresh dill. This brightens the flavor profile while maintaining the dish's hearty character. It also adds beautiful color contrast to the filling when served.
For those who enjoy heat, adding 1/2 teaspoon of Aleppo pepper or a pinch of cayenne to the spice mixture creates a subtle warmth that builds with each bite. This doesn't overpower the traditional spice profile but adds an extra dimension that many find irresistible.
When serving to children or those new to Greek flavors, I sometimes reduce the cinnamon slightly and add 1/4 cup of tomato paste to the meat mixture. This creates a more familiar flavor profile that serves as a gentle introduction to the traditional version.
After years of making this dish for everything from casual family dinners to special celebrations, I've come to appreciate how it bridges cultural traditions while creating new memories around my own table. There's something deeply satisfying about watching someone experience Kimadopita for the first time - the initial curiosity about the unusual combination of spices, the first tentative bite, and then the look of surprised delight as the flavors come together.
What I treasure most is how this dish connects generations and cultures. When my daughter requested it for her birthday dinner instead of pizza, I realized this Greek classic had truly become part of our family's culinary heritage. Food has always been my way of showing love and creating connections, and this phyllo meat pie - with its labor of love in the layering process and its perfect balance of flavors - embodies that philosophy perfectly. Whether you're making it for a special occasion or simply because you crave those warm, comforting flavors, Kimadopita rewards your efforts abundantly.
Frequently Asked Questions
- → Can I prepare this meat pie ahead of time?
- Yes, you can assemble the pie up to 24 hours ahead and refrigerate it unbaked. When ready to serve, pour the milk mixture over the top and bake. You may need to add 5-10 minutes to the baking time if cooking from cold.
- → How do I prevent phyllo from drying out while working with it?
- Keep the phyllo covered with a damp kitchen towel while working, and only remove sheets as you need them. Work quickly but carefully to minimize exposure to air which causes drying.
- → Can I freeze Kimadopita?
- Yes! You can freeze it either before or after baking. If freezing before baking, don't pour the milk mixture over it. When ready to bake, thaw in the refrigerator overnight, add the milk mixture, and bake as directed.
- → What can I serve with this meat pie?
- A traditional Greek salad with tomatoes, cucumbers, olives and feta makes a perfect side. You can also serve it with tzatziki (yogurt and cucumber dip) or a simple green salad with lemon vinaigrette.
- → Can I use a different meat instead of beef?
- Absolutely! Ground lamb works beautifully and is very traditional in Greek cooking. You can also use ground turkey or chicken for a lighter version, though you may want to add a bit more olive oil to keep it moist.