
 Pin it
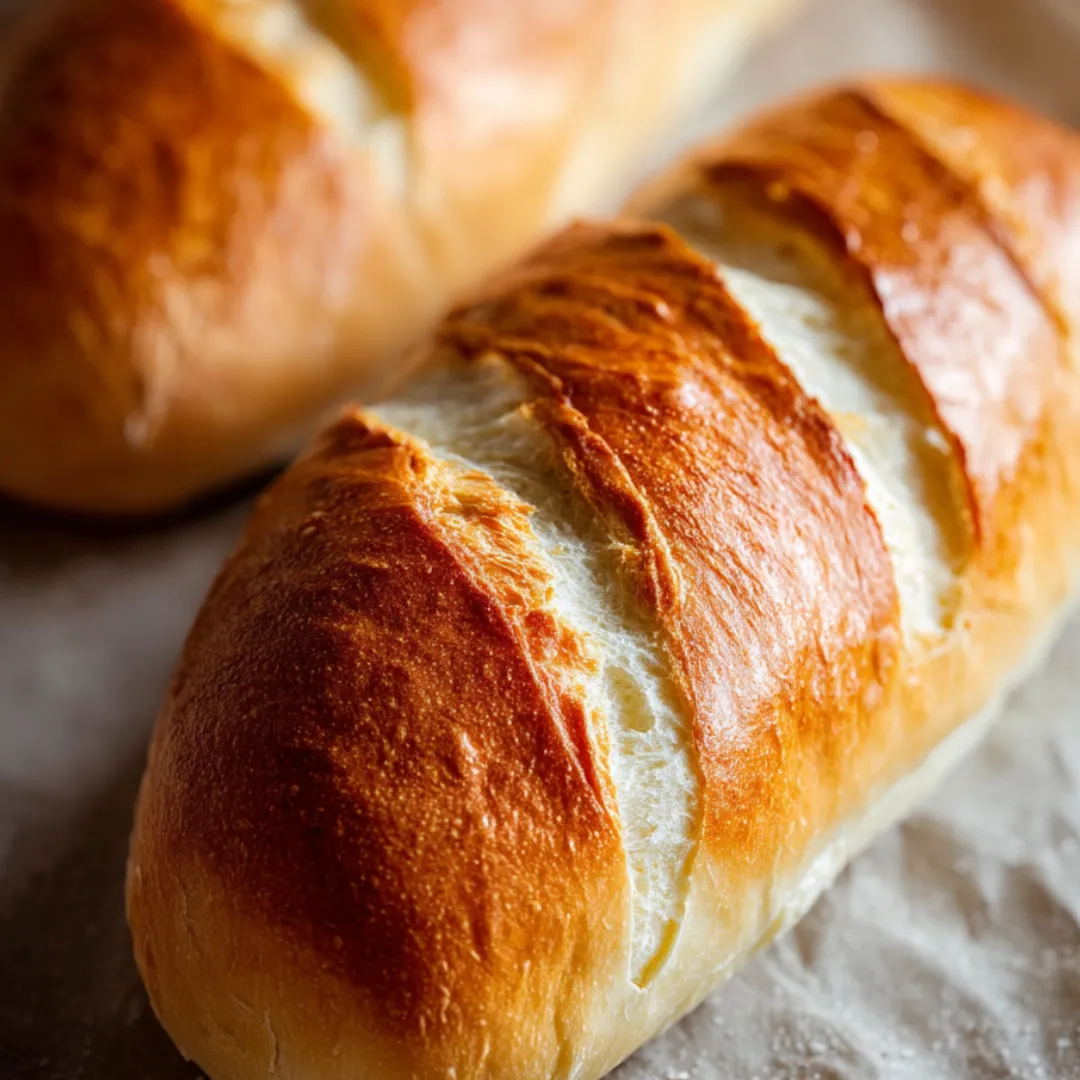
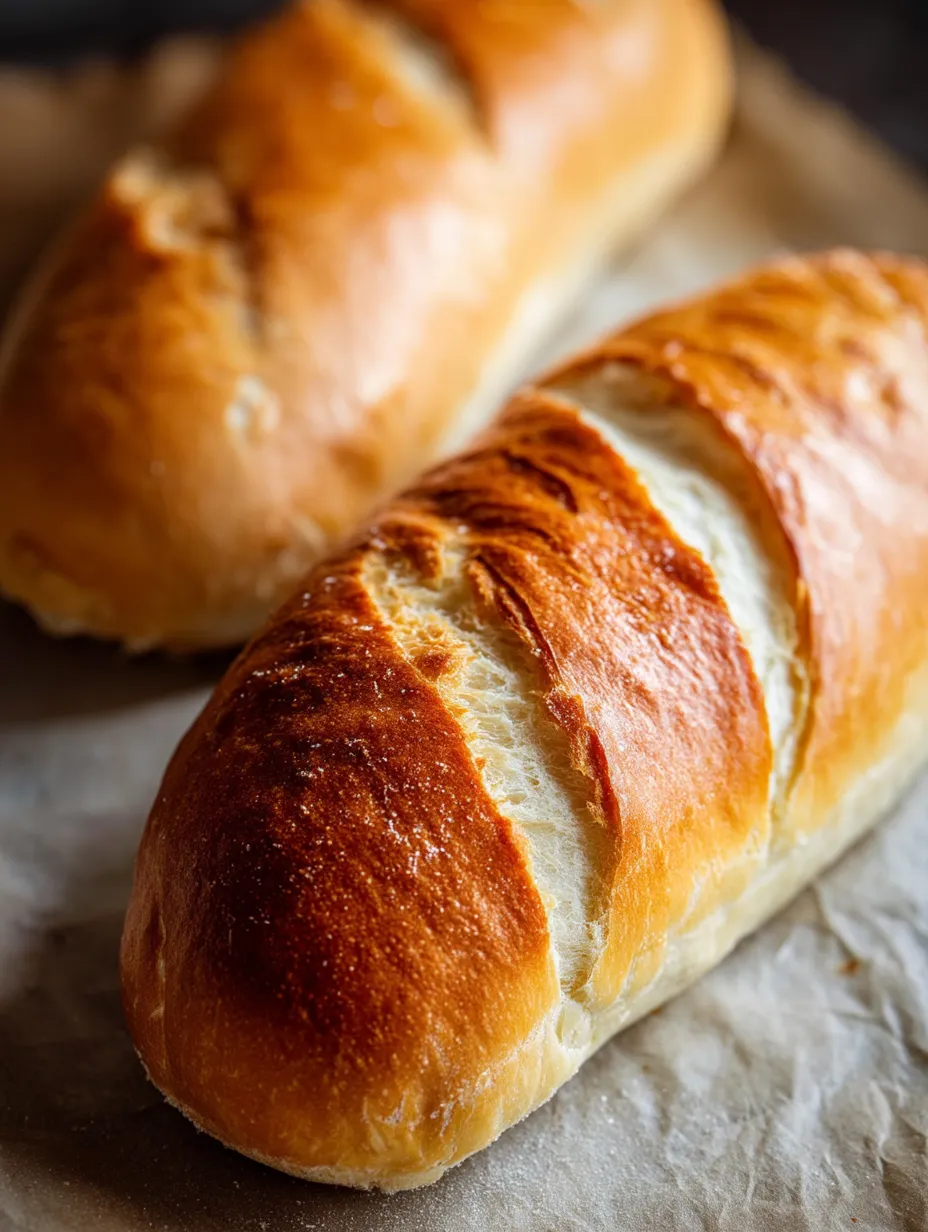
This French bread delivers an irresistible contrast of textures – a satisfyingly crisp golden crust that gives way to a pillow-soft, airy interior. Each slice reveals delicate air pockets throughout, the hallmark of perfectly fermented dough. The subtle wheaty aroma and mild flavor make this bread the ideal canvas for everything from hearty sandwiches to simple butter and jam, or as the perfect companion to soak up the last bits of soup or stew from your bowl.
The first time I made this bread, I was genuinely shocked at how well it turned out. I'd been buying French bread from our local bakery for years, paying nearly $5 a loaf, when I decided to try making it myself. The dough felt alive under my hands as I kneaded it, and watching it rise was surprisingly satisfying. When that amazing yeasty aroma filled my kitchen, my kids came running. They demolished half the loaf while it was still warm, dipping pieces into olive oil and declaring it better than 'store bread.'
Ingredients You'll Need
- All-Purpose Flour: The backbone of your bread, providing structure and texture. Look for unbleached flour for the best flavor, but bleached works too. The protein content (usually 10-12%) is perfect for French bread, creating that tender interior we're after. Make sure to measure by spooning flour into your measuring cup and leveling off rather than scooping directly, which compacts the flour.
- Active Dry Yeast: The magical ingredient that creates those beautiful air pockets and helps the dough rise. The freshness matters tremendously – check the expiration date and store unopened packets in a cool, dry place or even the refrigerator. When properly activated, it should smell pleasantly yeasty and look foamy.
- Lukewarm Water: Temperature is crucial here – aim for water between 105-115°F (40-46°C). Too cold and the yeast won't activate; too hot and you'll kill it. If you don't have a thermometer, the water should feel warm but not hot on your wrist, similar to testing baby formula.
- Sugar: Just a small amount feeds the yeast and encourages proper fermentation. It also contributes to the beautiful golden color of the crust without making the bread taste sweet. Any granulated sugar works fine here – white, raw, or even honey.
- Salt: Beyond adding flavor, salt controls the yeast activity and strengthens the gluten structure. Fine sea salt or table salt works perfectly, though I prefer fine sea salt for its clean taste. Never skip the salt – bread without it tastes flat and has poor texture.
- Olive Oil: Adds richness and helps keep the crumb tender. Extra virgin gives the best flavor, but any olive oil works well. The oil also helps the bread stay fresh a bit longer than traditional French bread recipes that omit fat entirely.
 Pin it
Step-by-Step Instructions
- Activate your yeast properly for the best rise:
- Begin by measuring 1½ cups of water and warming it to approximately 110°F (43°C) – this should feel pleasantly warm when you test it with your finger, but not hot. Pour this into a small bowl and add 1 tablespoon of granulated sugar, stirring to dissolve completely. Sprinkle 2¼ teaspoons (one standard packet) of active dry yeast over the water's surface and give it a gentle stir. Then leave it alone for 5-10 minutes and watch for the magic to happen. The mixture should become foamy and expand, sometimes even developing a slight dome on top. This proofing step is crucial not only to activate the yeast but also to verify it's still alive and vigorous. If after 10 minutes you don't see any activity, your yeast may be old or dead, and you'll need to start over with fresh yeast. The bubbling action you're seeing is the yeast consuming the sugar and releasing carbon dioxide – the same process that will eventually create those beautiful air pockets in your bread.
- Mix your dough with care to develop just enough gluten:
- In a large mixing bowl, whisk together 4 cups of all-purpose flour and 1½ teaspoons of salt, distributing the salt evenly throughout the flour. Make a well in the center of your dry ingredients and pour in your foamy yeast mixture. Add 2 tablespoons of olive oil and begin stirring with a wooden spoon, gradually incorporating the flour from the sides of the well. As the dough starts to come together, it will become increasingly difficult to stir. When it becomes too stiff for the spoon, use your hands to gather and press it into a shaggy ball. Don't worry if it looks a bit rough at this stage – that's exactly how it should be. The dough should feel slightly tacky but not overly sticky. If it seems too wet, add additional flour a tablespoon at a time. If it feels dry or tough, add a teaspoon of water at a time until it reaches the right consistency. Remember that different brands of flour absorb water differently, and even the humidity in your kitchen can affect the dough.
- Knead with purpose to develop structure without overworking:
- Turn your shaggy dough out onto a lightly floured surface – a clean countertop or large cutting board works perfectly. Begin kneading by folding the far edge of the dough toward you, then pushing it away using the heels of your hands. Give the dough a quarter turn and repeat. This folding, pushing, and turning motion develops the gluten strands that give your bread structure. Continue kneading for 8-10 minutes, adding minimal flour as needed to prevent sticking. You'll notice the dough gradually transforming from rough and shaggy to smooth and elastic. The proper texture is crucial – it should feel like a baby's earlobe when properly kneaded. To test if you've kneaded enough, perform the 'windowpane test' – take a small piece of dough and gently stretch it between your fingers. If you can stretch it thin enough to see light through it without tearing, the gluten is well-developed and you're ready for the next step. This process cannot be rushed; proper kneading creates the foundation for good bread texture.
- First rise: Give your dough time to develop flavor and strength:
- Lightly oil a large bowl with olive oil or cooking spray, making sure to coat the sides well. Place your kneaded dough in the bowl and flip it once to coat both sides with oil. This prevents the surface from drying out during rising. Cover the bowl with a clean kitchen towel or plastic wrap and place it in a warm, draft-free location. Ideal rising temperature is around 75-80°F (24-27°C). If your kitchen is cool, you can create a warm environment by placing the bowl in an oven that's been turned on for just a minute and then turned off, or on top of a refrigerator where heat collects. Allow the dough to rise until it has doubled in size, which typically takes about an hour but may take longer in cooler environments. The time can vary, so go by size rather than by the clock. You can tell the dough has doubled when you gently press it with your finger and the indentation remains instead of springing back. This first rise, called bulk fermentation, is where the yeast does much of its work, creating carbon dioxide that forms air pockets and developing the flavor compounds that make your bread delicious.
- Shape your loaf with intention for a beautiful finish:
- Once your dough has doubled, gently deflate it by pressing down with your fist – don't punch or knead aggressively, as you want to preserve some of those air bubbles. Turn the dough out onto a lightly floured surface and pat it into a rough rectangle, approximately 8×10 inches. Starting from the long edge farthest from you, begin rolling the dough tightly toward yourself, similar to rolling a jelly roll. Keep the roll even and relatively tight, but don't stretch the dough excessively. When you reach the end, pinch the seam and the ends firmly to seal them. This rolling technique creates the classic French bread shape and helps establish the interior crumb structure. If the dough resists rolling or seems to shrink back, let it rest for 5 minutes to allow the gluten to relax, then try again. Place the shaped loaf seam-side down on a baking sheet lined with parchment paper, preferably a sheet without sides or with very low sides to allow better air circulation during baking. Sprinkle the baking sheet with a little cornmeal or semolina flour first if you have it – this prevents sticking and adds a pleasant texture to the bottom crust.
- Second rise and preparation for the perfect crust:
- Cover your shaped loaf loosely with a clean kitchen towel and allow it to rise again until puffy and nearly doubled in size, about 30-45 minutes. This second rise, called proofing, gives the final lift to your bread. Meanwhile, preheat your oven to 375°F (190°C), making sure the rack is positioned in the center. Before baking, you'll need to score the top of the loaf. Using a very sharp knife, razor blade, or kitchen scissors, make 3-4 diagonal cuts about ¼-inch deep across the top of the loaf. These aren't just decorative – they allow the bread to expand properly while baking instead of bursting randomly. For an extra-crispy crust, place a shallow baking pan on the bottom rack of the oven as it preheats. Just before putting your bread in, pour about 1 cup of hot water into this pan to create steam. The steam helps gelatinize the starches on the bread's surface, creating that sought-after crispy crust. Alternatively, you can lightly brush the loaf with water or spray it with a fine mist just before baking.
- Bake with attention to visual cues rather than just time:
- Slide your bread into the preheated oven and bake for 25-30 minutes. The exact time can vary depending on your oven, so start checking at 20 minutes. You're looking for a deep golden-brown color on the crust. If the bread is browning too quickly but doesn't seem done in the center, tent it loosely with aluminum foil to prevent burning. To check if your bread is fully baked, carefully remove it from the oven and tap the bottom – a properly baked loaf will sound hollow. If you have an instant-read thermometer, the internal temperature should reach about 190-200°F (88-93°C). The baking process completes the transformation of your dough, setting the structure and developing the flavors through Maillard reactions that create hundreds of aromatic compounds. The contrast between the crisp exterior and soft interior happens during this critical stage, so patience is key.
- Cool strategically for the perfect texture:
- When your bread is done, transfer it immediately to a wire cooling rack. This allows air to circulate around the entire loaf, preventing the bottom from becoming soggy. Resist the temptation to cut into the bread right away – this is perhaps the hardest part of bread making! The loaf continues to cook and set internally for several minutes after removing it from the oven. Cutting too soon allows steam to escape and can result in a gummy texture. Allow the bread to cool for at least 20-30 minutes before slicing. As it cools, the starches in the bread crystallize, giving it the proper structure and preventing it from being too dense or wet inside. When you finally slice into your perfectly cooled loaf, you'll be rewarded with a wonderfully crisp crust and a soft, airy interior with that characteristic open crumb structure.
I've been making bread for over fifteen years now, and this recipe has evolved through countless Saturday mornings of flour-dusted countertops and yeasty aromas filling my kitchen. My grandfather was a baker back in Italy, and while I never met him, my mother tells me I have his hands – 'bread hands' she calls them. There's something about the way dough feels when it's perfectly kneaded that's become almost intuitive. My youngest son has become my bread-making apprentice, and watching his face light up when we pull a golden loaf from the oven connects me to a tradition that spans generations in a way few other activities can.
Perfect Pairings
French bread's versatility makes it the perfect companion to countless meals. For a classic pairing, serve thick slices alongside a hearty beef stew or French onion soup, allowing the bread to soak up those rich flavors. The contrast between the crusty bread and savory liquid creates a perfect bite.
When entertaining, I often slice the bread diagonally, brush it with olive oil, and lightly toast it to make crostini. Top with anything from simple tomato bruschetta to creamy cheese spreads. The sturdy texture holds up beautifully under toppings while still providing a satisfying crunch.
For breakfast or brunch, thick-cut slices make exceptional French toast when soaked in a vanilla-scented egg mixture and griddle-fried to golden perfection. The slightly open texture absorbs the custard beautifully while maintaining enough structure to avoid becoming soggy.
 Pin it
Make It Your Own
Once you've mastered the basic recipe, don't be afraid to experiment with variations. Try incorporating herbs like rosemary or thyme into the dough for an aromatic twist. A tablespoon of dried herbs added during the mixing stage infuses the entire loaf with flavor.
For a heartier version, substitute one cup of the all-purpose flour with whole wheat flour. This creates a slightly denser loaf with a nutty flavor profile that pairs wonderfully with robust soups and stews. Just note that whole wheat flour absorbs more liquid, so you might need to add an extra tablespoon or two of water to achieve the right dough consistency.
For special occasions, try a sweet variation by adding dried fruits and nuts to the dough. Cranberries and walnuts make a festive holiday combination, while apricots and pistachios create an elegant loaf perfect for brunch gatherings.
I've made this bread during the happiest and hardest times of my life. There's something profoundly therapeutic about the rhythmic motion of kneading, the patience required for rising, and the reward of pulling a perfect loaf from the oven. When my mother was ill last year, I baked this bread weekly and brought it to her hospital room where the nurses would comment on the aroma that filled the hallway. Food connects us in ways that transcend simple nutrition, and there's something almost magical about transforming four simple ingredients – flour, water, yeast, and salt – into something that nourishes both body and soul. Whether you're an experienced baker or trying your hand at homemade bread for the first time, this recipe offers a wonderful entry point into the world of breadmaking.
Frequently Asked Questions
- → Can I make this bread without a stand mixer?
- Absolutely! While a stand mixer makes the process easier, you can mix the dough by hand with a wooden spoon and then knead it on a floured surface. Hand-kneading takes a bit more effort but can produce excellent results and gives you a better feel for when the dough has reached the right consistency.
- → How do I know when my dough is properly kneaded?
- Properly kneaded dough should be smooth, elastic, and slightly tacky but not sticky. The 'windowpane test' is a good indicator: take a small piece of dough and gently stretch it between your fingers - it should stretch thin enough to be translucent without tearing. If it tears easily, continue kneading for a few more minutes.
- → Why didn't my bread rise as much as expected?
- Several factors can affect rising: 1) Old or inactive yeast - always check the expiration date, 2) Water temperature - too cold won't activate the yeast, too hot will kill it, 3) Environmental temperature - dough rises best in a warm environment (75-85°F), 4) Insufficient time - some doughs need longer to rise, especially in cooler kitchens.
- → How should I store this bread to keep it fresh?
- Once completely cooled, store the bread in a paper bag or bread box at room temperature for 2-3 days. For longer storage, slice the bread and freeze it in a freezer bag for up to 3 months. Avoid refrigerating bread as this actually accelerates staling.
- → Can I add herbs or other flavors to this bread?
- Yes! This recipe works beautifully as a base for flavored breads. Try adding 1-2 tablespoons of fresh herbs (rosemary, thyme, basil), a couple cloves of minced garlic, or even grated Parmesan cheese. Mix these ingredients in at the dough preparation stage for best distribution of flavor.