
 Pin it
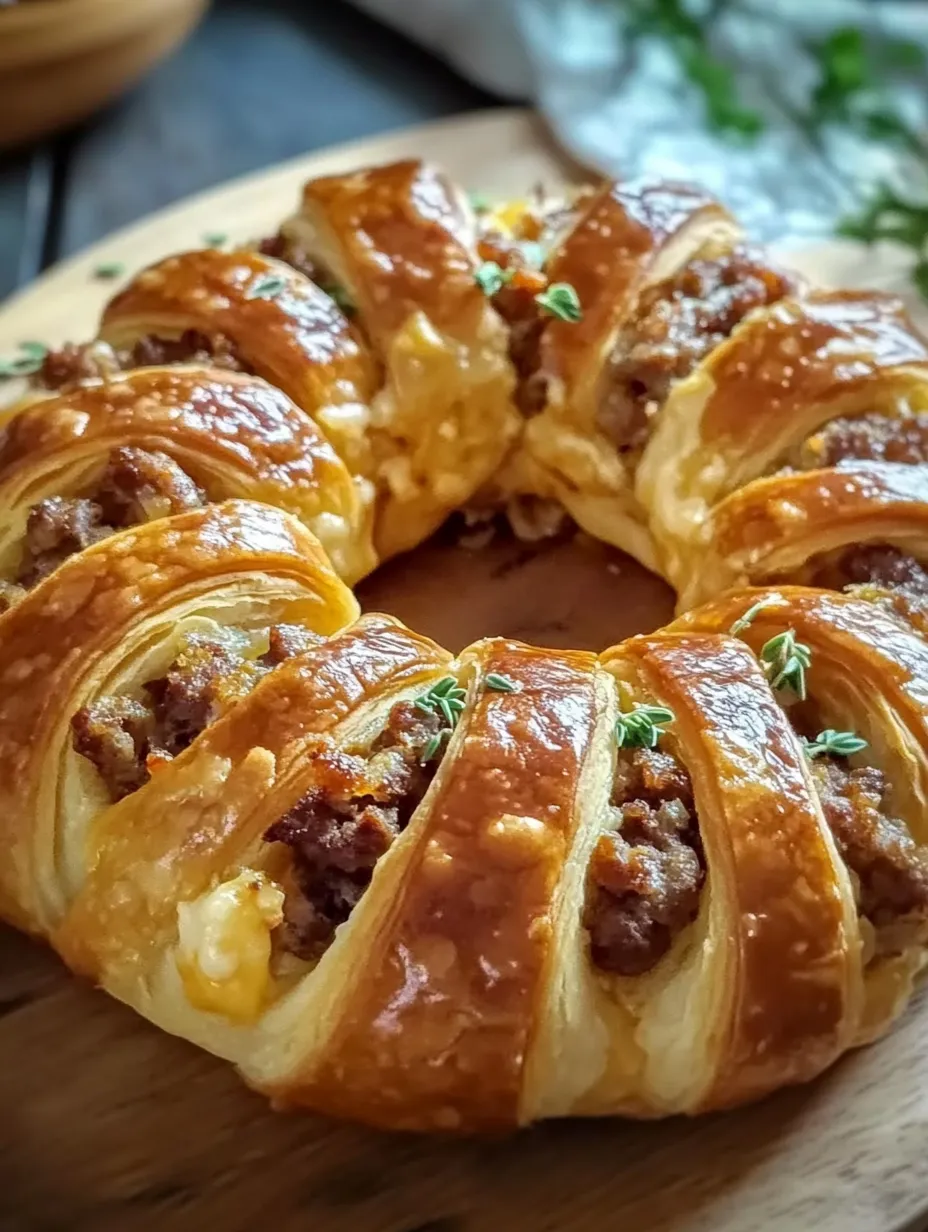
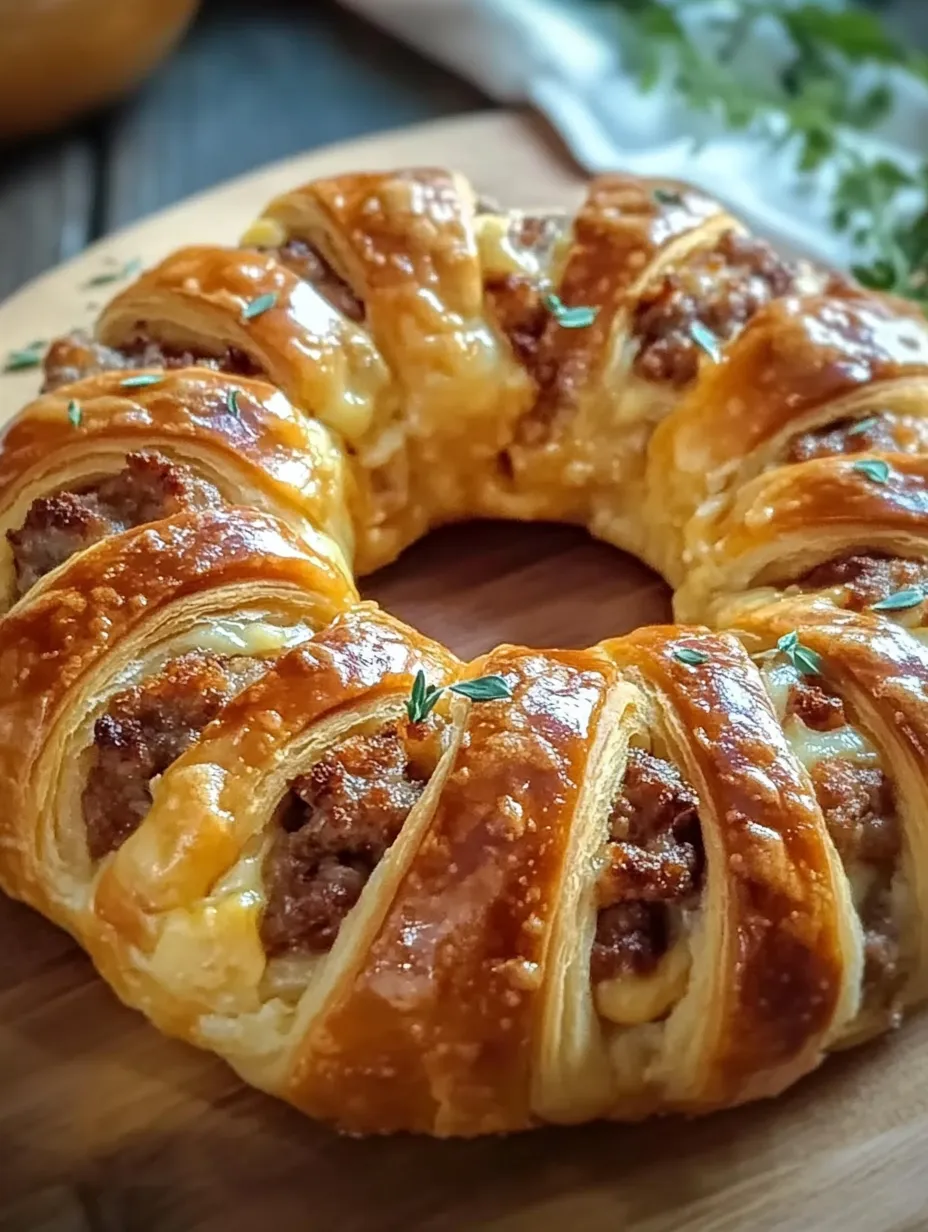
This stunning Sausage and Cheese Crescent Ring transforms simple ingredients into an impressive dish that looks like it came from a gourmet bakery. The flaky, golden pastry wrapped around savory sausage and melted cheese creates an irresistible combination that disappears within minutes at any gathering. The beautiful wreath-like presentation makes this dish a showstopper on your table, while the simple preparation keeps your stress levels low and your enjoyment high.
I first made this crescent ring when hosting an impromptu brunch for my sister and her family who stopped by unexpectedly. With limited ingredients on hand, I needed something that would feed a crowd and look intentional rather than thrown together. The moment I placed this golden ring on the table, my brother-in-law asked if I'd been taking secret culinary classes! The entire ring vanished before the coffee was gone, and now it's requested whenever they visit. What started as a kitchen improvisation has become one of my signature dishes.
Ingredients
- 1 pound ground sausage: Forms the savory foundation of the filling. Look for fresh, high-quality sausage with visible herbs and spices. Italian sausage provides wonderful flavor, but breakfast sausage works beautifully too. The fat content is important – too lean and it may be dry, too fatty and it could make the pastry soggy. A medium-fat content (around 15-20%) provides the best flavor and texture.
- 2 tubes crescent roll dough (8 ounces each): Creates the stunning ring shape with minimal effort. Store these in the refrigerator until the last possible moment before using. The colder the dough, the easier it is to work with and the flakier the final result. Look for name-brand options which tend to be more consistent in quality than generic versions.
- 2 cups shredded cheese blend: Provides creamy, melty goodness that binds the filling together. I recommend a combination of 1 cup sharp cheddar for flavor and 1 cup Monterey Jack for exceptional meltability. Freshly grated cheese melts much better than pre-shredded varieties, which contain anti-caking agents that can inhibit smooth melting. If the cheese is too finely shredded, it melts too quickly; a medium shred works best.
- 1 egg: Creates a golden, shiny exterior when brushed on the dough before baking. Use a large egg at room temperature for the most even coverage. The proteins in the egg wash create that bakery-worthy shine that makes the final presentation so impressive. A splash of water mixed with the egg thins it perfectly for brushing.
- ½ teaspoon garlic powder (optional): Adds depth to the filling without overpowering the other flavors. Look for fresh, aromatic garlic powder without clumps for the most even distribution of flavor. If your garlic powder has been sitting in the cupboard for months, consider replacing it – fresh spices make a noticeable difference.
- 1 teaspoon Italian seasoning (optional): Complements the sausage with herbal notes. A quality Italian seasoning blend should contain basil, oregano, rosemary, thyme, and marjoram. Crush it lightly between your fingers before adding to release the essential oils and enhance the flavor.
- ¼ teaspoon crushed red pepper flakes (optional): Provides a gentle heat that balances the richness of the cheese and sausage. Adjust according to your heat preference. The flakes should be bright red, indicating freshness, rather than dull brown.
- Fresh parsley or chives for garnish: Adds a pop of color and fresh flavor to the finished dish. Choose vibrant, perky herbs without wilting or yellowing. A fine chop allows them to distribute evenly across the surface of the ring for both flavor and visual appeal.
 Pin it
Step-by-Step Instructions
- Step 1: Prepare your kitchen workspace
- Begin by preheating your oven to 375°F, ensuring it reaches the proper temperature before baking. This specific temperature creates the perfect balance – hot enough to make the pastry rise and turn golden, but not so hot that the outside burns before the inside cooks. While the oven heats, line a large baking sheet with parchment paper. The parchment serves dual purposes: preventing sticking and making cleanup infinitely easier. If you don't have parchment, a silicone baking mat works well too. Gather all your ingredients and measuring tools so everything is within easy reach before you start working with the dough.
- Step 2: Cook the sausage properly
- Place a large skillet over medium heat and allow it to warm up completely before adding the sausage. Adding the meat to a properly heated pan ensures better browning and flavor development. Break the sausage into the skillet and cook it thoroughly, using a wooden spoon or heat-resistant spatula to break it into small, even crumbles as it browns. The smaller, consistent pieces distribute better through the filling. Cook until no pink remains and the sausage is completely browned, about 8-10 minutes. Be attentive during this process – properly cooked sausage makes all the difference in the final flavor.
- Step 3: Prepare the sausage for the filling
- Once the sausage is fully cooked, transfer it to a paper towel-lined plate, using a slotted spoon to leave behind as much grease as possible in the pan. Excess fat can make your pastry soggy, so this draining step is crucial. Gently press another paper towel on top to absorb additional grease. Allow the sausage to cool completely before mixing it with the cheese. This cooling period is non-negotiable – warm sausage will start melting your cheese prematurely, making the filling difficult to work with and potentially soggy.
- Step 4: Create the crescent ring framework
- Keep your tubes of crescent dough refrigerated until this exact moment – cold dough is much easier to handle. Open the tubes and unroll the dough carefully onto a clean work surface. Separate the dough along the perforations to create 16 triangles (8 from each tube). Now comes the clever part: place a 5-6 inch diameter bowl upside down in the center of your parchment-lined baking sheet – this creates the template for your ring. Arrange the triangles in a starburst pattern around the bowl, with the wide ends overlapping slightly along the edge of the bowl and the pointed tips extending outward. The overlapping wide ends form the inner circle that will hold your filling.
- Step 5: Prepare the flavorful filling
- In a medium mixing bowl, combine the completely cooled sausage crumbles with the freshly grated cheese blend. If you're using any optional seasonings like garlic powder, Italian herbs, or red pepper flakes, add them now. Mix everything together thoroughly but gently – aggressive mixing can compress the filling too much. The cheese and sausage should be evenly distributed throughout the mixture, creating a cohesive filling that will hold together when baked.
- Step 6: Assemble the ring carefully
- Gently remove the bowl from the center of your arranged dough triangles. The wide ends of the triangles should maintain their circular formation around where the bowl was. Using a measuring cup or an ice cream scoop for consistency, place equal portions of the filling mixture around the ring, concentrating it on the wide, overlapping sections of dough. Distribute the filling evenly to ensure consistent baking and serving portions. Resist the urge to overfill – about 3-4 tablespoons of filling per section is ideal.
- Step 7: Create the beautiful braided appearance
- Working your way around the circle, pull each pointed tip of dough up over the filling, stretching it to reach the inner edge of the ring. Tuck the tip under the inner edge of dough, pressing gently to secure it. This creates the beautiful braided appearance while ensuring the filling stays contained during baking. If any filling spills out, simply tuck it back in. The dough is flexible and forgiving, so don't worry if your first few attempts aren't perfect – by the time you work your way around the circle, you'll get the hang of it.
- Step 8: Apply the egg wash for a professional finish
- In a small bowl, beat the egg with a splash of water (about 1 teaspoon) until fully combined. Using a pastry brush, gently brush this egg wash evenly over the entire surface of the dough. Get into all the nooks and crannies, as the egg wash is what creates that bakery-worthy golden color and slight shine. Be careful not to let egg wash pool in the creases, as this can prevent proper rising and create soggy spots.
- Step 9: Bake to golden perfection
- Place your assembled ring in the preheated oven, positioning it in the center rack where heat circulates most evenly. Bake for 20-22 minutes, rotating the pan halfway through for consistent browning. Watch carefully during the final minutes – you're looking for a deep golden brown color across the surface and making sure the innermost parts of the dough where the triangles overlap are fully cooked. If the outer edges are browning too quickly but the inner sections still appear doughy, loosely cover the outer edge with strips of aluminum foil to prevent burning.
- Step 10: Allow proper cooling before serving
- Remove the finished ring from the oven and resist the temptation to serve immediately. Allow it to cool on the baking sheet for 5-7 minutes. This brief cooling period is crucial – it allows the cheese to set slightly so the filling doesn't spill out when you cut into it. The residual heat will keep everything warm while the structure firms up just enough for clean serving. During this time, the flavors also continue to develop and meld together.
- Step 11: Transfer and garnish for presentation
- After the initial cooling period, carefully transfer the ring to a serving platter or large round plate. A wide spatula or two can help with this transfer. For the finishing touch, sprinkle freshly chopped parsley or chives across the top of the ring. This isn't just decorative – the fresh herbs provide a bright contrast to the rich, savory flavors of the ring. The vibrant green against the golden pastry makes for a stunning presentation that will have everyone reaching for their phones to take pictures before they dig in.
The Perfect Party Dish
There's something magical about serving food in a ring shape that instantly elevates the dining experience. This Sausage and Cheese Crescent Ring has become my go-to recipe whenever I need to impress without spending hours in the kitchen. The beauty of this dish lies in its versatility – it works for breakfast, brunch, lunch, or dinner, and adapts to almost any occasion.
I've found this ring particularly perfect for those in-between times of day when people are gathering but a full meal isn't required. For weekend game days, I set it out during the first quarter, and it's inevitably gone before halftime. During holiday seasons, it makes an appearance at open houses where people come and go throughout the afternoon. The ring format makes it easy for guests to break off exactly the amount they want without needing serving utensils.
What I appreciate most is how this dish bridges the gap between casual and special. The ingredients are everyday staples, but the presentation feels celebratory. My teenagers have requested it for everything from study group sessions to pre-prom dinners. Each time, their friends are equally impressed by how "fancy" it looks, never suspecting how simple it was to make.
 Pin it
Endless Variations
One of the joys of making this crescent ring regularly is discovering how wonderfully adaptable the basic formula can be. After mastering the classic sausage and cheese version, I've experimented with countless variations that have all been enthusiastically received by my family and friends.
For breakfast gatherings, I sometimes substitute cooked, crumbled bacon for the sausage and add a layer of scrambled eggs to the filling. The eggs must be slightly undercooked before adding to the ring, as they'll continue cooking in the oven. This breakfast variation disappears especially quickly when I add a little maple syrup to the egg wash for a sweet-savory finish.
When hosting lunch for my vegetarian niece, I created a version with sautéed mushrooms, spinach, and roasted red peppers in place of the sausage. The key was cooking the vegetables until all excess moisture had evaporated, preventing a soggy bottom. The earthy mushrooms provided such a satisfying umami flavor that even my carnivore husband requested it again.
For holiday gatherings, a festive version with ham, swiss cheese, and a touch of Dijon mustard mixed into the filling evokes the flavors of a classic sandwich in an elegant presentation. No matter how I vary the ingredients, the beautiful ring shape always elicits compliments and recipe requests.
The first time I made this for a large family gathering, I learned an important lesson about preparation timing. I had just finished assembling the ring when unexpected early guests arrived. Thinking I was being a good host, I abandoned my kitchen duties to greet them, letting the assembled ring sit at room temperature for nearly 30 minutes before baking. The result was noticeably less flaky than usual, as the dough had warmed and the butter within it had started to melt before hitting the hot oven. Now I either complete the recipe before guests arrive or keep the assembled ring refrigerated if there's going to be a delay before baking.
After years of making this sausage and cheese crescent ring for gatherings large and small, I'm still delighted by how something so simple to prepare can create such a lasting impression. There's a brief moment of pride I experience each time I place it on the table—that sweet spot where effort and outcome align perfectly. The appreciative "oohs" and "aahs" never get old, nor does the satisfaction of watching people enjoy something made with care. In our busy world of complicated recipes and gourmet aspirations, there's something wonderfully satisfying about a dish that delivers so much pleasure from such straightforward ingredients and techniques.
Frequently Asked Questions
- → Can I make this ahead of time?
- You can prepare the sausage and cheese mixture up to a day ahead, but it's best to assemble with the crescent dough just before baking for the freshest result.
- → What's the best way to reheat leftovers?
- Reheat in a 325°F oven for about 10 minutes or until warmed through. Avoid the microwave which can make the crescent dough soggy.
- → Can I use turkey sausage instead?
- Absolutely! Turkey sausage works great as a lighter alternative. Just make sure it's well-seasoned since it can be milder than pork sausage.
- → Why do I need to cool the sausage before mixing?
- Hot sausage will start melting the cheese too early, making the mixture harder to work with and potentially soggy. Cooling prevents this issue.
- → What's the best way to transport this to a potluck?
- Let it cool completely, then cover loosely with foil. Reheat at your destination for about 10 minutes at 325°F for that fresh-baked taste.