
 Pin it
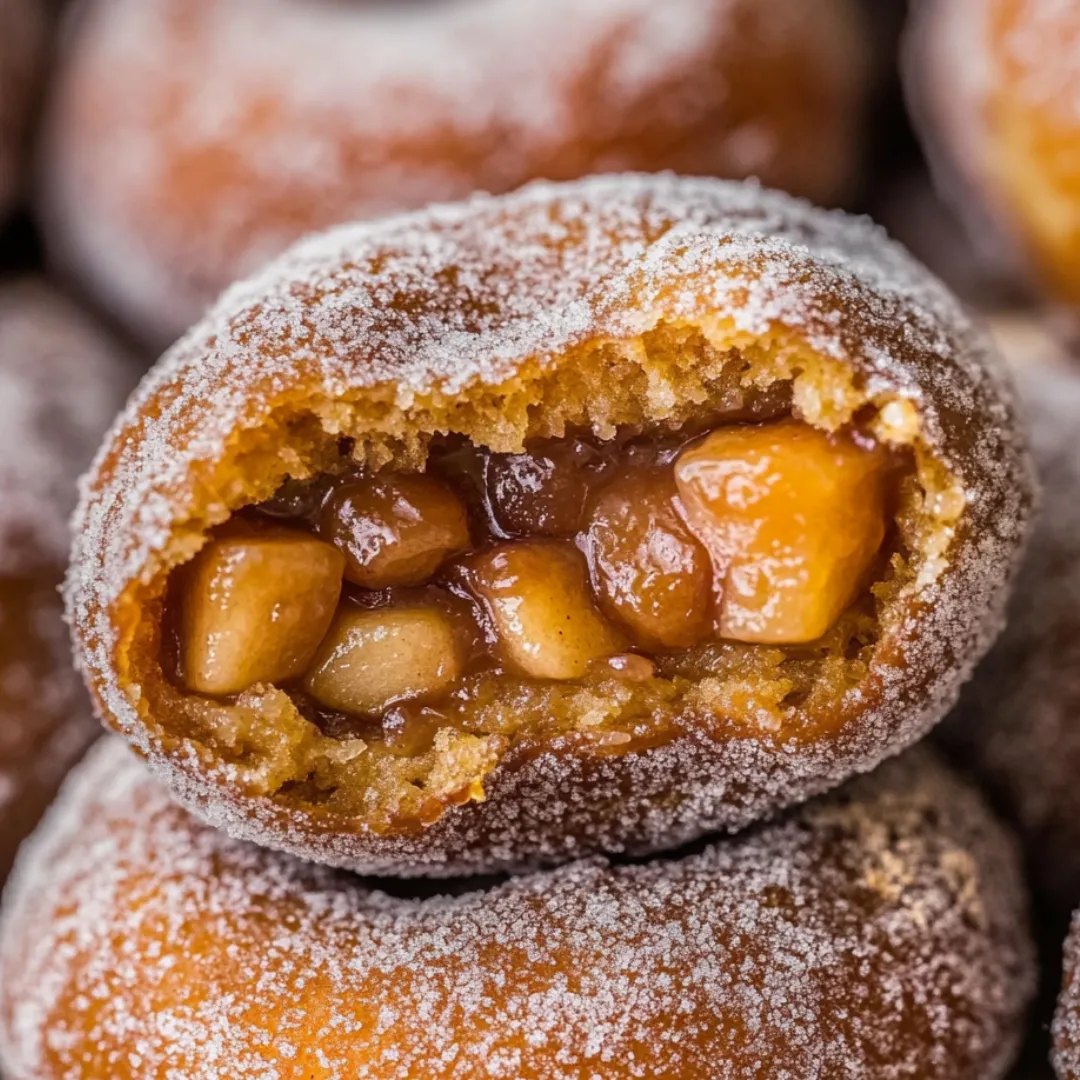
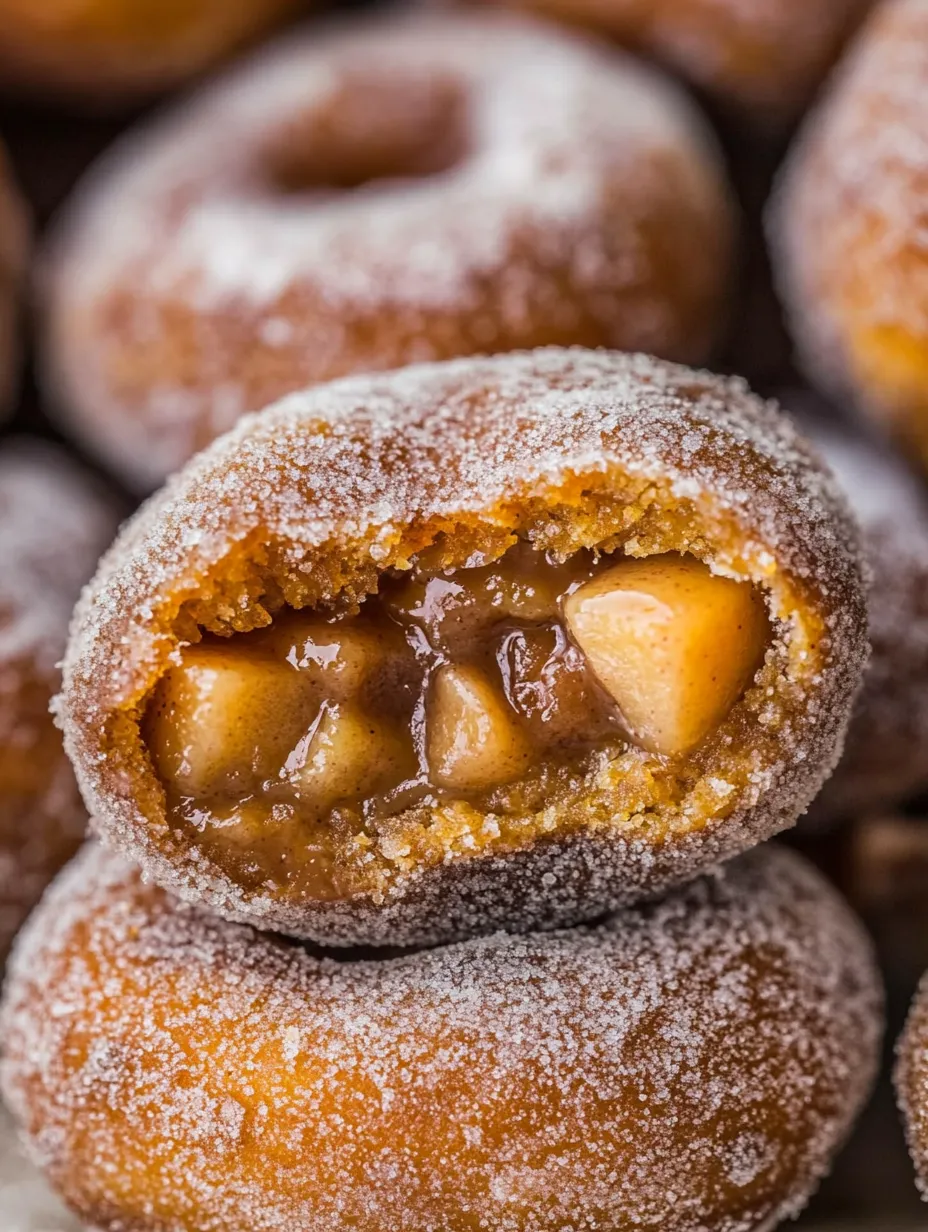
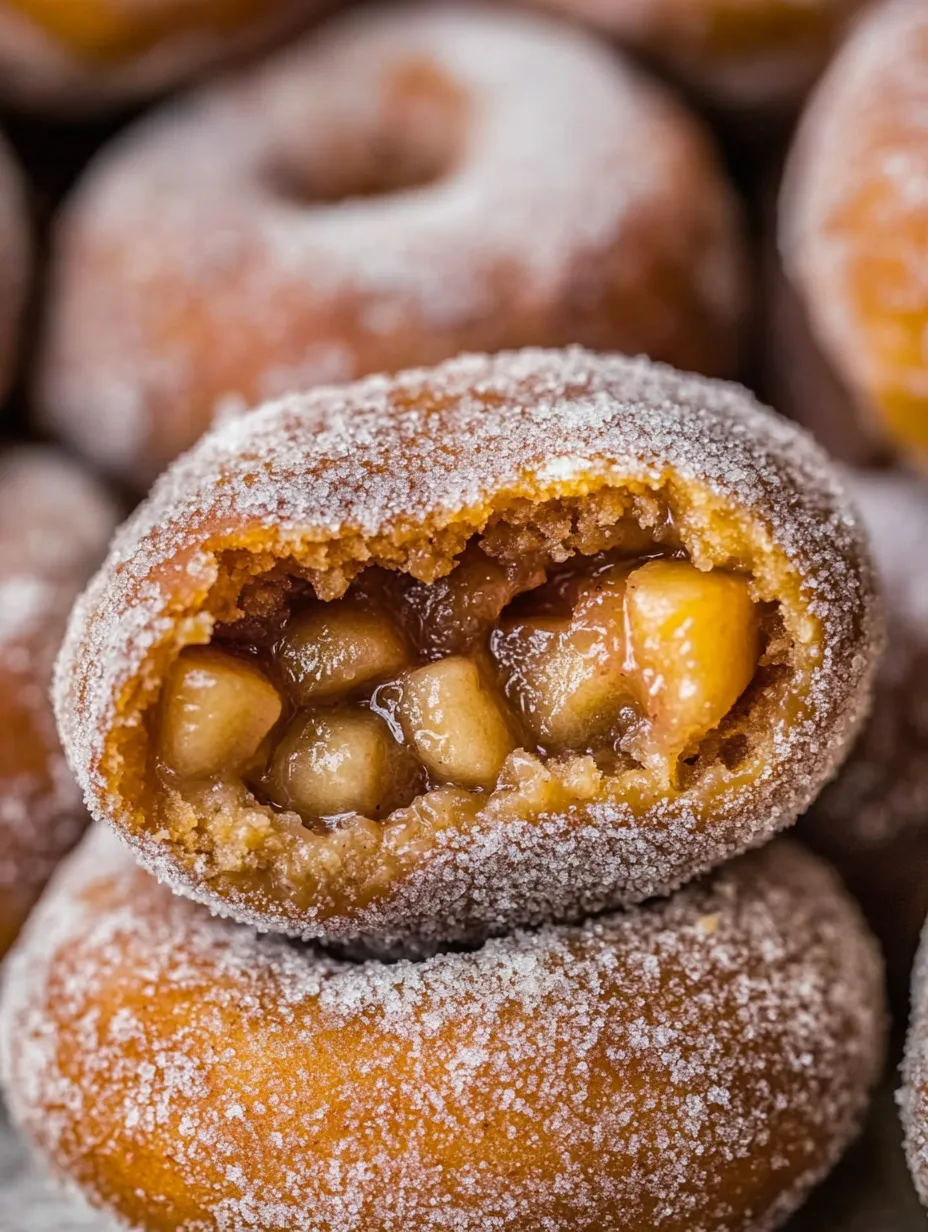
These irresistible Apple Pie Doughnuts combine two beloved classics into one spectacular treat that captures the essence of fall in every bite. The pillowy brown butter apple cider dough provides the perfect vehicle for a generous filling of warm, cinnamon-spiced apples that tastes exactly like homemade apple pie. Each doughnut is finished with a coating of cinnamon sugar that creates a delightful crunch before giving way to the fluffy interior and rich filling. Whether enjoyed as a special breakfast with coffee, an afternoon pick-me-up, or a dessert topped with a scoop of ice cream, these doughnuts deliver cozy fall flavors in a hand-held format that's impossible to resist.
I created these doughnuts on a crisp autumn morning when I was craving apple pie but didn't have enough butter for my usual all-butter crust. What began as a compromise quickly became a family favorite that we now look forward to making every fall. What I love most about this recipe is how it transforms simple ingredients into something truly spectacular without requiring advanced baking skills. My children have deemed these 'even better than the apple orchard doughnuts,' which is high praise indeed! The first time my husband tried one, still warm from the fryer, he closed his eyes and declared it might be the best thing I've ever made. The combination of the fluffy, aromatic dough and the warm apple filling creates a magical eating experience that feels like the culinary equivalent of a cozy sweater on a cool fall day.
Ingredients You'll Need
- ¾ cup Apple Cider: Provides authentic apple flavor to the dough. Use fresh, unfiltered cider (not apple juice or vinegar) for best results
- 2¼ teaspoons Active Dry Yeast (1 package): The leavening agent that creates those fluffy, airy doughnuts. Ensure it's fresh for proper rising
- ¼ cup Granulated Sugar: Adds sweetness to the dough and helps feed the yeast for proper fermentation
- ½ cup Browned Butter, cooled: Delivers nutty, caramelized notes that elevate the dough. Worth the extra step for incredible flavor
- 2 large Eggs, room temperature: Provides structure and richness to the dough. Room temperature eggs incorporate more easily
- 1 teaspoon Vanilla Extract: Enhances the overall flavor profile with warm, aromatic notes
- 3½ cups All-Purpose Flour, plus more for dusting: Creates the structure of the doughnut. Measure accurately for best results
- ¾ teaspoon Salt: Balances the sweetness and enhances all other flavors in the dough
- 1 teaspoon Ground Cinnamon: Adds warm spice notes that complement the apple flavors
- Vegetable Oil for frying: Provides the perfect medium for that crisp exterior and fluffy interior
 Pin it
For the Apple Pie Filling
- 3 medium Apples, peeled and diced small: The star of the filling. Firm varieties like Granny Smith or Honeycrisp work best
- 3 tablespoons Unsalted Butter: Creates a rich base for the filling and helps caramelize the apples
- ½ cup Brown Sugar, packed: Provides deep caramel notes that enhance the apple flavor
- 1 tablespoon Ground Cinnamon: Essential for that classic apple pie flavor
- ¼ teaspoon Ground Nutmeg: Adds subtle warmth and complexity to the filling
- Pinch of Salt: Balances the sweetness and enhances the apple flavor
- 1 tablespoon Cornstarch mixed with 1 tablespoon Water: Thickens the filling to the perfect consistency
For the Coating
- 1 cup Granulated Sugar: Creates the sweet exterior coating
- 2 tablespoons Ground Cinnamon: Adds warm spice notes to the coating that complement the filling
Step-by-Step Cooking Instructions
- Activate the Yeast:
- Begin by warming the apple cider to precisely 110-115°F (43-46°C) – use a cooking thermometer for accuracy as this temperature range is crucial. Too hot and you'll kill the yeast; too cold and it won't activate properly. Pour the warmed cider into a large mixing bowl and sprinkle the yeast over the surface. Add a pinch of the sugar and gently stir to combine. Let this mixture stand for 5-10 minutes until it becomes frothy and bubbly, indicating the yeast is active and ready to work its magic. This activation step is your insurance policy for perfectly risen doughnuts.
- Create the Dough Base:
- Once the yeast is activated, add the remaining sugar, cooled browned butter, eggs, and vanilla extract to the bowl. Using a wooden spoon or the paddle attachment of a stand mixer, stir these wet ingredients until well combined. The mixture will look slightly curdled, but don't worry – this is normal and will smooth out once the flour is added. The browned butter adds a nutty depth that makes these doughnuts truly special, so don't be tempted to substitute regular melted butter.
- Develop the Dough:
- In a separate bowl, whisk together the flour, salt, and ground cinnamon until evenly distributed. Gradually add this dry mixture to the wet ingredients, stirring after each addition. Once all the flour is incorporated, the dough will be quite sticky. Turn it out onto a lightly floured surface and knead for about 5 minutes, adding only enough extra flour to prevent sticking. The goal is a smooth, elastic dough that's still slightly tacky to the touch but doesn't cling to your fingers. Proper kneading develops the gluten structure that will give your doughnuts their characteristic chew.
- First Rise:
- Shape the kneaded dough into a smooth ball and transfer it to a large, lightly oiled bowl. Turn the dough once to coat it with oil, then cover the bowl with plastic wrap or a clean kitchen towel. Place in a warm, draft-free area of your kitchen and allow the dough to rise until nearly tripled in size, about 1 to 1½ hours. If your kitchen is cool, create a warm environment by placing the bowl on top of your refrigerator or in an oven that's been briefly warmed and then turned off. This first rise develops flavor and creates the airy texture essential for perfect doughnuts.
- Prepare the Apple Filling:
- While the dough rises, make the apple pie filling. In a medium saucepan over medium heat, melt the butter. Add the diced apples, brown sugar, cinnamon, nutmeg, and salt, stirring to combine. Cook for 7-8 minutes until the apples begin to soften but still maintain some texture. Stir in the cornstarch slurry and continue cooking for 1-2 minutes until the mixture thickens and becomes glossy. Remove from heat and transfer to a bowl to cool completely before using. The filling can be made a day ahead and refrigerated if desired. The small dice of apples ensures they'll fit through your piping tip when filling the doughnuts.
- Shape the Doughnuts:
- Once the dough has completed its first rise, gently punch it down to release the air and turn it out onto a lightly floured surface. Roll the dough to approximately ½-inch thickness, being careful not to work in too much additional flour. Using a 3-inch round cutter, cut out as many circles as possible. Transfer these rounds to lightly oiled baking sheets, spacing them about 2 inches apart. Re-roll the scraps once to cut additional doughnuts, or use them to make doughnut holes. Cover the cut doughnuts loosely with plastic wrap or clean kitchen towels.
- Second Rise:
- Allow the cut doughnuts to rise in a warm spot for about 45 minutes to 1 hour, until they're puffy and nearly doubled in size. This second rise ensures the doughnuts will be light and airy after frying. While the doughnuts are rising, prepare your frying station. Fill a heavy-bottomed pot or Dutch oven with about 2 inches of vegetable oil. Attach a candy/deep-fry thermometer to the side of the pot and begin heating the oil to 360-365°F (182-185°C). Also, prepare the cinnamon-sugar coating by mixing the sugar and cinnamon in a shallow bowl.
- Fry to Golden Perfection:
- When the doughnuts have risen and the oil has reached temperature, carefully lower 2-3 doughnuts into the hot oil using a slotted spoon or spider. Do not overcrowd the pot as this will lower the oil temperature too much. Fry for about 1-2 minutes per side until golden brown, using the spider or wooden chopsticks to gently flip them. Maintain the oil temperature between 360-365°F throughout the frying process, adjusting your heat source as needed. This precise temperature range ensures the doughnuts cook through without absorbing excess oil or burning.
- Finish with Cinnamon Sugar:
- As soon as the doughnuts come out of the oil, briefly drain them on paper towels, then immediately toss them in the cinnamon-sugar mixture while still hot. The residual heat helps the coating stick beautifully to the surface. Set the coated doughnuts on a wire rack to cool slightly. Continue this process with the remaining doughnuts, allowing the oil to return to the proper temperature between batches. The contrast between the crunchy, sweet coating and the fluffy interior creates an irresistible texture.
- Fill with Apple Pie Filling:
- Once the doughnuts have cooled enough to handle but are still warm, it's time to fill them with the apple pie filling. Transfer the cooled filling to a piping bag fitted with a wide round tip (or use a ziplock bag with a corner snipped off). Insert the tip into the side of each doughnut, creating a pocket for the filling. Gently squeeze the bag to fill each doughnut with approximately 1-2 tablespoons of the apple mixture. You'll feel the doughnut expand slightly as it fills. This filling step transforms a simple doughnut into a spectacular fall treat that tastes exactly like apple pie.
Serving Suggestions
These Apple Pie Doughnuts are delicious on their own, but they can be elevated into an impressive dessert by serving them slightly warmed with a scoop of salted caramel or vanilla ice cream on top. The contrast between the warm doughnut and cold ice cream creates a delightful temperature play. For a special breakfast presentation, arrange them on a platter with fresh apple slices and a small pitcher of warm caramel sauce for drizzling. When serving for brunch, pair with a spiced apple cider mimosa or a robust cup of coffee to complement the fall flavors.
Storage Solutions
While these doughnuts are undeniably best when freshly made, they can be stored in an airtight container at room temperature for up to two days. To refresh them, warm in a 300°F oven for 3-5 minutes before serving. If you want to prepare components ahead of time, the apple filling can be made up to three days in advance and stored in the refrigerator. The dough can also be prepared and refrigerated after the first rise for up to 12 hours – just bring it to room temperature before rolling and cutting. This make-ahead flexibility makes the recipe more accessible for busy schedules or special occasions.
 Pin it
Troubleshooting Tips
If your doughnuts are coming out too dense, your yeast may not have been properly activated or your dough may need a longer rise time. Remember that yeast is sensitive to temperature – a warm environment will yield the best results. If your filling is leaking out of the doughnuts, it may be too thin; cook it a little longer next time to evaporate more moisture. For doughnuts that brown too quickly on the outside while remaining doughy inside, your oil is likely too hot – always use a thermometer for accuracy. And if you're having trouble with the filling process, try making the hole with a chopstick rather than your finger for more control.
My first attempt at these doughnuts taught me an important lesson about patience. I was so eager to taste them that I rushed the second rise, resulting in dense, rather than fluffy, doughnuts. Now I know that giving the yeast enough time to work its magic is essential for that perfect texture. Another game-changer was discovering that the filling tastes even better when made a day ahead, giving the spices time to fully infuse the apples. My favorite memory with this recipe was last Thanksgiving morning, when my kitchen filled with the intoxicating aroma of apple spice as we fried batches of these doughnuts. My visiting in-laws, still in their pajamas, gathered around the kitchen island, hands reaching for warm doughnuts as soon as they were coated in cinnamon sugar. Those moments of shared joy and anticipation are what make baking so rewarding.
The magic of these Apple Pie Doughnuts lies in their ability to transform simple ingredients into something truly extraordinary. There's something deeply satisfying about creating a treat that combines the nostalgic comfort of apple pie with the irresistible appeal of a freshly fried doughnut. Beyond their delicious taste, what I cherish most is how making these doughnuts has become a cherished fall tradition in our home – a marker of the changing seasons and an opportunity to slow down and create something special together. Whether you're making them for a cozy weekend breakfast, a special fall gathering, or just because you're craving something delicious, these doughnuts deliver both comfort and joy in equal measure.
Frequently Asked Questions
- → Can I bake these doughnuts instead of frying them?
- While these are designed to be fried for the authentic doughnut texture, you could bake them at 350°F for about 15-18 minutes. The texture will be more bread-like and less traditional, but they'll still be delicious. Brush with melted butter before rolling in cinnamon sugar.
- → What kind of apples work best for the filling?
- Firm, tart apples like Granny Smith work excellently as they hold their shape and provide a nice contrast to the sweet dough. Other good options include Honeycrisp, Braeburn, or Pink Lady. Avoid softer varieties like Red Delicious which can turn mushy.
- → Can I make the dough ahead of time?
- Yes! You can prepare the dough and let it complete its first rise, then punch it down, cover tightly, and refrigerate overnight. The next day, let it come to room temperature for about 30 minutes before rolling out and cutting the doughnuts.
- → I don't have a pastry bag. How else can I fill the doughnuts?
- You can use a clean squeeze bottle with the tip cut larger, or even create a makeshift piping bag with a ziplock bag by cutting off one corner. As a last resort, you could carefully split the doughnuts partially open and spoon the filling inside.
- → How do I know when the oil is at the right temperature?
- The ideal temperature is 360°F. If you don't have a thermometer, you can test the oil by dropping in a small piece of dough - it should sizzle and float to the top within seconds, but not brown too quickly. If it browns instantly, your oil is too hot.