
 Pin it
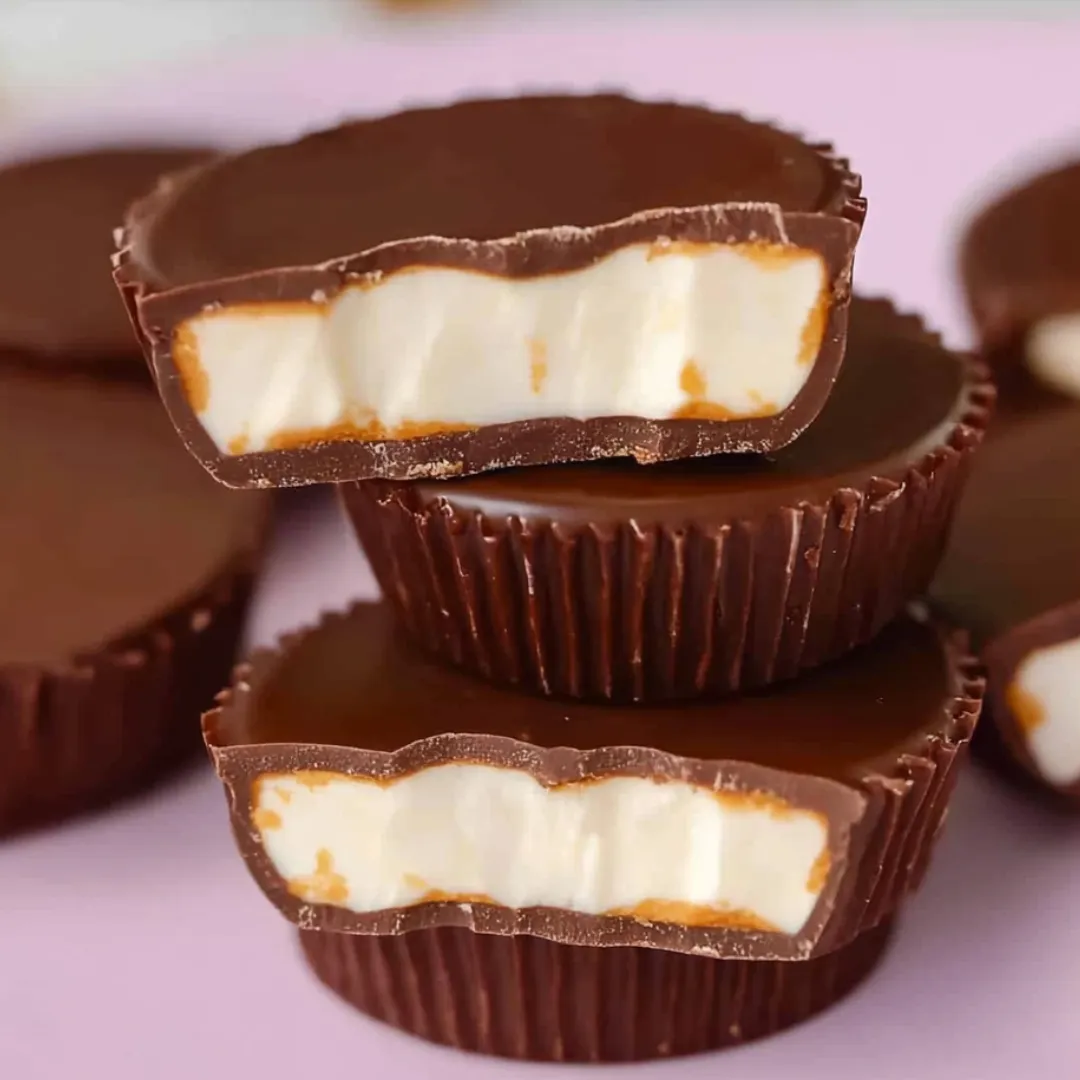
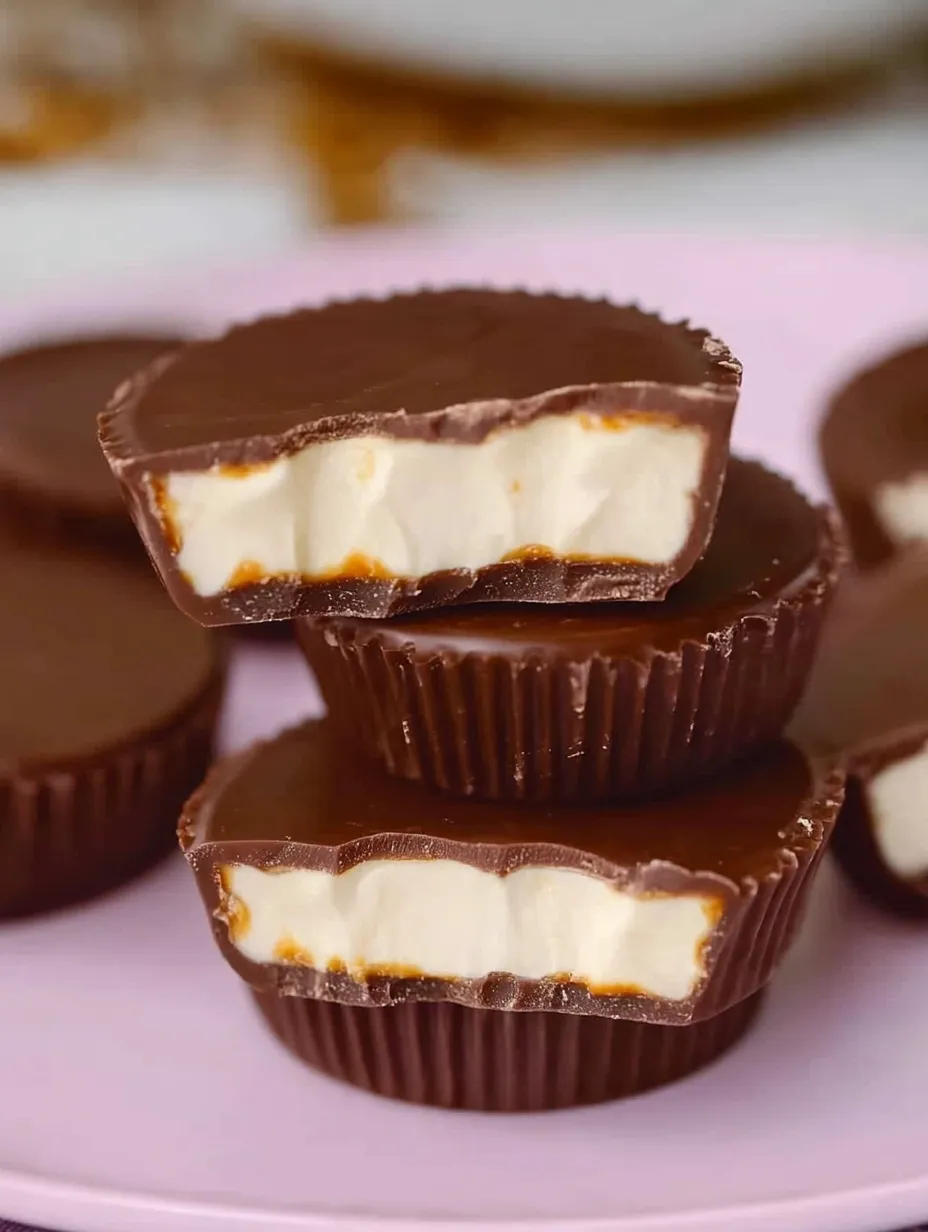
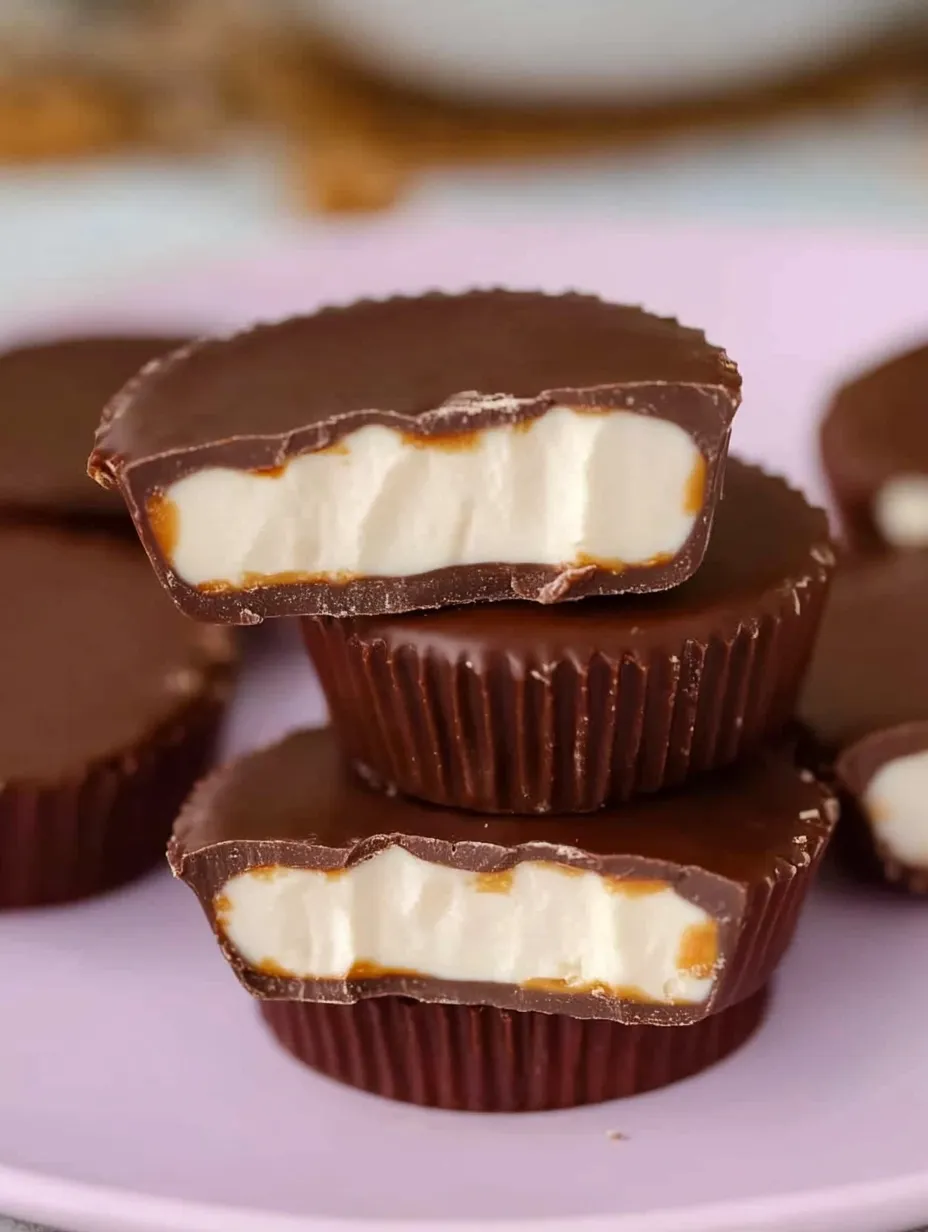
These delectable Cadbury Creme Bites capture all the indulgent magic of traditional Cadbury Creme Eggs in a much more approachable format. By reimagining the iconic Easter treat in mini cupcake form, we eliminate the frustrating challenge of molding chocolate into egg shapes while preserving the decadent combination of rich milk chocolate and sweet, creamy filling that makes the original so irresistible. The clever use of parchment liners creates perfect presentation with minimal effort, and the two-toned cream filling—complete with the signature "egg yolk" center—delivers that nostalgic Easter experience in every bite. Perfect for gifting, sharing at gatherings, or simply enjoying as a special seasonal indulgence.
I created this recipe after years of attempting to recreate traditional Cadbury eggs at home and growing frustrated with the messy, inconsistent results. The breakthrough came during last year's Easter gathering when my niece suggested using mini muffin cups instead of egg molds. The first batch disappeared from the dessert table in minutes, with several guests asking if I'd somehow managed to purchase "fancy gourmet" Cadbury eggs. My sister-in-law, who typically avoids sweets, sheepishly admitted to eating three of them and requested the recipe immediately. The best compliment came from my chocolate-obsessed nephew who declared them "even better than the real ones" because of the higher chocolate-to-filling ratio. From that moment, these have become my signature Easter contribution, with family members requesting them well before the holiday season begins.
Essential Ingredients
- High-quality milk chocolate: Forms the decadent shell that encases the creamy filling. Choose baking chocolate rather than candy bars for proper melting properties and superior flavor. Premium options like Ghirardelli or Guittard create the richest, smoothest results.
- Butter: Creates the luxurious mouthfeel in the cream filling. Use unsalted butter to control the overall salt level, and ensure it's perfectly softened for proper incorporation.
- Light corn syrup: Provides that distinctive glossy sweetness and prevents sugar crystallization in the filling. This helps achieve the characteristic smooth texture of authentic Cadbury creme.
- Powdered sugar: Adds sweetness while maintaining a silky texture in the filling. Sift it first to eliminate any lumps that could affect the smoothness of your creme.
- Vanilla extract: Enhances the overall flavor profile with warm, aromatic notes that complement both the chocolate and the sweet filling. Use pure vanilla extract rather than imitation for the best flavor.
- Milk: Adds creaminess and adjusts the consistency of the filling. Whole milk provides the best richness, but any milk you have on hand will work.
- Gel food coloring: Creates the distinctive "egg yolk" appearance in the center of the filling. Gel colors provide vibrant hues without thinning the filling consistency the way liquid coloring might.
- Parchment paper liners: Essential for easy removal and perfect presentation. The non-stick quality of parchment ensures your treats release cleanly without the need for additional greasing.
 Pin it
Step-By-Step Preparation
- Step 1:
- Prepare your workspace properly - Begin by lining a 24-cup mini muffin pan with parchment paper liners. These specialized liners are naturally non-stick, eliminating the need for cooking spray and ensuring your finished treats release perfectly. Standard paper liners can stick to chocolate and create a messy final product, so parchment is truly essential for success. Have all ingredients measured and at room temperature before beginning to ensure smooth, efficient assembly.
- Step 2:
- Melt the chocolate with care - Place 6 ounces of high-quality milk chocolate in a microwave-safe bowl. Heat on high power for 30 seconds, then remove and stir thoroughly even if the chocolate doesn't appear completely melted. Return to the microwave and heat in 20-second intervals, stirring well between each interval, until the chocolate is completely smooth. Be careful not to overheat, as chocolate can scorch easily and develop a grainy texture. The residual heat will continue melting the chocolate as you stir. Transfer the melted chocolate to a heavy-duty piping bag and snip off the tip, creating an opening about ¼-inch wide.
- Step 3:
- Create the chocolate base layer - Pipe the melted chocolate into the bottom of each parchment liner, using approximately 1 teaspoon per cup. Ensure the chocolate spreads to cover the entire bottom surface, tapping the pan gently on the counter to eliminate air bubbles and create an even layer. This foundation needs to be thick enough to support the filling but not so thick that it overwhelms the cream center. After piping all bases, squeeze any remaining chocolate back into your melting bowl for later use in the top layer. Allow the chocolate bases to cool completely until firm, about 15-20 minutes at room temperature or 5-10 minutes in the refrigerator.
- Step 4:
- Prepare the white creme filling - In the bowl of a stand mixer fitted with the paddle attachment (or using a hand mixer), combine ¼ cup softened unsalted butter with ¼ cup light corn syrup. Beat on medium speed until completely combined and creamy, about 2 minutes. Add 1 tablespoon milk, 1 teaspoon vanilla extract, and a pinch of salt, mixing until incorporated. Gradually add 2 cups of powdered sugar, ½ cup at a time, mixing thoroughly between additions and scraping down the sides of the bowl as needed. The final texture should be thick but smooth, similar to a stiff frosting—firm enough to hold its shape but soft enough to pipe. Transfer two-thirds of this white creme mixture to a heavy-duty piping bag and secure the end with a clip or twist tie.
- Step 5:
- Create the "egg yolk" creme - With the remaining one-third of the white creme mixture still in the mixing bowl, add 2 drops of orange and 1 drop of yellow gel food coloring. Beat on medium speed until the color is completely uniform with no streaks, about 2-3 minutes. The color should resemble an egg yolk—a warm golden-orange rather than a bright, artificial orange. Transfer this tinted mixture to another heavy-duty piping bag and secure the end to prevent leaking.
- Step 6:
- Layer the fillings with precision - Ensure the chocolate bases are completely set before proceeding. Cut a ½-inch opening at the tip of the white creme piping bag. Pipe a layer of white creme onto each chocolate base, filling about two-thirds of the remaining space in each cup. Use about 2 teaspoons of white filling per cup, making sure it reaches the edges of the chocolate base. Next, snip a smaller opening (about ¼-inch) in the orange creme piping bag and add a small dollop of orange creme in the center of each white creme layer, using approximately ½ teaspoon per cup. The orange portion should remain centered, not extending to the edges, to mimic the appearance of an egg yolk surrounded by egg white.
- Step 7:
- Complete with the chocolate top layer - Allow the filling to settle for about 5 minutes, which helps create a smoother surface for the top chocolate layer. Meanwhile, melt the remaining 6 ounces of milk chocolate following the same careful process as before. Transfer to a clean piping bag and cut a ¼-inch opening at the tip. Pipe the melted chocolate over each filled cup, using about 1 teaspoon per cup, ensuring it completely covers the filling and connects with the edges of the bottom chocolate layer to seal in the creme. Gently tap the pan on the counter to help the chocolate spread evenly and eliminate any air pockets. Allow the completed Cadbury Creme Bites to set completely at room temperature for about 1 hour, or in the refrigerator for 30 minutes until the chocolate is firm and shiny.
The Art of Chocolate Selection
While any milk chocolate will work in this recipe, understanding the differences between chocolate types can elevate your Cadbury Creme Bites from good to exceptional. The chocolate you choose contributes significantly to both the flavor profile and the structural integrity of these treats.
For authentic Cadbury flavor, look for milk chocolate with a cocoa content between 30-45%. Higher percentages create a darker, less sweet shell that contrasts more sharply with the sweet filling, while lower percentages more closely mimic the distinctive Cadbury milk chocolate taste. European-style milk chocolates tend to have a higher milk fat content, creating a creamier, smoother mouthfeel that complements the filling beautifully.
Baking chocolate bars are preferable to chocolate chips for this recipe. Chips contain stabilizers that help them maintain their shape during baking, which can interfere with achieving the perfect melted consistency we need. Look for chocolate marked specifically for baking or melting in the baking aisle rather than the candy section.
The way chocolate is tempered affects its final appearance and texture. Properly tempered chocolate has a beautiful shine and satisfying snap when bitten into. While this recipe doesn't require formal tempering, being careful not to overheat the chocolate and stirring thoroughly during melting helps maintain some of the temper from the original chocolate, resulting in a more professional-looking finish.
I've made these treats dozens of times now, and I've learned that patience truly makes the difference between good and great results. My first attempt was rushed, and I tried adding the top layer of chocolate before the filling had fully settled. The result was a messy, uneven top with filling that pushed through the chocolate. Now I allow at least five minutes for the filling to settle before adding the top chocolate layer. Another game-changing discovery was using gel food coloring instead of liquid. The vibrant color without added moisture made the orange center much more visually striking without affecting the filling's texture. The most satisfying improvement came when I switched from regular paper liners to parchment—the treats released perfectly without any bits of paper stuck to the chocolate, making them look truly professional.
 Pin it
Creative Easter Variations
While these Cadbury Creme Bites are delightful in their classic form, there are several variations to consider for creating a spectacular Easter dessert spread:
For a sophisticated twist, try using dark chocolate instead of milk chocolate for the outer shell. The bittersweet notes create a beautiful contrast with the sweet filling and appeal to more adult palates while still maintaining the nostalgic element.
Create a cookies-and-cream version by mixing finely crushed chocolate sandwich cookies into the white creme filling. The added texture and flavor elevate these treats for those who enjoy more complex desserts.
For a springtime touch, consider decorating the tops with small royal icing flowers or edible Easter decorations while the final chocolate layer is still slightly soft. These subtle decorations transform the simple bites into festive centerpieces.
Consider creating a variety pack by making some with traditional creme filling and others with flavored filling—mint, orange, or even strawberry extracts can be added to the white creme for surprising flavor variations that still honor the original concept.
For those who love the combination of chocolate and peanut butter, substitute part of the butter in the filling with creamy peanut butter for a Reese's-meets-Cadbury experience that offers the best of both iconic candy worlds.
My final thought on these Cadbury Creme Bites is that they perfectly capture what makes holiday treats so special—they honor beloved traditions while making them more accessible and personal. There's something magical about recreating a classic commercial candy at home, where you can control the quality of ingredients and adjust flavors to your preference. The smile of recognition when someone bites into these and realizes they're enjoying a homemade version of a childhood favorite is truly priceless. While the original Cadbury eggs will always have their place, these homemade bites offer something the commercial version can't—the unmistakable touch of being made with care specifically for the people you love to share them with.
Frequently Asked Questions
- → Can I use dark or white chocolate instead of milk chocolate?
- Absolutely! This recipe works well with any type of chocolate, so feel free to use dark, semi-sweet, or white chocolate based on your preference.
- → How long do these Cadbury Creme Bites stay fresh?
- When stored in an airtight container in the refrigerator, they'll stay fresh for up to 2 weeks. You can also freeze them for up to 3 months.
- → Can I make these without food coloring?
- Yes, you can skip the orange center entirely and just use the white cream filling throughout, or try natural colorings like turmeric for yellow.
- → Why is my filling too runny?
- This usually happens if there's not enough powdered sugar. Add more powdered sugar, a little at a time, until you reach a stiff but pipeable consistency.
- → Do I need to temper the chocolate?
- For best results and shine, tempering is ideal, but this recipe works fine with untempered chocolate since the bites are stored in the refrigerator.