
 Pin it
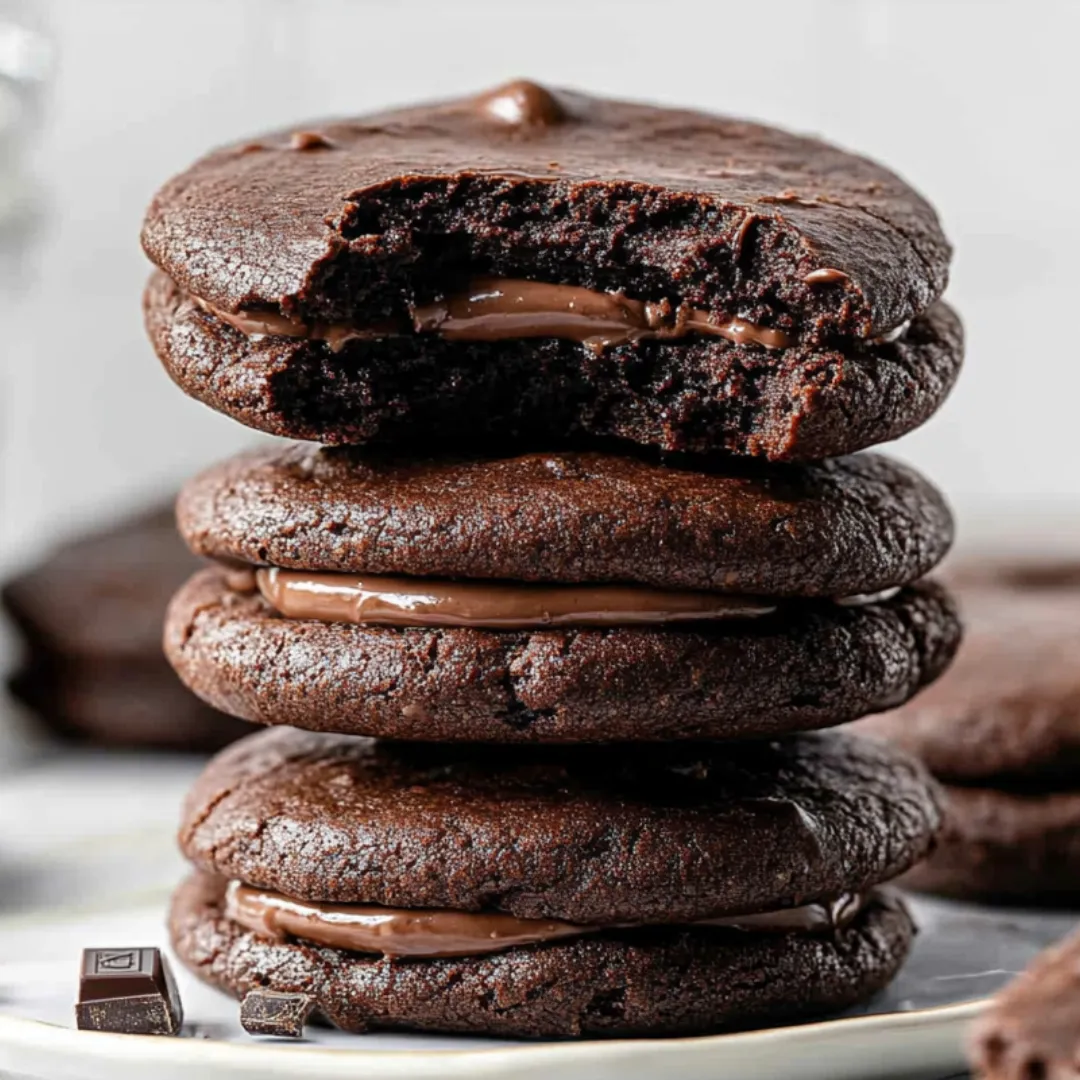
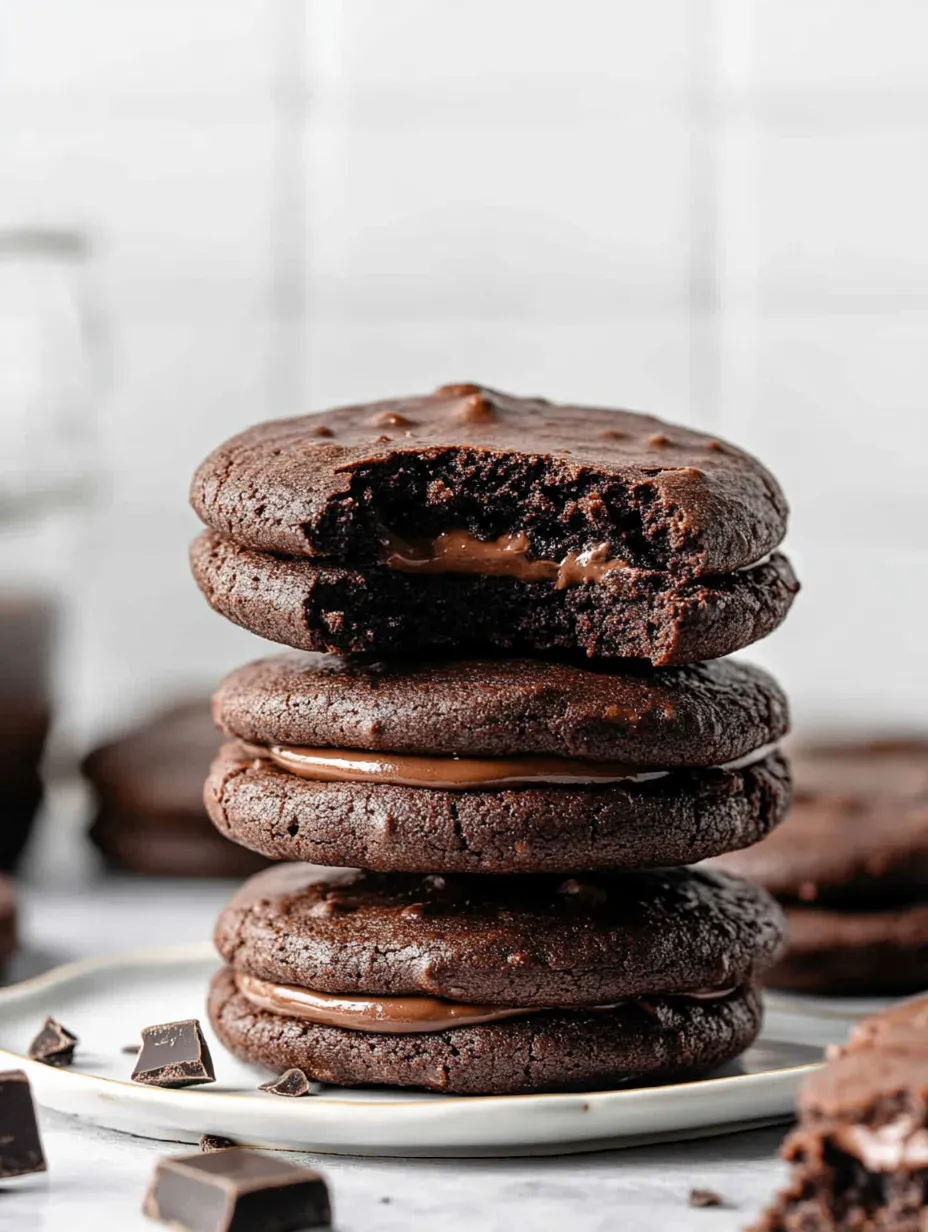
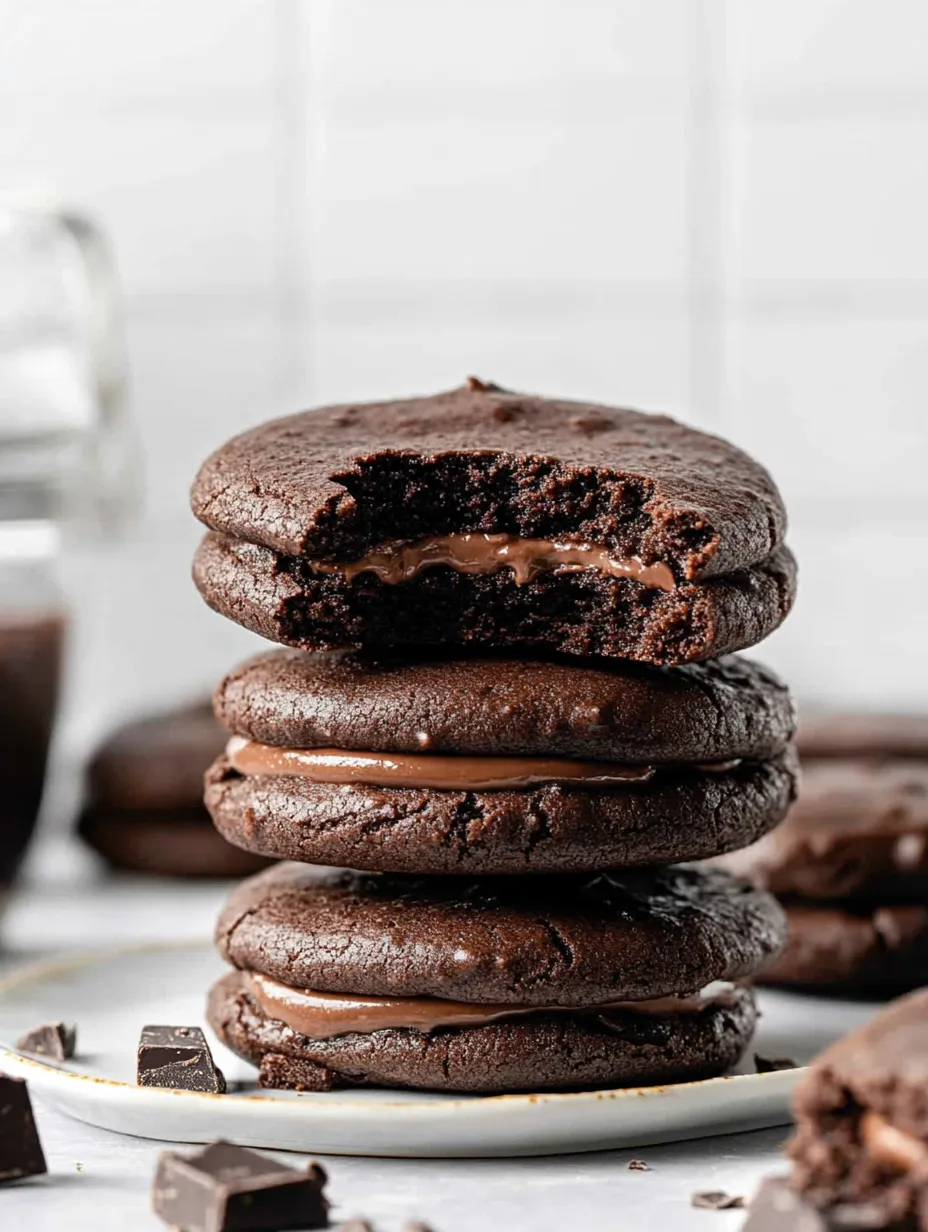
These intensely chocolatey sandwich cookies deliver an experience that's simultaneously familiar and extraordinary—like an elevated version of those classic store-bought chocolate sandwich cookies we all grew up with, but infinitely more sophisticated. The magic happens in the contrast between the chewy, brownie-like cookies with their melty chocolate chips and the silky-smooth chocolate frosting that binds them together. Unlike many chocolate cookies that merely hint at chocolate flavor, these double-down with cocoa in both the cookie and the filling, creating a truly immersive chocolate experience. Each bite offers the perfect balance of textures—tender yet chewy cookies giving way to creamy, rich frosting that melts on your tongue.
I discovered this recipe during a particularly stressful work deadline, when only something intensely chocolatey would satisfy my late-night baking therapy needs. The first batch disappeared so quickly between my family and neighbors that I've never been allowed to show up to a gathering without them since. My teenager son, who normally inhales cookies without noticing their flavor, actually stopped mid-bite with these to ask, 'What EXACTLY is in these?' before proceeding to eat three more. That moment of attention from a perpetually distracted teenager convinced me these cookies were something truly special.
Essential Ingredients
- All-Purpose Flour: Creates the perfect structure without overshadowing the chocolate flavor. Measuring precisely is crucial—too much creates cakey cookies, too little results in spread-out, thin cookies. For best results, fluff the flour, spoon it into your measuring cup, and level with a knife rather than scooping directly from the bag, which compacts the flour.
- Cocoa Powder: The foundation of the chocolate flavor in both the cookies and frosting. Dutch-processed cocoa (sometimes labeled 'dark' or 'specialty dark') creates a richer, more intense flavor and deeper color than natural cocoa, though either will work. The alkalization process in Dutch-processed cocoa removes some acidity, resulting in a smoother, less bitter chocolate flavor.
- Brown Sugar: Brings moisture, chewiness, and depth to the cookies that white sugar alone cannot provide. The molasses content adds subtle complexity that complements the chocolate beautifully. Light or dark brown sugar works—dark will simply intensify the caramel notes.
- Butter: Creates tenderness and carries flavor throughout both cookies and frosting. Room temperature butter is non-negotiable for proper creaming, which creates the perfect texture. The butter should yield to gentle pressure but still hold its shape, not be so soft that it appears shiny or greasy.
- Chocolate Chips: Provide pockets of melty chocolate goodness throughout the cookies. Dark or semi-sweet varieties balance the sweetness better than milk chocolate. High-quality chips with a higher cocoa content will deliver more complex flavor notes than basic brands.
- Vanilla Extract: Though subtle against the chocolate backdrop, vanilla rounds out the flavor profile and enhances the chocolate notes. Pure extract rather than imitation offers cleaner flavor, though the difference is less noticeable in chocolate-heavy recipes than in vanilla-forward ones.
- Whipping Cream: Creates luxurious silkiness in the frosting while thinning it to spreadable consistency. The higher fat content produces a smoother mouthfeel than milk. Just a few tablespoons transform the frosting from stiff to perfectly spreadable while maintaining structure.
 Pin it
Step-by-Step Cooking Instructions
- Prepare Your Dry Ingredients:
- In a medium bowl, whisk together 1 cup (125g) all-purpose flour, 2/3 cup (60g) cocoa powder, 1/2 teaspoon baking powder, and 1/4 teaspoon salt. This thorough mixing ensures even distribution of the leavening agent and prevents bitter pockets of cocoa or salty surprises in your finished cookies. Whisking also aerates the dry ingredients, contributing to a lighter texture in the final product. Set this mixture aside while you prepare the wet ingredients.
- Create the Cookie Base:
- In a large bowl, beat 10 tablespoons (140g) softened unsalted butter with 2/3 cup (140g) brown sugar and 1/3 cup (67g) granulated sugar. Beat for 2-3 minutes until the mixture becomes lighter in color and somewhat fluffy. This creaming process incorporates air into the fat-sugar mixture, creating tiny pockets that expand during baking for the perfect texture. The combination of brown and white sugars creates the ideal balance of moisture, chewiness, and structure.
- Add Wet Ingredients:
- Beat one room-temperature large egg and 1 teaspoon of vanilla extract into the butter-sugar mixture until fully incorporated. The room-temperature egg blends more easily than a cold one, preventing the batter from curdling. Scrape down the sides and bottom of the bowl with a rubber spatula to ensure even mixing. The egg provides structure, moisture, and richness to the cookies, while the vanilla enhances the chocolate flavors.
- Combine Wet and Dry Mixtures:
- With your mixer on low speed, gradually add the flour mixture to the butter mixture, about half at a time. This slow incorporation prevents the dry ingredients from flying everywhere and reduces the risk of overmixing. Mix just until no dry streaks remain, then stop the mixer. Overmixing at this stage would develop too much gluten, resulting in tough rather than tender cookies.
- Fold in Chocolate Chips:
- Using a rubber spatula or wooden spoon, gently fold 3/4 cup (135g) chocolate chips into the dough until evenly distributed. Consider reserving about 3 tablespoons of chips to press into the tops of the cookies just after baking for a professional bakery appearance. The folding technique prevents overmixing while ensuring chocolate in every bite.
- Chill the Dough:
- Cover the bowl with plastic wrap and refrigerate for at least 3 hours or up to 48 hours. This chilling period is non-negotiable for several reasons: it allows the flour to fully hydrate, prevents excessive spreading during baking, and actually enhances the flavor as the ingredients meld. The cookies baked after a longer chill time will have a more developed flavor profile, similar to how soups and stews taste better the next day.
- Prepare for Baking:
- When ready to bake, preheat your oven to 350°F (180°C) and line cookie sheets with parchment paper or silicone baking mats. If your dough has been refrigerated for more than 5 hours, let it sit at room temperature for about 10 minutes to make it easier to scoop. Using a cookie scoop or tablespoon measure, form the dough into balls using about 1 tablespoon of dough for each cookie. This smaller size is perfect for sandwich cookies, which will be eaten in pairs.
- Bake with Precision:
- Place the dough balls about 2 inches apart on your prepared cookie sheets. Bake one sheet at a time in the preheated oven for 9-11 minutes, or until the tops look set but not dry or cracked. The cookies will seem slightly underdone, but they continue to set as they cool. Baking one sheet at a time ensures even heat distribution and consistent results across all your cookies. If desired, press a few reserved chocolate chips into the tops of the cookies immediately after removing them from the oven for a professional appearance.
- Cool Strategically:
- Allow the cookies to cool on the baking sheet for at least 10 minutes. This resting period allows them to firm up enough to be moved without breaking. Then transfer them to a wire rack to cool completely. Patience is essential here—attempting to fill warm cookies will result in melted frosting and a messy final product.
- Prepare the Chocolate Frosting:
- While the cookies cool, make the filling. Beat 1/2 cup (112g) softened unsalted butter until creamy. Sift together 1-2 cups (110-220g) powdered sugar (adjust for desired sweetness) and 1/4 cup (23g) cocoa powder to remove any lumps. Gradually add this mixture to the butter along with 1/4 teaspoon salt, beating on low speed initially to prevent a powdered sugar cloud. Add 1-3 tablespoons of whipping cream as needed until you achieve a smooth, spreadable consistency that will hold its shape when sandwiched between cookies.
- Assemble the Sandwich Cookies:
- Once the cookies are completely cool, match them in pairs of similar size. Spread or pipe about 1-1.5 tablespoons of chocolate frosting onto the flat side of one cookie from each pair. Gently press the second cookie, flat side down, onto the frosting to create a sandwich. Apply just enough pressure to spread the filling to the edges without squeezing it out. This assembly process works best at cool room temperature—not too warm, which would make the frosting too soft.
The Art of Baking Chocolate Sandwich Cookies
When I first began testing this recipe, my original goal was to recreate those classic store-bought chocolate sandwich cookies from my childhood, but with real ingredients and deeper flavor. After one particularly long chilling time (36 hours in the refrigerator because life got busy), I discovered that the cookies had developed an almost brownie-like quality that was infinitely better than my nostalgic reference point. Now I intentionally make the dough at least a day ahead, knowing that the wait creates a more complex, satisfying cookie. My family knows when they see the covered bowl in the refrigerator that something special is coming.
When I first began testing this recipe, my original goal was to recreate those classic store-bought chocolate sandwich cookies from my childhood, but with real ingredients and deeper flavor. After one particularly long chilling time (36 hours in the refrigerator because life got busy), I discovered that the cookies had developed an almost brownie-like quality that was infinitely better than my nostalgic reference point. Now I intentionally make the dough at least a day ahead, knowing that the wait creates a more complex, satisfying cookie. My family knows when they see the covered bowl in the refrigerator that something special is coming.
Perfect Pairings
These intensely chocolatey cookies call for thoughtful beverage pairings that either complement or contrast their richness. A glass of cold whole milk provides the classic combination, cutting through the chocolate intensity while enhancing the cookies' creamy qualities. For adult gatherings, consider serving alongside a ruby port, whose fruity notes harmonize beautifully with dark chocolate. Coffee lovers will appreciate these cookies alongside a medium-roast coffee, whose roasted notes echo the cocoa without overwhelming it. For an unexpected but delightful pairing, try a sparkling rosé—the bubbles and slight berry notes create a sophisticated contrast to the deep chocolate flavors.
Storage Strategy
Proper storage ensures these cookies maintain their perfect texture balance between chewy cookies and creamy filling. At room temperature in an airtight container, they'll keep well for about three days. For longer storage, refrigerate for up to five days, though I recommend allowing them to come to room temperature for about 30 minutes before serving for the best texture and flavor. If you need to prepare further in advance, these cookies freeze surprisingly well—place them in a single layer until frozen solid, then stack in an airtight container with parchment between layers for up to two months. Thaw in the refrigerator overnight, then bring to room temperature before serving.
Creative Variations
While the classic chocolate-on-chocolate combination is hard to improve upon, several variations have become favorites in my kitchen. For holiday occasions, try adding 1/4 teaspoon of peppermint extract to the frosting for chocolate-mint sandwich cookies that disappear from cookie exchanges. Coffee enthusiasts might appreciate 1 teaspoon of espresso powder added to either the cookies or frosting (or both for intensity). For texture contrast, consider rolling the exposed edges of the filling in finely chopped nuts, toffee bits, or festive sprinkles. Orange zest in the cookie dough creates a sophisticated chocolate-orange combination reminiscent of fancy European chocolates.
Troubleshooting Common Issues
Even experienced bakers occasionally encounter challenges with sandwich cookies. If your cookies spread too much during baking, your butter may have been too warm or your dough insufficiently chilled—next time, ensure proper refrigeration and consider adding an extra tablespoon of flour to the dough. For cookies that seem too dry or crumbly, you likely overbaked them; aim to remove them from the oven when they still look slightly underdone in the center, as they'll continue baking on the hot cookie sheet. If your filling oozes out when bitten, it contains too much liquid—add additional powdered sugar to stiffen it up. Remember that proper cooling before filling is essential for structural integrity.
 Pin it
Gifting Guidance
These impressive sandwich cookies make exceptional gifts due to their professional appearance and keeping quality. For holiday cookie boxes, place them in a single layer or separated by parchment paper to prevent sticking. Their sturdy nature makes them suitable for shipping if packed carefully—arrange in a rigid container with minimal movement space, and consider shipping earlier in the week to avoid weekend transit delays. Include a note about refrigeration for recipients who won't be enjoying them immediately. For local gifts, a simple kraft paper box lined with parchment creates an artisanal presentation that hints at the quality within.
After years of cookie baking, these double chocolate sandwich cookies remain in my top three favorites. There's something magical about the perfect balance of textures—the slight resistance of the cookie giving way to that creamy center—and the unapologetic chocolate intensity that makes them feel special. While they require a bit more effort than drop cookies, the results are absolutely worth it. When you see someone close their eyes after taking that first bite, you'll understand why these cookies have earned a permanent place in my recipe collection. They're not just cookies; they're an experience.
Frequently Asked Questions
- → Can I freeze these cookies?
- Yes! Freeze the baked unfilled cookies for up to 3 months. You can also freeze assembled sandwich cookies, though the texture of the filling may change slightly.
- → Why do I need to chill the dough?
- Chilling prevents the cookies from spreading too much during baking and develops deeper flavor. Don't skip this step for best results.
- → Can I make smaller sandwich cookies?
- Absolutely! Use 2 teaspoons of dough per cookie instead of 1 tablespoon. Reduce baking time by 1-2 minutes and you'll get about 20-24 sandwich cookies.
- → What chocolate chips work best?
- Semi-sweet or dark chocolate chips both work well. For extra richness, try using chopped high-quality chocolate instead of chips.
- → Can I use a different filling?
- Yes! These cookies also taste great with vanilla buttercream, peanut butter frosting, or even a layer of caramel between them.