
 Pin it
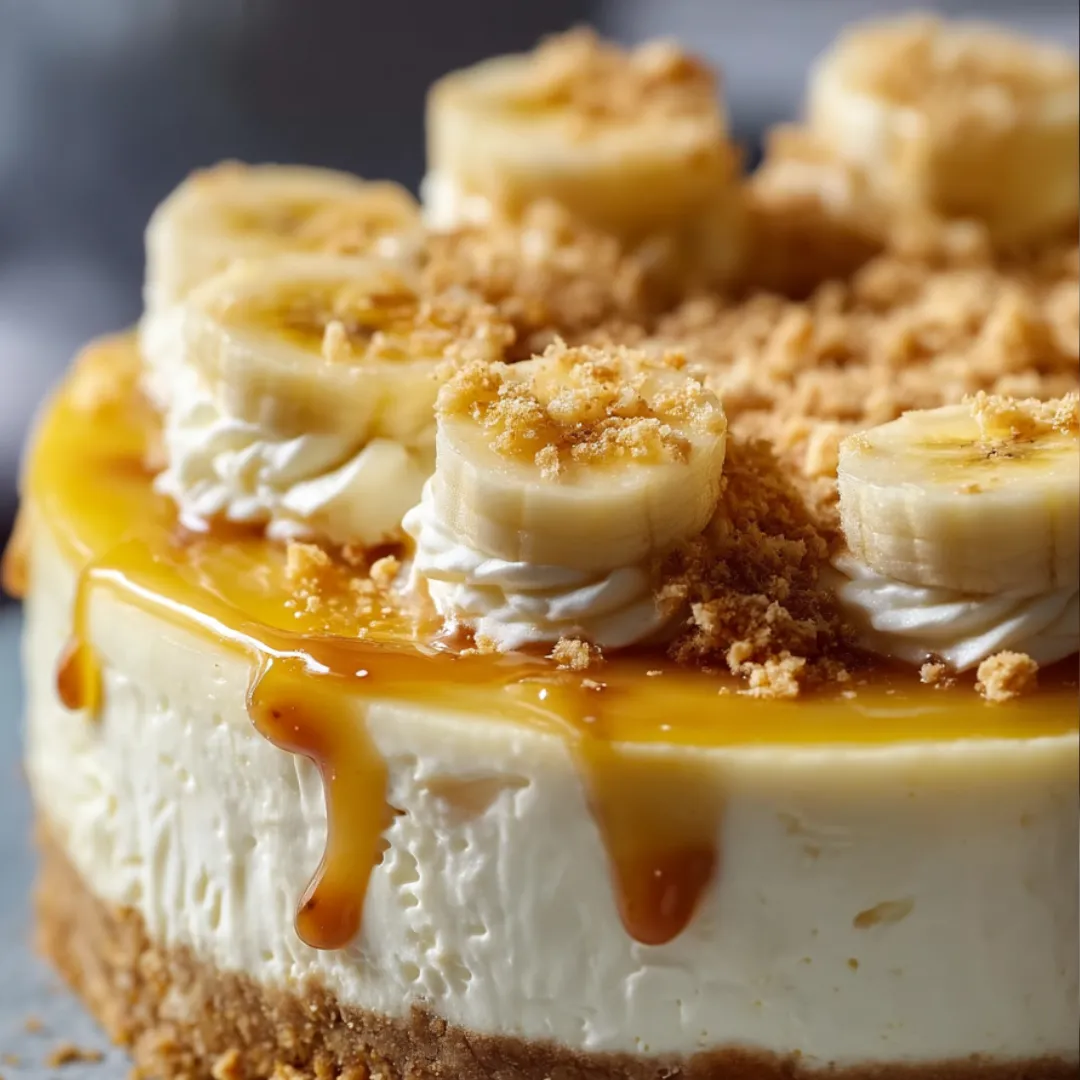
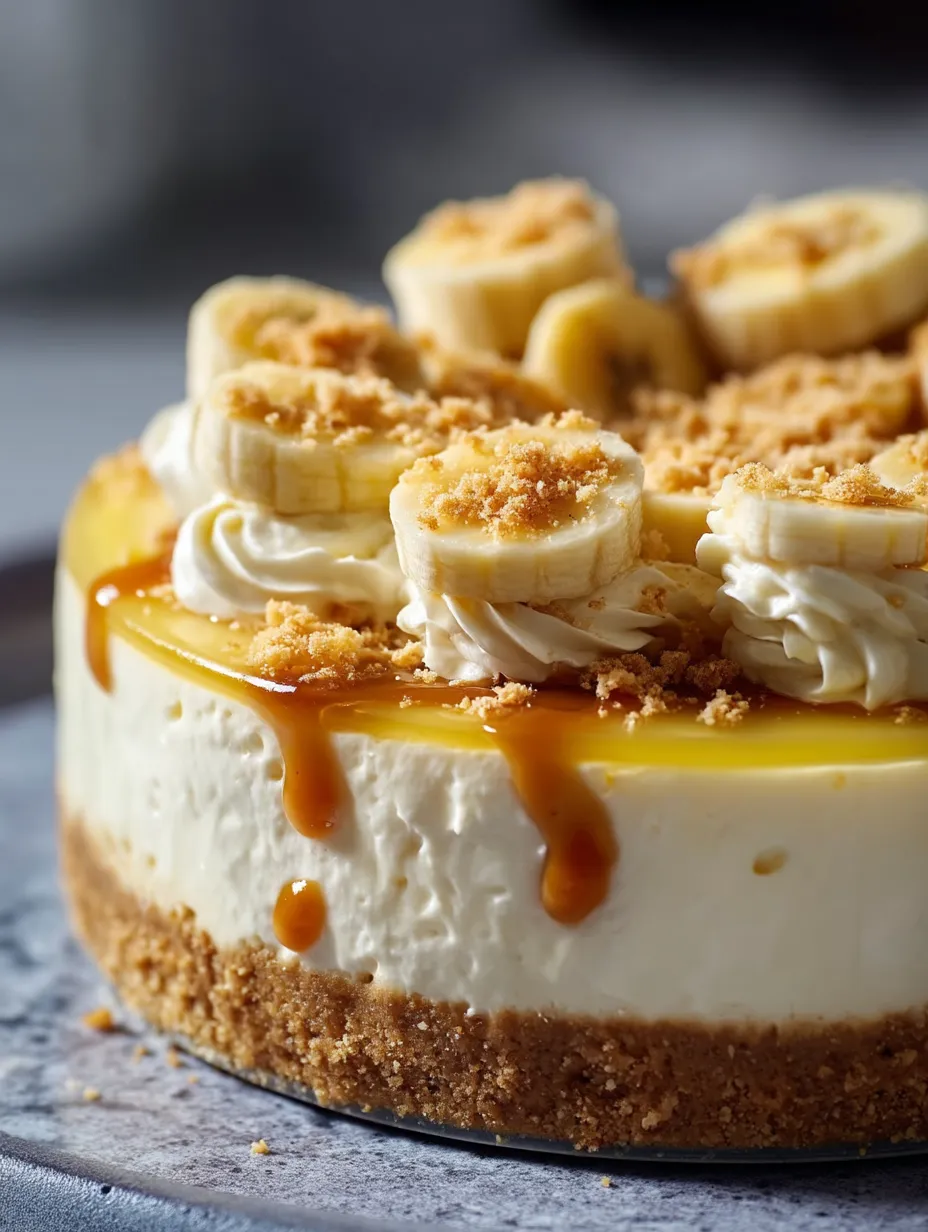
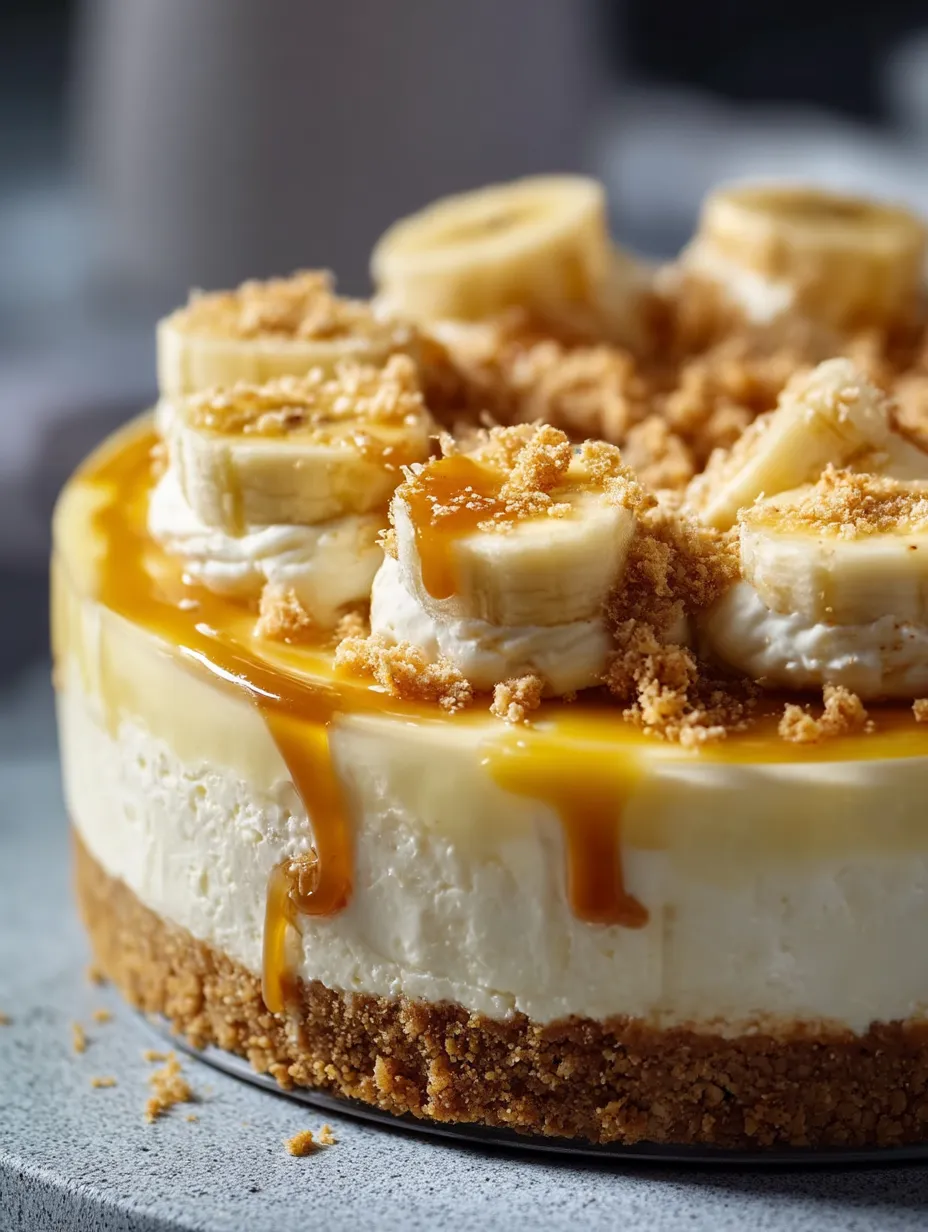
This extraordinary Heavenly Banana Pudding Cheesecake marries two beloved desserts into one showstopping creation that looks impressive but requires surprisingly little effort. The velvety smooth, banana-infused cheesecake filling rests on a buttery vanilla wafer crust, creating a perfect reinterpretation of classic banana pudding in cheesecake form. Topped with clouds of whipped cream and garnished with fresh banana slices and cookie crumbles, each slice delivers that nostalgic banana pudding flavor with the rich decadence of cheesecake – a combination that makes any occasion feel special.
I first developed this recipe for my sister's birthday, knowing her lifelong love of both banana pudding and cheesecake. As someone who typically sticks to basic desserts, I was initially intimidated by the idea of creating something that seemed restaurant-worthy. The night of her party, I nervously placed the cake at the center of the dessert table, worried it wouldn't live up to expectations. When it came time for dessert, I watched as my brother-in-law (a notorious dessert critic) took his first bite, closed his eyes, and declared it the best cheesecake he'd ever tasted. The entire cake disappeared within minutes, with guests scraping the serving plate for crumbs. What began as a birthday experiment has since become my most requested dessert for family gatherings, potlucks, and holiday celebrations. People who claim they "don't like cheesecake" or are "not banana fans" find themselves reaching for seconds – it's that irresistible.
Ingredients
- 1½ cups vanilla wafer crumbs (about 45-50 cookies): Creates the perfect nostalgic crust reminiscent of traditional banana pudding. Choose fresh, crisp cookies for the best texture. Pulse in a food processor until you have fine, even crumbs with no large pieces remaining.
- 5 tablespoons unsalted butter, melted: Binds the crust together while adding rich flavor. Use unsalted butter to control the overall saltiness of the dessert. The butter should be completely melted but not hot when mixed with the crumbs.
- 24 ounces cream cheese (3 standard packages), softened: Forms the creamy base of the cheesecake. Full-fat cream cheese provides the richest flavor and best texture. The cream cheese must be fully softened to room temperature to prevent lumps in your batter – about 1-2 hours on the counter before beginning.
- 1 cup granulated sugar: Sweetens the filling perfectly without overwhelming the banana flavor. Regular white sugar creates the smoothest texture. The amount balances the tanginess of the cream cheese while letting the banana flavor shine.
- 3 large eggs: Provides structure and helps the cheesecake set properly. Room temperature eggs incorporate more easily than cold ones. Farm-fresh eggs with vibrant yolks add richness to the finished cheesecake.
- 1 cup mashed ripe bananas (about 2 medium bananas): Delivers the signature banana flavor throughout the cheesecake. Choose very ripe bananas with brown spots for the sweetest, most intense flavor. Mash until smooth with no large chunks for the most even flavor distribution.
- 1 teaspoon pure vanilla extract: Enhances the banana flavor with warm, aromatic notes. Pure extract rather than imitation offers the most complex flavor. The vanilla should have a rich aroma without any alcohol smell overtones.
- ½ cup sour cream: Adds tanginess and creates an incredibly smooth texture. Full-fat sour cream provides the best results. It should have a thick consistency without any separation or wateriness.
- 1 cup heavy whipping cream (for topping): Creates a light, fluffy garnish that beautifully contrasts with the dense cheesecake. The cream should contain at least 36% milk fat for proper whipping. Alternatively, you can use 8 ounces of prepared whipped topping if pressed for time.
- 2 tablespoons powdered sugar (for whipped topping): Sweetens the whipped cream and helps stabilize it. Sift the sugar to avoid any lumps in your whipped topping. This small amount adds just enough sweetness without overpowering.
- Extra vanilla wafers and banana slices (for garnish): Provides visual appeal and reinforces the banana pudding connection. Choose firm, just-ripe bananas for garnish to prevent browning. Fresh cookies add a delightful crunch contrast to the creamy dessert.
 Pin it
Step-by-Step Instructions
- Step 1:
- Prepare your equipment properly - Begin by positioning a rack in the center of your oven and preheating to 325°F (165°C). This moderate temperature is crucial for baking cheesecake evenly without cracking. While the oven heats, wrap the outside of a 9-inch springform pan with two layers of heavy-duty aluminum foil, ensuring the foil extends up the sides of the pan. This waterproofing step is essential for the water bath that will help your cheesecake bake gently and evenly. Press the foil firmly against the pan but be careful not to tear it. A properly prepared pan prevents water seepage that could ruin your perfect crust. Also, gather all ingredients and allow the cream cheese, eggs, and sour cream to come to room temperature for at least an hour before beginning – properly tempered ingredients are crucial for a smooth, lump-free batter.
- Step 2:
- Create a perfect wafer crust - In a food processor, pulse vanilla wafers until they form fine crumbs. Alternatively, place cookies in a sealed plastic bag and crush with a rolling pin. Measure out exactly 1½ cups of crumbs and transfer to a mixing bowl. Add the melted butter and mix until the mixture resembles wet sand and holds together when pressed between your fingers. Pour this mixture into your prepared springform pan and, using the flat bottom of a measuring cup or glass, press firmly to create an even layer across the bottom and about 1 inch up the sides of the pan. The crust should be compact and uniform in thickness to prevent crumbling when served. Bake the crust for exactly 10 minutes until it's just set and slightly fragrant but not browned. Remove from the oven and allow to cool completely while preparing the filling. A properly pre-baked crust ensures it won't become soggy when the filling is added.
- Step 3:
- Mix the filling with precision - In the bowl of a stand mixer fitted with the paddle attachment (or a large bowl with a hand mixer), beat the softened cream cheese on medium-low speed until completely smooth and free of lumps, about 2-3 minutes. Scrape down the sides and bottom of the bowl thoroughly during this process – hidden pockets of unmixed cream cheese can ruin the texture of your cheesecake. Add the granulated sugar and continue to beat for another 2 minutes until the mixture is light and fluffy. The proper creaming of these ingredients creates the silky texture that makes this cheesecake exceptional. Keep the mixer at medium-low speed throughout this process – beating at high speed incorporates too much air, which can cause cracks during baking.
- Step 4:
- Incorporate eggs and flavoring components carefully - With the mixer running on low speed, add the eggs one at a time, allowing each to incorporate fully before adding the next. Pause to scrape down the bowl after each addition. This methodical approach prevents overbeating while ensuring the eggs are properly distributed throughout the batter. After all eggs are incorporated, add the mashed bananas, vanilla extract, and sour cream. Mix on low speed just until combined and smooth – about 30-45 seconds. Overmixing at this stage can affect the final texture of your cheesecake. The finished batter should be completely smooth with a pale yellow color and visible flecks of banana. It will be thicker than cake batter but should pour easily.
- Step 5:
- Assemble for baking success - Pour the prepared cheesecake filling over the cooled crust, using a rubber spatula to smooth the top. Tap the pan gently against the counter several times to release any trapped air bubbles, which could create holes in your finished cheesecake. Place the foil-wrapped springform pan into a larger roasting pan or baking dish. Carefully pour hot water into the larger pan until it reaches halfway up the sides of the springform pan, creating a water bath. This water bath is crucial for gentle, even baking that prevents cracks and creates that perfectly smooth texture. Take care not to splash any water into the cheesecake batter during this process.
- Step 6:
- Bake with attention to detail - Carefully transfer the water bath setup to the preheated oven, moving slowly to avoid splashing water. Bake for 60-70 minutes, checking after the 60-minute mark. The cheesecake is done when the edges are set and appear slightly puffed, but the center still has a slight jiggle – about a 3-inch diameter circle in the middle should wobble slightly when the pan is gently shaken. The cheesecake will continue to cook and set after being removed from the oven, so it's better to underbake slightly than overbake. An overbaked cheesecake can become dry and crack, while a properly baked one will be creamy and smooth. Resist the urge to open the oven door during the first 45 minutes of baking, as temperature fluctuations can cause cracking.
- Step 7:
- Cool gradually for perfect texture - When the cheesecake has finished baking, turn off the oven but leave the cheesecake inside with the door cracked open about 1 inch. Allow it to cool gradually in the oven for one hour. This slow cooling process prevents the dramatic temperature change that can cause the cheesecake surface to crack and sink. After the hour in the oven, remove the cheesecake from the water bath, carefully peel away the foil, and let it cool completely on a wire rack at room temperature, about another hour. Once completely cooled, cover the cheesecake with plastic wrap (without touching the surface) and refrigerate for at least 4 hours, preferably overnight. This chilling time is non-negotiable – it allows the flavors to meld and the texture to set properly for clean slicing.
- Step 8:
- Prepare the topping with care - Shortly before serving, prepare the whipped cream topping. In a chilled mixing bowl, combine the heavy whipping cream and powdered sugar. Beat with clean, cold beaters until soft peaks form – the cream should hold its shape but still have a slight curl at the tips when the beaters are lifted. Avoid overbeating, which can turn the cream into butter. If using prepared whipped topping instead, simply allow it to thaw in the refrigerator according to package directions. The lightness of freshly whipped cream provides the perfect textural contrast to the dense, rich cheesecake, mimicking the fluffy aspect of traditional banana pudding.
- Step 9:
- Assemble the final presentation - When ready to serve, carefully remove the sides of the springform pan by running a thin knife around the edge of the cheesecake first, then unlatching and lifting away the ring. Transfer the cheesecake to a serving platter if desired. Spread the prepared whipped cream evenly over the top of the cheesecake, creating decorative swirls with an offset spatula or the back of a spoon. Leave a small border around the edge of the cheesecake uncovered so the beautiful banana filling is visible. This visual contrast makes the dessert even more appealing and gives guests a preview of the flavor within.
- Step 10:
- Garnish and serve at the perfect moment - Just before serving, add the final touches that make this dessert truly special. Arrange fresh banana slices around the edge of the cheesecake or in a decorative pattern on top. Crumble a few vanilla wafers and sprinkle them over the whipped cream. Add whole wafers standing upright around the perimeter if desired for a more dramatic presentation. These garnishes should be added at the last minute to prevent the bananas from browning and the cookies from becoming soggy. Slice the cheesecake with a clean, sharp knife dipped in hot water and wiped dry between each cut for the neatest presentation. Serve immediately while the garnishes are fresh and the contrast between the cool, creamy cheesecake and crisp cookies is at its peak.
The finished cheesecake should showcase a perfect balance of textures and flavors: the crisp vanilla wafer crust giving way to a velvety smooth, banana-infused filling, all topped with a cloud of whipped cream and fresh garnishes that reinforce the banana pudding inspiration.
The Perfect Make-Ahead Dessert
One of the most wonderful aspects of this Heavenly Banana Pudding Cheesecake is how it lends itself to advance preparation, making it ideal for entertaining or special occasions when you want to minimize last-minute kitchen stress.
I discovered this time-saving benefit when preparing for my parents' anniversary celebration. With a long menu to coordinate, I was concerned about finding time to make dessert on the day of the party. Taking a chance, I made the cheesecake two days ahead, keeping it in the springform pan in the refrigerator. To my delight, when I served it at the celebration, the flavors had actually deepened and melded, creating an even more pronounced banana pudding flavor than when freshly made.
The key to successful make-ahead preparation lies in the separate components. The cheesecake itself actually improves with 24-48 hours of refrigeration, allowing the banana flavor to fully permeate the filling. However, the whipped cream topping and garnishes should always be added shortly before serving to maintain their fresh appearance and texture. I typically prepare the cheesecake up to three days in advance, then spend just five minutes adding the finishing touches before presenting it to guests.
This make-ahead quality has made the cheesecake my go-to dessert for busy holiday gatherings. During Thanksgiving or Christmas, when oven space and preparation time are at a premium, having a show-stopping dessert already waiting in the refrigerator is invaluable. Guests are always impressed, never suspecting that the spectacular dessert was completed days before their arrival.
Serving Suggestions for Every Occasion
The versatility of this Banana Pudding Cheesecake makes it appropriate for countless occasions, from casual family dinners to elegant celebrations. Over the years, I've developed various serving styles to match different events.
For intimate family gatherings, I serve the cheesecake straight from the refrigerator, with additional fresh banana slices and vanilla wafers on the side. This allows everyone to add extra garnishes according to their preference. My husband particularly loves adding more cookies for extra crunch, while my daughter always reaches for additional banana slices. A drizzle of caramel sauce sometimes makes an appearance for those who enjoy an extra touch of sweetness.
When entertaining for more formal occasions, I elevate the presentation by serving individual slices on dessert plates with a light dusting of cocoa powder and a mint leaf garnish. Sometimes I'll add a quenelle of freshly whipped cream beside each slice and a single perfect vanilla wafer standing upright. This restaurant-quality presentation never fails to impress dinner party guests.
For larger gatherings like potlucks or family reunions, I occasionally prepare a deconstructed version. I'll make the cheesecake in a rectangular pan without the springform, then top it with whipped cream, crumbled cookies, and sliced bananas arranged in a decorative pattern. This adaptation serves more people and is easier to transport while maintaining all the flavors that make the original so special.
During summer months, I sometimes serve the cheesecake with a side of fresh berries – particularly strawberries or blueberries – which add a welcome fruity acidity that cuts through the richness of the cheesecake. The color contrast also makes for a beautiful plate presentation that feels seasonally appropriate.
I learned the importance of properly softened cream cheese through a memorable kitchen disaster. Pressed for time while making this cheesecake for a dinner party, I tried to speed up the softening process by microwaving the cream cheese for a few seconds. This created unevenly warmed cheese with some parts still cool and others too soft. Despite extensive mixing, the filling developed small lumps that were impossible to remove. While the taste remained delicious, the texture was noticeably compromised. Now I always plan ahead, removing the cream cheese from the refrigerator at least two hours before beginning, ensuring that perfect silky-smooth filling that makes this cheesecake so special.
 Pin it
Creative Variations to Explore
While the classic version of this cheesecake perfectly captures the essence of traditional banana pudding, I've developed several variations that offer delightful twists on the original concept.
For chocolate lovers, I sometimes add a layer of ganache between the crust and filling. To create this variation, I melt 1 cup of semi-sweet chocolate chips with ¼ cup of heavy cream, then pour this over the pre-baked crust and chill until set before adding the banana cheesecake filling. The chocolate adds a rich counterpoint to the banana flavor, reminiscent of chocolate-dipped bananas. This version has become particularly popular at children's birthday celebrations.
When serving during autumn months, I create a spiced version by adding ½ teaspoon of cinnamon and ¼ teaspoon of nutmeg to the filling. These warming spices complement the banana beautifully and create a cozy dessert perfect for Thanksgiving gatherings. Sometimes I'll substitute gingersnap cookies for the vanilla wafers in the crust, further enhancing the seasonal spice profile.
For a tropical variation that's perfect for summer, I incorporate ¼ cup of well-drained crushed pineapple to the filling and replace the vanilla extract with coconut extract. The finished cheesecake is garnished with toasted coconut flakes alongside the banana slices and vanilla wafers. This version transports diners to a tropical paradise and pairs wonderfully with grilled summer meals.
When serving to guests with more sophisticated palates, I sometimes create a banana foster-inspired version. The basic cheesecake remains the same, but before serving, I prepare a quick sauce by melting 4 tablespoons of butter with ¼ cup brown sugar and a splash of rum (which cooks off), then pouring this warm sauce over sliced bananas. This luxurious topping is spooned over each slice just before serving, creating a dessert worthy of the finest restaurants.
For those who prefer a lighter option, I occasionally prepare mini versions using a muffin tin lined with paper cups. These individual cheesecakes bake more quickly (about 20-25 minutes) and offer perfect portion control. They're particularly popular at bridal or baby showers, where guests appreciate the elegant single-serving presentation.
After years of making this cheesecake for family, friends, and countless special occasions, I've come to appreciate how a dessert can become more than just food – it becomes a tradition and a memory-maker. There's something magical about watching someone taste this cheesecake for the first time, seeing their eyes widen with surprise at how perfectly it captures the essence of banana pudding in a new, elevated form.
What I find most rewarding is how this recipe has spread through my community. After bringing it to a school fundraiser, three different parents asked for the recipe. Months later, at a neighborhood block party, I discovered my cheesecake had inspired variations in other kitchens – one neighbor had created a strawberry version, while another had adapted it for a gluten-free family member. The recipe had taken on a life of its own, evolving while maintaining the core elements that make it special.
This Heavenly Banana Pudding Cheesecake reminds me why I love baking – it's not just about creating something delicious, but about bringing people together, honoring traditions while making them your own, and finding those perfect flavor combinations that create moments of pure joy around the table. Whether you're baking it for a milestone celebration or simply because it's Tuesday, this cheesecake has a way of making any day feel special.
Frequently Asked Questions
- → Can I use ripe bananas for this cheesecake?
- Yes, ripe bananas with some brown spots are perfect for this recipe as they're sweeter and mash easily. Just avoid overripe bananas that are too mushy or black, as they might make the filling too wet.
- → How do I prevent my cheesecake from cracking?
- The slow cooling method in the recipe (leaving it in the oven with the door cracked) is key. Also, don't overmix after adding the eggs, make sure ingredients are at room temperature before starting, and consider using a water bath for extra protection against cracks.
- → Can this cheesecake be frozen?
- Yes! Freeze the cheesecake without the toppings. Wrap it well in plastic wrap and then aluminum foil and freeze for up to 1 month. Thaw overnight in the refrigerator and add fresh toppings before serving.
- → How do I know when the cheesecake is done baking?
- The cheesecake is done when the edges are set but the center still has a slight jiggle (about a 2-3 inch circle in the middle should wobble slightly when gently shaken). It will continue to set as it cools.
- → When should I add the banana slices for topping?
- Add the fresh banana slices just before serving or no more than a few hours ahead of time. Bananas oxidize and turn brown when exposed to air. If you need to prepare further in advance, brush the banana slices lightly with lemon juice to slow browning.