
 Pin it
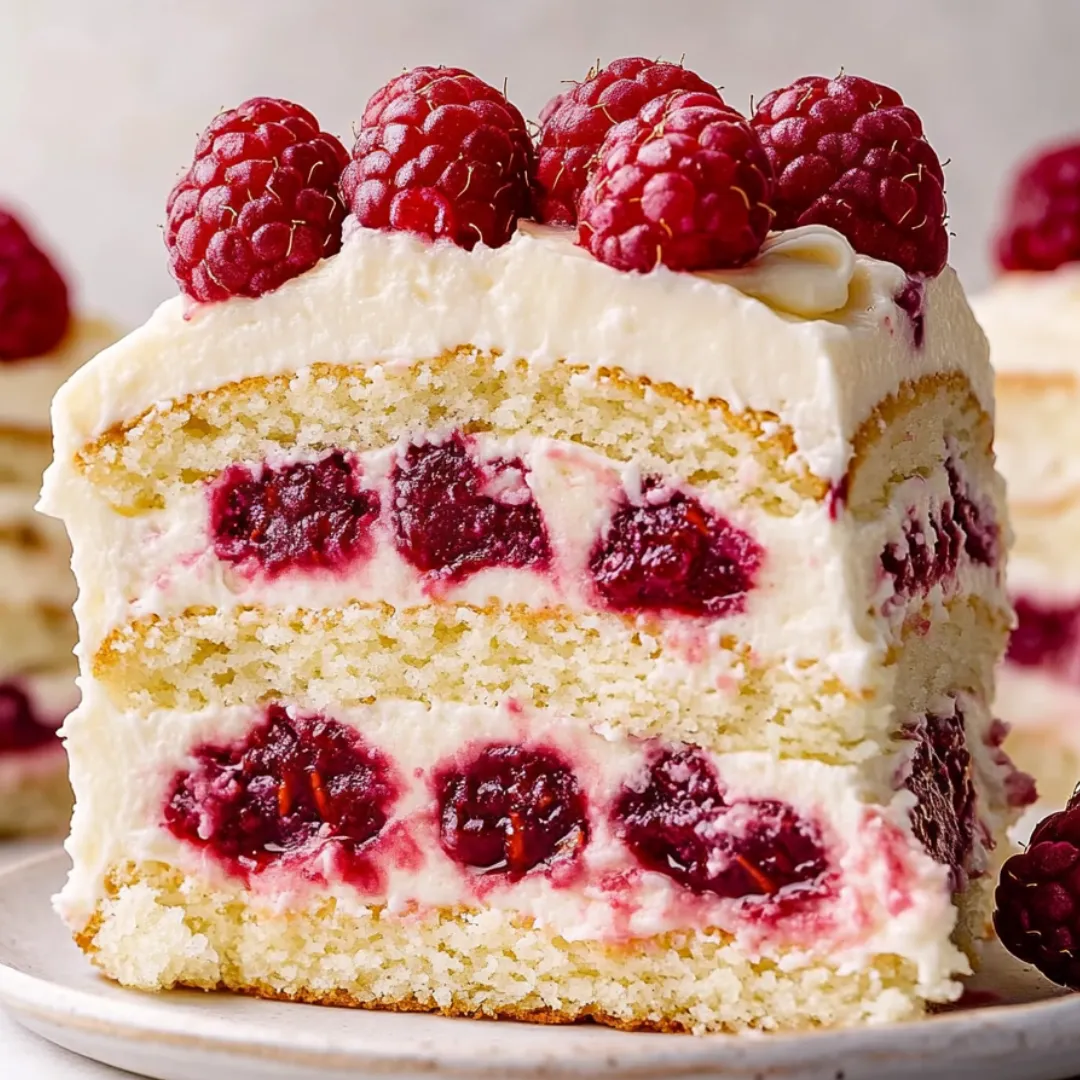
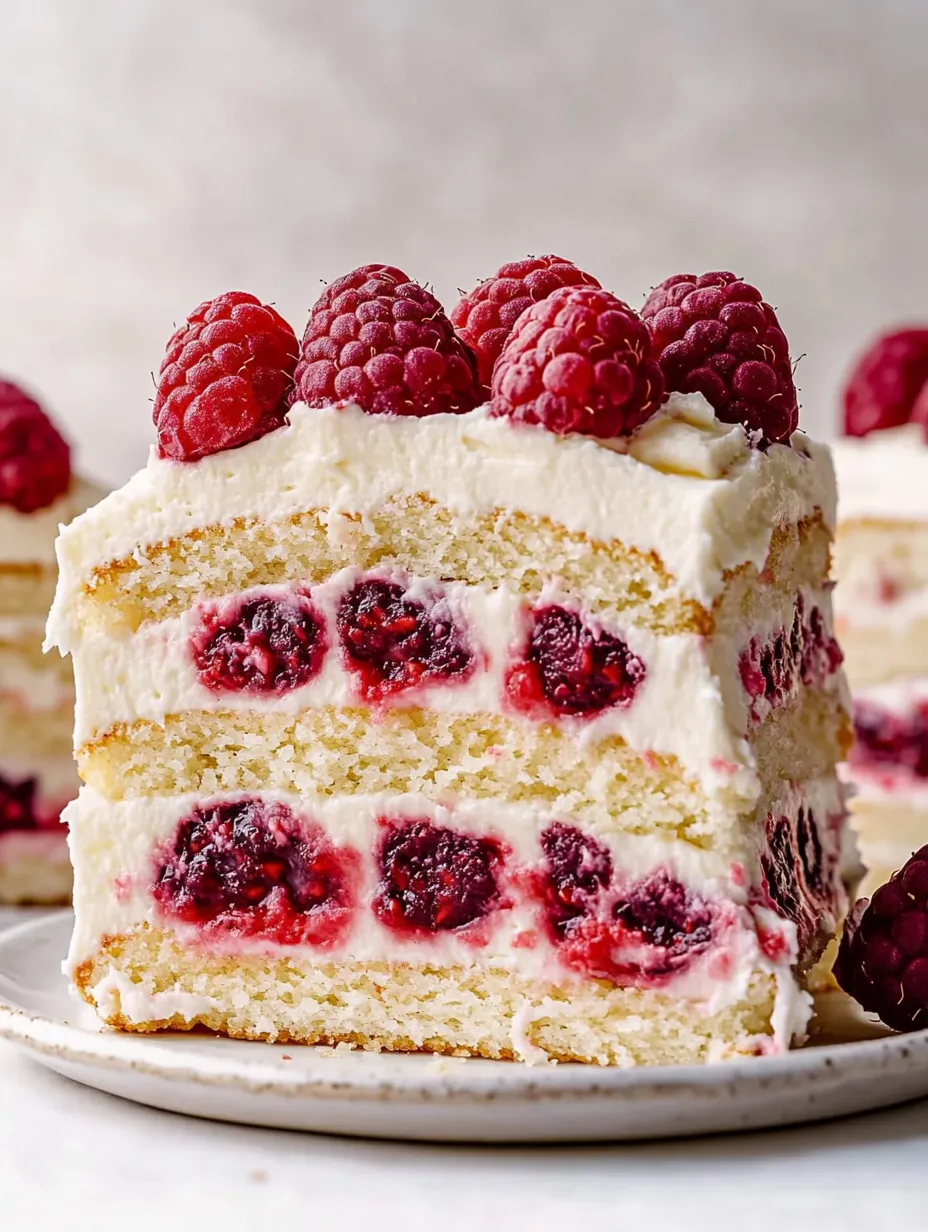
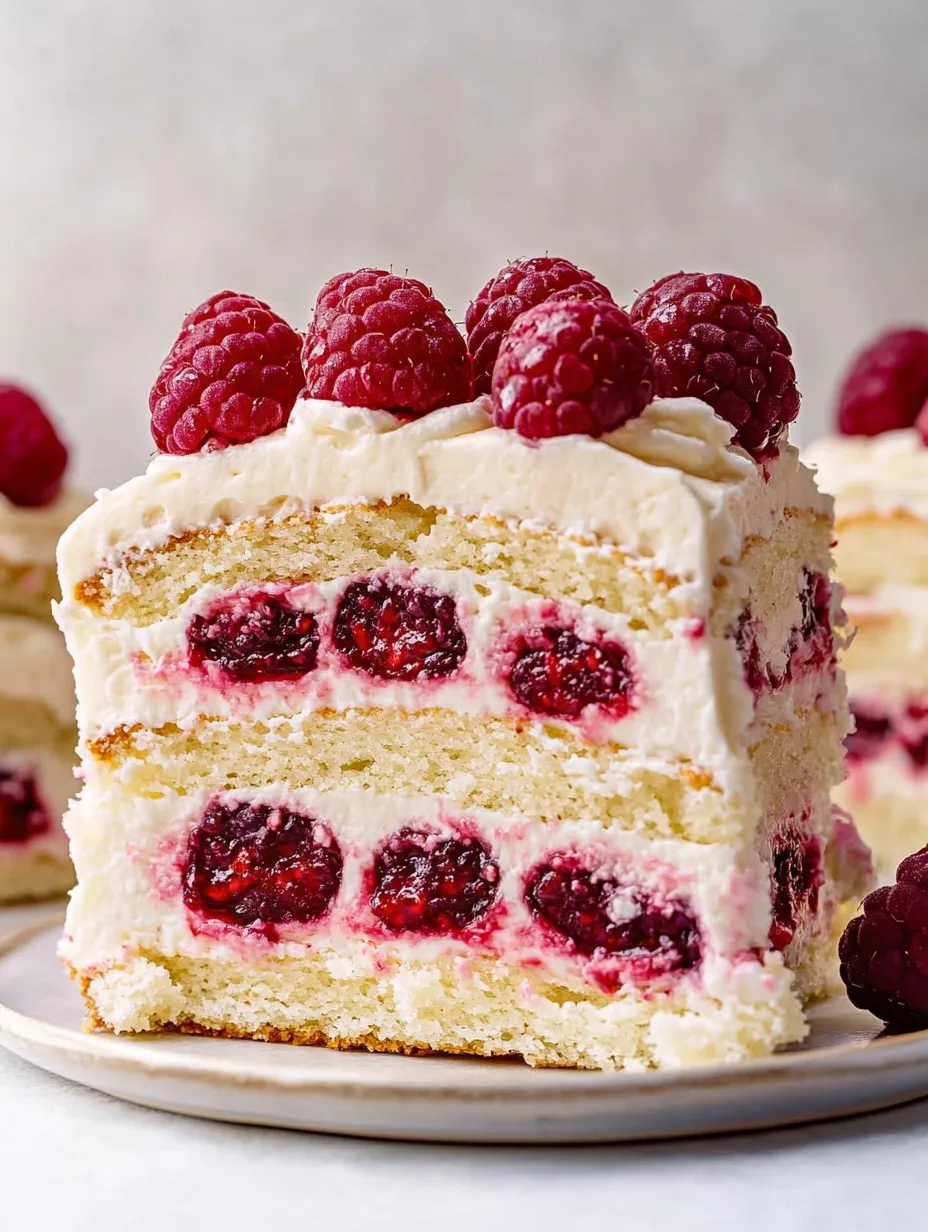
This stunning white chocolate raspberry cake combines delicate almond-scented layers with the perfect balance of sweet and tart flavors. Each bite delivers moist cake, silky white chocolate buttercream, and bright raspberry jam that melts in your mouth. The fresh berries crowning the top add a beautiful pop of color and freshness that makes this cake as gorgeous as it is delicious. Whether you're celebrating a special occasion or simply craving something extraordinary, this showstopper dessert is guaranteed to impress everyone at the table.
I first made this cake for my sister's bridal shower last spring, and the reaction was better than I could have imagined. Everyone thought I'd ordered it from an expensive bakery! The bride-to-be was especially touched that I'd created something so beautiful just for her. What I love most about this recipe is how the tartness of the raspberries cuts through the sweetness of the white chocolate, creating a perfectly balanced dessert that isn't cloying. Now it's become my signature cake that friends and family request for special celebrations.
Ingredients You'll Need
- 3 cups cake flour: Using cake flour rather than all-purpose is non-negotiable for achieving that tender, fine crumb; it has less protein which means less gluten development
- 1 tablespoon baking powder: Provides the perfect rise without making the cake too airy or too dense
- ½ teaspoon salt: Enhances all the flavors and balances the sweetness
- 1 cup unsalted butter, room temperature: The butter must be genuinely soft (but not melted) for proper creaming with the sugar
- 2 cups granulated sugar: Creates moisture and tenderness while adding just the right level of sweetness
- 4 large eggs, room temperature: Eggs provide structure and richness; room temperature eggs incorporate more easily
- 1½ teaspoons almond extract: This is the secret flavor boost that makes this cake special; don't substitute vanilla
- 1 cup whole milk, room temperature: Adds moisture and helps create a tender crumb
- 12 ounces white chocolate, chopped: Use real white chocolate bars (not chips) which melt beautifully for the buttercream
- 2 cups unsalted butter, room temperature: For a silky-smooth buttercream that spreads like a dream
- 4-5 cups powdered sugar, sifted: Creates structure in the frosting while adding sweetness
- 3 tablespoons heavy cream: Helps achieve that perfectly smooth, pipeable consistency
- 2 tablespoons amaretto liqueur: Adds sophisticated flavor depth that complements both the almond and raspberry notes
- ¼ teaspoon salt: Crucial for balancing the sweetness of white chocolate
- 1 cup high-quality raspberry jam: Look for one with seeds for texture and authentic raspberry flavor
- 2 cups fresh raspberries: For the gorgeous topping that makes this cake truly special
- ½ cup sliced almonds: Creates a beautiful decorative border with delightful textural contrast
 Pin it
Step-by-Step Cooking Instructions
- Prepare Your Baking Pans:
- Position a rack in the center of your oven and preheat to 350°F (175°C). This consistent temperature is crucial for even baking. Thoroughly grease two 9-inch round cake pans with nonstick baking spray, making sure to coat the sides completely. Cut parchment paper rounds to fit the bottoms of the pans, press them in place, and spray again. This double insurance prevents any sticking and ensures your cakes release perfectly.
- Mix the Dry Ingredients:
- In a medium bowl, whisk together the cake flour, baking powder, and salt until thoroughly combined. This even distribution is essential for proper leavening throughout the cake. Sifting these ingredients together is even better if you have a sifter handy, as it removes any lumps and incorporates air for a lighter texture.
- Cream Butter and Sugar:
- In the bowl of a stand mixer fitted with the paddle attachment (or using a hand mixer and large bowl), beat the room temperature butter on medium speed until creamy and lightened in color, about 1 minute. Gradually add the granulated sugar and continue beating on medium-high speed until the mixture becomes noticeably lighter in both color and texture, approximately 3-4 minutes. Don't rush this step - proper creaming incorporates air into the batter, which is essential for a tender cake.
- Add Eggs and Extract:
- Reduce the mixer speed to medium. Add the eggs one at a time, beating well after each addition and scraping down the sides of the bowl as needed. This gradual addition prevents the batter from curdling. After all eggs are incorporated, beat in the almond extract until the mixture is smooth and uniform.
- Combine Wet and Dry Ingredients:
- Reduce the mixer speed to low. Add the flour mixture in three parts, alternating with two additions of milk, beginning and ending with the flour mixture. Mix only until each addition is just incorporated - you'll see the flour or milk disappear into the batter. Stop mixing as soon as the last streaks of flour vanish. Overmixing at this stage will develop gluten, resulting in a tough cake.
- Bake the Cakes:
- Divide the batter evenly between the prepared pans, using a scale if you have one for perfect precision. Smooth the tops with an offset spatula. Tap the pans firmly against the counter a few times to remove any large air bubbles. Bake until the cakes are golden on top and a toothpick inserted into the center comes out clean or with just a few moist crumbs, approximately 25-30 minutes. The cakes should spring back when lightly touched in the center.
- Cool Properly:
- Allow the cakes to cool in their pans on a wire rack for exactly 10 minutes. Run a thin knife around the edges to loosen, then carefully invert onto the cooling rack. Peel off the parchment paper and allow to cool completely before slicing and frosting. Rushing this cooling process can result in cakes that crumble when sliced or frosting that melts.
- Prepare White Chocolate Buttercream:
- Melt the white chocolate in a heatproof bowl set over a pan of barely simmering water (double-boiler method), stirring occasionally until smooth. Alternatively, microwave in 20-second intervals, stirring between each, until just melted. Set aside to cool until tepid but still fluid. In a clean mixer bowl, beat the butter on medium-high speed until exceptionally light and fluffy, about 3-4 minutes. Gradually add 4 cups of sifted powdered sugar, one cup at a time, beating well after each addition and scraping down the sides as needed. Pour in the heavy cream and amaretto, then beat until incorporated. With the mixer on low, slowly pour in the cooled white chocolate and salt, then increase speed to medium and beat until perfectly smooth and silky. If needed, add more powdered sugar until the frosting holds its shape but remains spreadable.
- Slice the Cake Layers:
- Once the cakes are completely cool, use a long serrated knife to carefully slice each cake horizontally into two even layers. Place your hand gently on top of the cake and keep the knife level as you cut, rotating the cake as needed to maintain an even slice. This will give you four cake layers total. If the layers seem uneven, don't worry - the filling and frosting will hide minor imperfections.
- Assemble Your Masterpiece:
- Place one cake layer on a serving plate or cake stand. Spread approximately 3/4 cup of the white chocolate buttercream evenly over the top, leaving a small margin around the edge. Spoon about 1/3 cup of raspberry jam over the buttercream, gently spreading it but not mixing the two completely. Top with the second cake layer and repeat the process with buttercream and jam. Add the third layer and repeat once more. Place the final cake layer on top, cut side down for a perfectly flat surface. Apply a thin layer of buttercream over the entire cake (this is your 'crumb coat') and refrigerate for 15-20 minutes to set. After chilling, apply the remaining buttercream generously over the top and sides of the cake, creating smooth sides or decorative swirls as desired.
- Add the Finishing Touches:
- Press sliced almonds around the sides of the cake, gently pushing them into the frosting so they adhere. Pile fresh raspberries generously on top of the cake, creating a beautiful crown of berries. For an extra touch of elegance, dust the berries and top edge with a little powdered sugar just before serving.
The first time I made this cake, I rushed the cooling process and tried to frost it while still slightly warm. The buttercream started melting and sliding off! I've learned that patience is key - letting each component cool properly makes assembly so much easier. Another tip I've discovered over time: keeping a small offset spatula in warm water makes spreading the jam layer much easier, especially if your jam is a bit firm from refrigeration.
Perfect Pairings
This cake pairs beautifully with a glass of champagne or prosecco for celebrations. The effervescence of the bubbles contrasts wonderfully with the richness of the cake. For a non-alcoholic option, an herbal tea like chamomile or a light floral tea complements the almond notes perfectly. If serving for a special occasion, consider adding a small glass of amaretto liqueur on the side to echo the flavors in the buttercream.
Simplify the Process
If you're new to layer cakes or short on time, you can simplify this recipe without sacrificing flavor. Instead of slicing the cakes horizontally, simply use the two whole cakes as your layers. Double the amount of filling between them, and you'll still get all the delicious flavors in every bite. You can also prepare components ahead: bake the cakes up to a day in advance and wrap well in plastic, or make the buttercream a day ahead and refrigerate, then bring to room temperature and re-whip before using.
Storage Tips
This cake keeps beautifully at room temperature for up to two days, covered with a cake dome or stored in a cake keeper. For longer storage, refrigerate for up to five days, but always bring slices to room temperature before serving for the best flavor and texture. If you want to freeze portions, wrap individual slices tightly in plastic wrap and then foil; they'll keep for up to three months. Thaw overnight in the refrigerator, then bring to room temperature before enjoying.
 Pin it
Seasonal Adaptations
While raspberries are the star of this cake, you can adapt it seasonally. In late summer, substitute blackberries or a mixture of summer berries. During winter months when fresh berries are expensive or less flavorful, use high-quality preserves for the filling and decoration, perhaps with a few fresh berries as accent. For a holiday version, add a touch of orange zest to the cake batter and decorate with sugared cranberries and rosemary sprigs for a festive appearance.
I'll never forget the grateful tears in my friend's eyes when I surprised her with this cake for her 40th birthday. She'd been having a difficult year, and this small gesture meant the world to her. That's the power of homemade cake - it's not just about the delicious flavors, but the love and effort that goes into creating something special for someone you care about. There's something magical about transforming simple ingredients into a stunning dessert that brings people together around the table, creating memories that last far longer than the cake itself.
Frequently Asked Questions
- → Can I make this cake without alcohol?
- Yes, you can substitute the amaretto liqueur with 1-2 teaspoons of additional almond extract, or use a non-alcoholic amaretto flavoring. The cake will still be delicious.
- → How far in advance can I make this cake?
- You can make the cake one day ahead and store at room temperature. If storing for up to 2 days, keep refrigerated but bring to room temperature before serving for best flavor and texture.
- → Can I use a different type of fruit?
- Yes, you can substitute the raspberries with strawberries, blackberries, or even peaches. Just make sure to use a complementary fruit preserve for the filling.
- → What if I don't have cake flour?
- You can make a cake flour substitute by replacing 2 tablespoons of all-purpose flour with 2 tablespoons of cornstarch for each cup of flour. Sift them together several times to combine well.
- → How do I ensure my cake layers are even when cutting them horizontally?
- Use a long serrated knife and make small marks around the side of the cake at the halfway point. Then, keeping the knife level, slowly cut through the cake, rotating it as you go to maintain an even cut.