
 Pin it
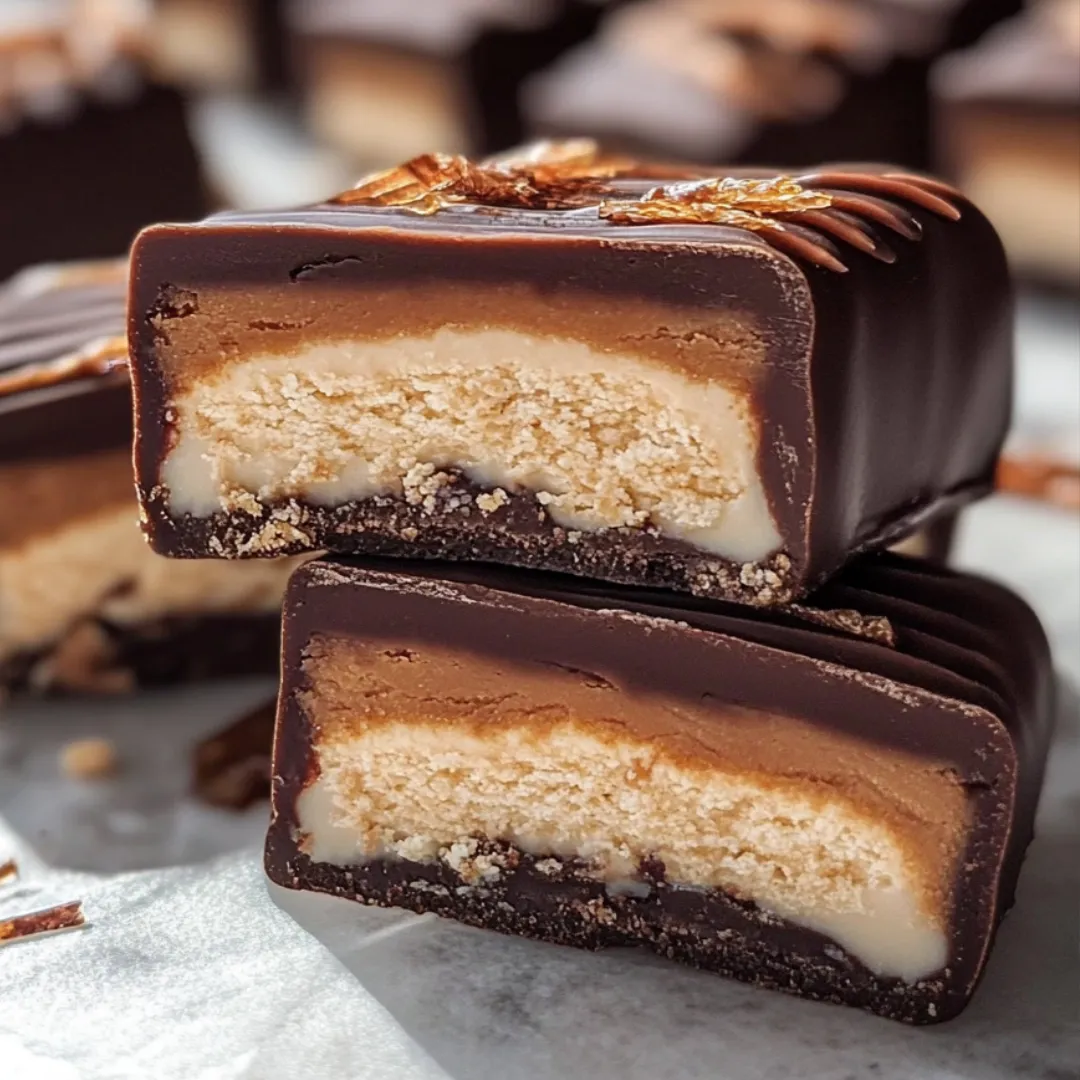
These irresistible homemade Twix bars transform simple, wholesome ingredients into a decadent treat that rivals the classic candy bar without any of the processed ingredients. Each bar features a crisp, buttery shortbread base made from tigernut flour, topped with a luscious date caramel layer that provides natural sweetness and chewy texture. The crowning glory is a smooth dark chocolate coating that encases everything in rich cocoa goodness. Perfect for those with dietary restrictions or anyone looking to enjoy a healthier version of their favorite candy, these no-bake treats satisfy sweet cravings without compromising on taste or texture. The best part? You'll feel good knowing exactly what's in them—just real food ingredients you can pronounce.
I first created these Twix bars after my daughter was diagnosed with several food allergies that left her feeling excluded during classroom celebrations. Determined to give her a treat that felt special rather than restrictive, I experimented with tigernut flour and date caramel until the perfect combination emerged. The first time she tried them, her eyes lit up, and she whispered, 'These taste even better than the real ones!' Now they've become our family's favorite dessert, disappearing mysteriously from the refrigerator overnight. I've caught my husband sneaking them for breakfast on more than one occasion, claiming that dates and tigernuts are basically breakfast foods anyway!
Ingredients You'll Need
- For the Shortbread Base:
- 1 cup Tigernut Flour - Creates a crisp, nutty-tasting cookie layer despite being completely nut-free. This flour comes from a small root vegetable, not a nut
- 3 tablespoons Coconut Oil, melted - Binds the shortbread together and adds richness. Use refined coconut oil if you prefer no coconut flavor
- 2 tablespoons Maple Syrup - Provides just enough sweetness to the cookie base. Look for pure maple syrup, not pancake syrup
- 1 teaspoon Vanilla Extract - Enhances the shortbread's flavor with warm, aromatic notes
- ¼ teaspoon Salt - Balances the sweetness and brings out the other flavors
- For the Date Caramel:
- 1 cup Medjool Dates, pitted - Creates a naturally sweet, chewy caramel layer. Medjool dates work best for their soft texture and rich flavor
- 2 tablespoons Coconut Oil - Adds creaminess and helps the caramel set properly
- 2 tablespoons Coconut Flour - Thickens the caramel to the perfect consistency for slicing
- 1 teaspoon Vanilla Extract - Complements the dates' natural caramel flavor
- ¼ teaspoon Salt - Essential for that classic salted caramel taste
- For the Chocolate Coating:
- 1 cup Dark Chocolate Chips (70-85% cacao) - Provides a rich coating that contrasts beautifully with the sweet caramel. Higher percentage ensures less sugar
- 1 tablespoon Coconut Oil - Thins the chocolate slightly for easier dipping and creates a smoother finish
- Flaky Sea Salt (optional) - Adds a professional finishing touch and enhances all flavors
 Pin it
Step-by-Step Cooking Instructions
- Prepare Your Workspace:
- Begin by lining an 8" x 8" baking pan with aluminum foil, ensuring there's enough overhang on the sides to easily lift the bars out later. Smooth out any wrinkles in the foil to create a flat surface. Having the proper setup from the start makes the entire process smoother and results in more professional-looking bars.
- Create the Shortbread Base:
- In a medium mixing bowl, combine the tigernut flour, melted coconut oil, maple syrup, vanilla extract, and salt. Mix first with a fork to incorporate the wet ingredients into the dry. As the mixture begins to come together, switch to using your hands to fully combine. Initially, the dough may seem too dry and crumbly, but continue working it with your hands—the warmth and pressure will help bind everything together. Once the dough forms a cohesive ball that holds together when pressed, transfer it to your lined pan. Press the dough firmly and evenly into the bottom of the pan, creating a thin but solid base. For the smoothest surface, place a piece of parchment paper over the dough and use the flat bottom of a measuring cup to press and level it.
- Craft the Date Caramel:
- Place the pitted dates in a microwave-safe bowl and cover completely with water. Microwave on high for 2 minutes to soften them thoroughly. If you prefer not to use a microwave, pour boiling water over the dates and let them soak for 5-10 minutes. The dates must be soft enough to blend into a smooth paste. Drain the water completely—excess moisture will prevent your caramel from setting properly. Transfer the softened dates to a food processor along with the coconut oil, vanilla extract, and salt. Process on high, stopping occasionally to scrape down the sides with a spatula. Once the mixture is smooth, add the coconut flour and continue processing until you achieve a thick, uniform caramel consistency with no date pieces visible.
- Assemble the Layers:
- Scoop the date caramel onto the center of your shortbread base. To spread it evenly without disturbing the shortbread layer underneath, place a sheet of parchment paper over the caramel and use your hands to gently push it to the edges of the pan. The parchment prevents the caramel from sticking to your hands while allowing you to apply even pressure. Once the caramel is spread in an even layer, carefully peel off the parchment paper. Transfer the pan to your freezer and let it set for a minimum of 2 hours. This freezing step is crucial—it ensures the bars will hold their shape when cut and dipped in chocolate.
- Prepare the Chocolate Coating:
- When your bars are completely frozen and firm to the touch, prepare the chocolate coating. In a small saucepan over low heat, combine the dark chocolate chips and coconut oil. Stir frequently with a silicone spatula to prevent burning. Remove from heat as soon as the mixture is completely smooth and glossy. Transfer the melted chocolate to a small, deep bowl that will allow you to fully submerge the bars. The ideal chocolate temperature for dipping is slightly warm but not hot—too hot and it will melt the caramel layer.
- Cut and Coat the Bars:
- Remove the set bars from the freezer and use the foil overhang to lift the entire block out of the pan. Place on a cutting board and, using a sharp knife, cut into 16 equal pieces (4 rows by 4 columns). For the cleanest cuts, wipe your knife with a warm, damp cloth between slices. Working quickly while the bars are still frozen, dip each piece into the melted chocolate. The easiest method is to drop the bar into the chocolate, flip it once using a fork, then lift it out by sliding the fork underneath. Tap the fork gently against the edge of the bowl to remove excess chocolate, then slide the coated bar onto a parchment-lined baking sheet. If the chocolate begins to thicken during the dipping process, gently rewarm it.
- Add Finishing Touches:
- Once all bars are coated, use any remaining chocolate to create decorative drizzles over the tops. Simply dip a fork in the chocolate and wave it back and forth over the bars for an artistic finish. If desired, sprinkle a few flakes of sea salt on top of each bar while the chocolate is still wet. This not only adds visual appeal but enhances the flavor contrast between the sweet caramel and rich chocolate. Allow the bars to set completely at room temperature, which takes approximately 30 minutes, or speed up the process by placing them in the refrigerator for about 10 minutes until the chocolate is firm to the touch.
I learned the importance of properly freezing these bars the hard way during a summer dinner party. Eager to impress my guests, I rushed the freezing process and attempted to dip bars that weren't completely solid. The result was a messy yet comical disaster—melting caramel swirling into my chocolate, creating what looked more like chocolate soup with cookie islands! My guests actually gathered around the kitchen counter, laughing as we all attempted to salvage the delicious mess by pouring it over ice cream instead. Now I always set a timer for the full two hours of freezing time, no matter how impatient I'm feeling.
Storage Solutions
These homemade Twix bars need to be stored properly to maintain their perfect texture. Keep them in an airtight container in the refrigerator for up to two weeks—though they rarely last that long in my household! For longer storage, they freeze beautifully for up to two months. I like to place small pieces of parchment paper between layers to prevent them from sticking together. If you're planning to enjoy them from the freezer, let them sit at room temperature for about 5-10 minutes before eating for the best texture experience. The slight softening allows the caramel to return to its perfect chewy consistency.
Customization Options
While this recipe is perfect as written, there are several delicious variations you might enjoy. For a mocha twist, add 1 teaspoon of espresso powder to the melted chocolate. If you're not concerned about keeping them nut-free, try substituting almond flour (about 1½ cups or 150 grams) for the tigernut flour in the shortbread layer. For a festive touch, sprinkle the chocolate coating with crushed freeze-dried raspberries or a dusting of cinnamon. You can also experiment with different chocolate varieties—white chocolate creates a beautiful contrast with the golden caramel, while milk chocolate offers a sweeter, more traditional candy bar experience.
Troubleshooting Tips
If your shortbread dough seems too crumbly to hold together, add an additional teaspoon of coconut oil. Conversely, if your date caramel turns out too runny, add an additional tablespoon of coconut flour and return it to the processor until it reaches a thicker consistency. Should your chocolate coating become too thick for smooth dipping, simply stir in an additional teaspoon of coconut oil to thin it out. If you notice the chocolate seizing (becoming grainy or stiff), it may have come into contact with water—start over with fresh chocolate and ensure all utensils are completely dry.
 Pin it
Presentation Ideas
Turn these homemade treats into a gift by packaging them in a small bakery box lined with parchment paper. For special occasions, arrange them on a serving platter alongside fresh berries and mint leaves for a pop of color. Create a dessert platter by cutting some bars into smaller, bite-sized pieces and pairing them with other complementary treats like fresh fruit, dairy-free ice cream, or coconut whipped cream. The bars also make a beautiful addition to holiday cookie exchanges—their professional appearance and irresistible taste will have everyone requesting the recipe.
My favorite memory with these Twix bars involves my most skeptical friend—a self-proclaimed 'junk food connoisseur' who insisted that healthy versions of candy could never taste authentic. I served these after dinner without mentioning the ingredients, and watched as he reached for a second, then a third. When I finally revealed they were made with dates and tigernut flour, he stopped mid-bite, looked suspiciously at the half-eaten bar, then finished it anyway with a reluctant 'I can't believe I'm saying this, but I actually prefer these to the original.' That moment confirmed what I already knew—sometimes the most wholesome ingredients create the most extraordinary treats when combined with a little creativity and care.
Frequently Asked Questions
- → What is tigernut flour and where can I find it?
- Tigernut flour is made from ground tigernuts, which are small root vegetables (not actually nuts). It's grain-free, nut-free and rich in fiber. You can find it at health food stores, specialty grocers, or online retailers.
- → Can I use regular flour instead of tigernut flour?
- While the recipe is designed to be grain-free, you could use regular all-purpose flour, though the texture and flavor will be different. You'll likely need less flour since tigernut flour absorbs more moisture.
- → How long do these homemade Twix bars last?
- These bars will last about 1 week in the refrigerator or up to 3 months in the freezer when stored in an airtight container. They're actually delicious eaten straight from the freezer!
- → Can I use a different sweetener instead of maple syrup?
- Yes, honey (if not vegan) or agave nectar would work well as substitutes for the maple syrup in the shortbread layer.
- → What kind of dark chocolate is best for the coating?
- For vegan bars, look for dairy-free dark chocolate with at least 70% cacao content. Check the ingredients to ensure it doesn't contain milk solids or other dairy ingredients.