
 Pin it
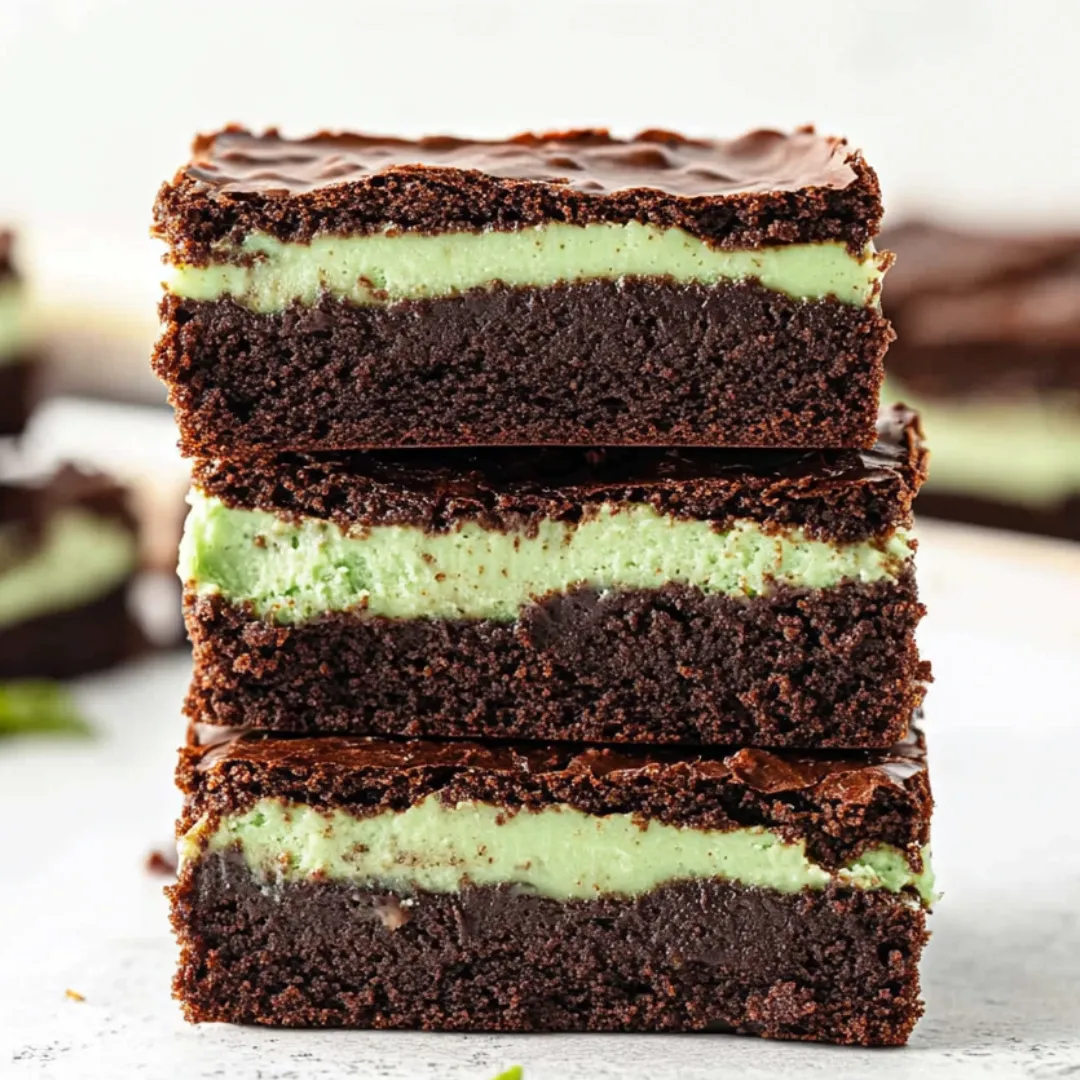
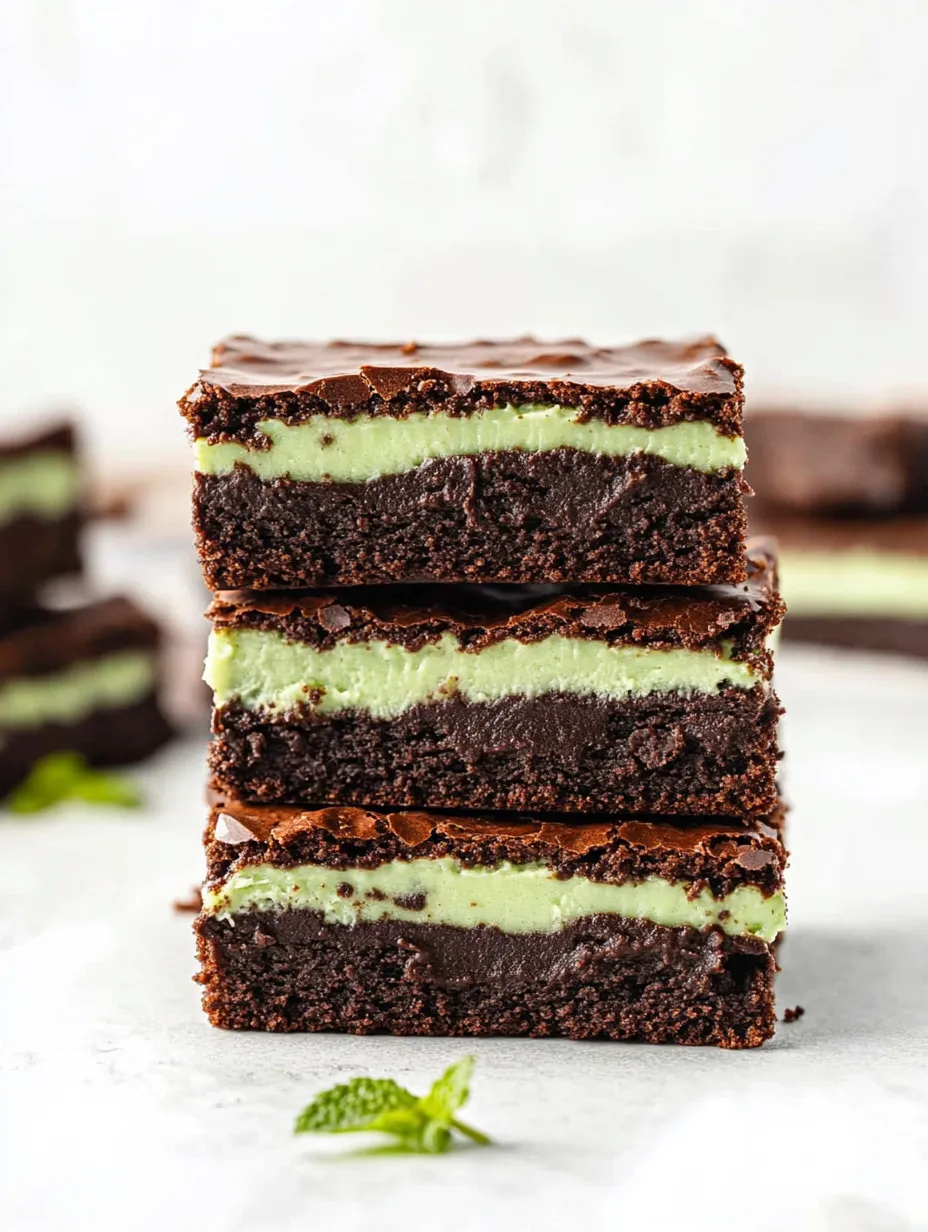
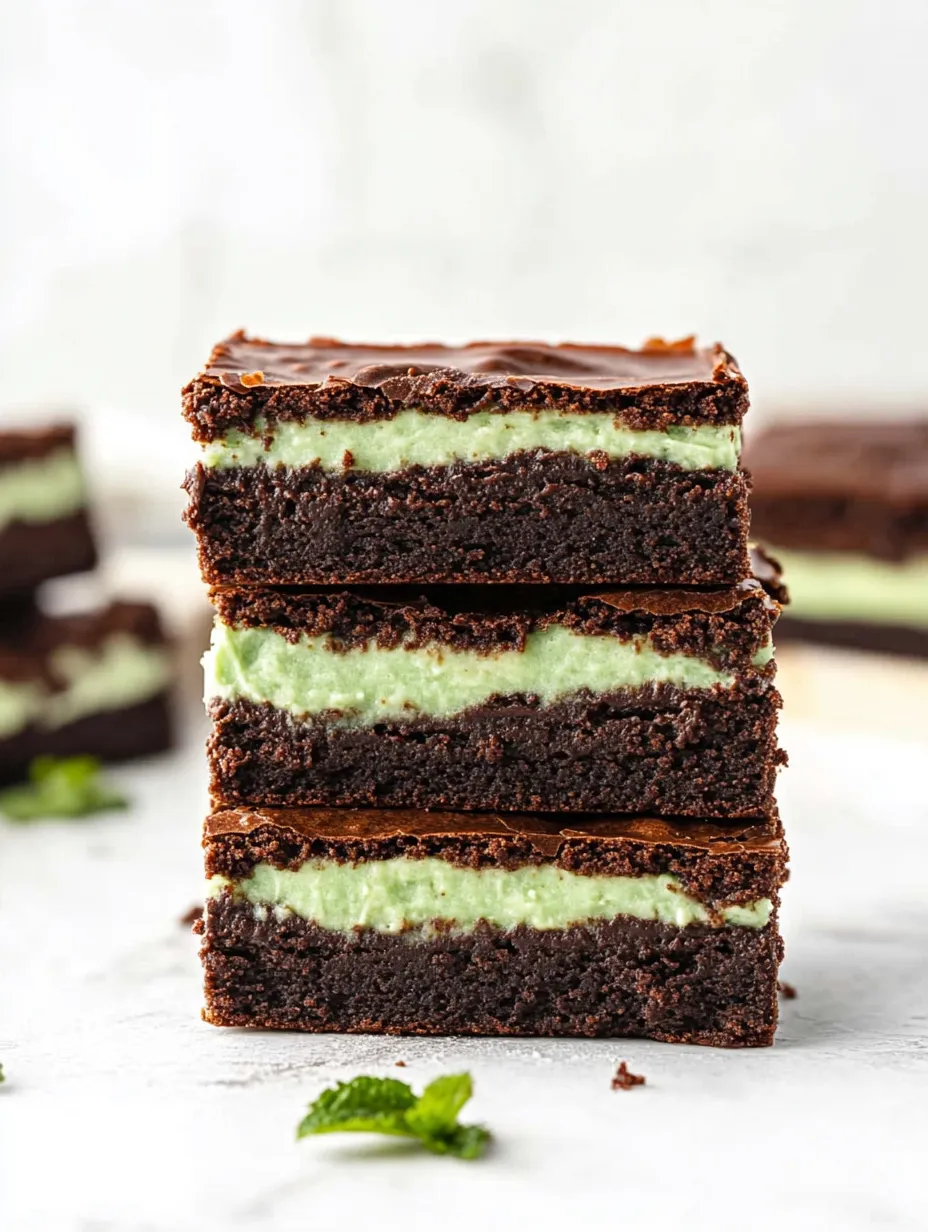
These triple-layer mint brownies transform ordinary chocolate treats into something truly extraordinary. The magic happens in the harmonious stacking of three distinct yet complementary layers—a fudgy, rich chocolate brownie base that provides the perfect foundation; a smooth, creamy mint frosting that delivers refreshing coolness; and a glossy chocolate topping that seals in all that goodness with another hit of deep chocolate flavor. Unlike basic brownies that can be one-dimensional, these bars offer a symphony of textures and temperatures in each bite—the dense chewiness of the brownie, the cool creaminess of the mint layer, and the smooth snap of the chocolate top. The visual impact is just as impressive as the taste, with the emerald green mint layer creating a stunning contrast between the two chocolate components.
I discovered this recipe years ago when looking for something special to bring to a holiday gathering that wouldn't be duplicated by other guests. The first time I made them, conversation at the party actually paused when people took their first bites. Now they're requested for nearly every gathering, and I've had friends text me from the grocery store for the ingredient list so they can make them immediately after trying them at my home. That's how irresistible these layered treats truly are.
Essential Ingredients
- Unsalted Butter: Creates the backbone of richness throughout all three layers. Using unsalted allows precise control over the salt content in each component. Room temperature butter is crucial for the mint layer while melted butter works in the brownie and top layers. The fat content in European-style butter (higher butterfat percentage) creates an even more luxurious result if available.
- Semi-Sweet Chocolate: Provides deep chocolate flavor without overwhelming sweetness. Look for bars with 50-60% cacao for the perfect balance in both the brownie base and chocolate topping. Avoid chocolate chips for the brownie layer as they contain stabilizers that affect melting quality, though they work fine in the topping.
- Cocoa Powder: Intensifies the chocolate flavor in the brownie layer without adding additional sweetness or fat. Dutch-processed cocoa offers a smoother, less acidic flavor, while natural cocoa provides more fruity notes. Either works well, but don't substitute one for the other as they react differently with leavening agents.
- All-Purpose Flour: Creates structure while still allowing for fudginess. Measuring precisely is crucial—too much flour results in cakey brownies, too little creates gooey, underbaked results. For best results, weigh the flour or use the spoon-and-level method for accuracy.
- Peppermint Extract: The star flavoring that transforms these from chocolate brownies to mint chocolate masterpieces. Pure extract rather than artificial flavoring provides a cleaner, more natural mint taste. The amount can be adjusted to your preference, but start conservatively as it's potent.
- Green Food Coloring: While technically optional, the visual impact of the green layer creates much of these brownies' appeal. Gel food coloring provides vibrant color without adding excess liquid that could affect the frosting consistency.
 Pin it
Step-by-Step Cooking Instructions
- Prepare Your Baking Environment:
- Position an oven rack in the center position and preheat to 350°F (175°C). This moderate temperature allows the brownies to bake evenly without drying out the edges before the center is done. Line a 9×13 inch baking pan with parchment paper, leaving an overhang on at least two sides to create handles for easy removal later. The parchment prevents sticking and makes transferring the finished brownies to a cutting board simple. Take care to press the parchment into the corners of the pan to prevent batter from seeping underneath.
- Create the Brownie Base:
- In a large, microwave-safe bowl, combine 1 cup (226g) unsalted butter and 4 ounces (112g) semi-sweet chocolate, broken into pieces. Microwave in 30-second intervals at medium power (not high), stirring between each interval until completely smooth. This gentle melting prevents the chocolate from seizing or burning. Allow this mixture to cool slightly—about 5 minutes—before adding 2 cups (400g) sugar and whisking until well combined. The cooling step prevents the eggs from cooking when added. Whisk in 4 room-temperature eggs, one at a time, until fully incorporated. The room temperature eggs maintain the batter's temperature and incorporate more smoothly than cold eggs.
- Complete the Brownie Batter:
- Sift together 1/4 cup (22g) cocoa powder, 1 cup (125g) all-purpose flour, and 1/2 teaspoon salt directly into the wet ingredients. Sifting eliminates lumps and aerates the dry ingredients for proper incorporation. Using a whisk or rubber spatula, gently fold the dry ingredients into the wet until just combined and no flour streaks remain. Avoid overmixing, which develops gluten and results in tough brownies rather than fudgy ones. Pour the batter into your prepared pan, using a spatula to spread it evenly into the corners and create a level surface.
- Bake to Perfection:
- Place the pan in the preheated oven and bake for 25-30 minutes. The brownies are done when the top appears set and an inserted toothpick comes out with a few moist crumbs but no wet batter. Avoid overbaking—these brownies will continue to set as they cool, and slightly underbaked is better than overbaked for a fudgy texture. Place the pan on a wire rack and allow the brownies to cool completely in the pan. This cooling period is crucial—attempting to add the mint layer to warm brownies will result in a melted, uneven frosting.
- Prepare the Mint Frosting:
- Once the brownies are completely cool (allow at least 2 hours or speed the process by placing in the refrigerator after the first hour), prepare the mint layer. In a medium bowl, beat 1/2 cup (112g) softened unsalted butter until creamy and smooth. Add 1 1/2 teaspoons peppermint extract, 2-4 drops of green food coloring (depending on your color preference), and 1/4 teaspoon salt. Beat until well combined and evenly colored. Gradually add 2 cups (220g) powdered sugar, beating on low speed initially to prevent a sugar cloud, then increasing to medium speed until incorporated. If the frosting seems too thick, add 1-2 tablespoons of heavy cream, one teaspoon at a time, until you reach a spreadable consistency that holds its shape. The frosting should be thick enough to spread in a defined layer without being so stiff it tears the brownie surface.
- Add the Mint Layer:
- Using an offset spatula, spread the mint frosting in an even layer over the cooled brownies. The layer will seem thin—this is intentional, as a thick layer of frosting would overwhelm the brownie base and chocolate topping. Work carefully to create an even layer with a smooth surface. Place the pan in the refrigerator for at least 20 minutes, or until the frosting is firm to the touch. This chilling step ensures the mint layer won't melt or mix with the warm chocolate topping in the next step.
- Create the Chocolate Topping:
- In a medium, microwave-safe bowl, combine 6 ounces (170g) semi-sweet chocolate chips or chopped chocolate with 1/2 cup (112g) unsalted butter. Microwave in 30-second intervals at medium power, stirring between each interval until completely smooth. Allow the mixture to cool for about 5 minutes—it should still be fluid but not hot enough to melt the mint layer. Pour the chocolate mixture over the chilled mint layer, working quickly to spread it into an even layer before it begins to set. Tilt the pan gently if needed to help the chocolate reach the corners.
- Set and Slice:
- Return the pan to the refrigerator and chill for at least 1 hour, or until the chocolate topping is completely set. Using the parchment paper handles, lift the entire brownie slab out of the pan and transfer to a cutting board. Allow to sit at room temperature for about 10 minutes before cutting—this prevents the chocolate top from cracking during slicing. With a large, sharp knife, cut into squares or rectangles as desired, wiping the knife clean between cuts for the cleanest result. For the most precise cuts, dip your knife in hot water and dry it between slices.
The Art of Layering Brownies
My first attempt at these brownies taught me an important lesson about patience. Eager to taste them, I rushed the cooling process and attempted to add the mint layer while the brownies were still warm. The result was a messy, partially melted green frosting that swirled unattractively into the brownie base. Now I make these a day ahead, not just for convenience but because the overnight rest in the refrigerator actually improves both the flavor and texture. The mint becomes more pronounced yet mellower, and the three layers achieve the perfect firmness while still maintaining their distinct characteristics.
My first attempt at these brownies taught me an important lesson about patience. Eager to taste them, I rushed the cooling process and attempted to add the mint layer while the brownies were still warm. The result was a messy, partially melted green frosting that swirled unattractively into the brownie base. Now I make these a day ahead, not just for convenience but because the overnight rest in the refrigerator actually improves both the flavor and texture. The mint becomes more pronounced yet mellower, and the three layers achieve the perfect firmness while still maintaining their distinct characteristics.
Perfect Occasion Pairings
These mint brownies transition beautifully through the seasons, though they have particular appeal during certain times of year. For winter holidays, they make a sophisticated addition to cookie exchanges and dessert tables, their green layer offering festive color without being overly themed. During summer months, the cool mint provides refreshing contrast to seasonal warmth. For St. Patrick's Day celebrations, they're an obvious choice that's more refined than green beer and artificially colored baked goods. At baby or bridal showers, their elegant appearance elevates the dessert offering beyond ordinary sweets.
Variation Possibilities
While the classic recipe creates perfect mint chocolate brownies, subtle variations can customize them for different occasions or preferences. For a holiday twist, crush candy canes and sprinkle them over the chocolate topping before it sets completely. Those who prefer a more subtle mint flavor can reduce the peppermint extract to 1 teaspoon, while mint enthusiasts might increase it to a full 2 teaspoons. For textural contrast, consider adding a thin layer of chopped Andes mints between the brownie and mint layers. Those who enjoy nuts in brownies can add 1/2 cup of finely chopped walnuts to the brownie batter without compromising the structural integrity needed for the layering.
Troubleshooting Tips
Even careful bakers occasionally encounter challenges with layered desserts. If your brownie layer seems too crumbly, it may have been overbaked—next time, reduce the baking time by 2-3 minutes. Should your mint frosting appear grainy, the butter likely wasn't soft enough before beating; allow butter to sit at room temperature for at least 30 minutes before making the frosting. For chocolate topping that cracks during cutting, ensure you're allowing the brownies to sit at room temperature for 10-15 minutes before slicing, and always use a hot knife. If the mint layer seems to disappear into the chocolate topping, your chocolate was too hot when poured—next time, allow it to cool longer before adding to the mint layer.
 Pin it
Make-Ahead and Storage
The complex layers of these brownies actually make them ideal for advance preparation. The complete brownies can be refrigerated, tightly covered, for up to 5 days with excellent results. For longer storage, cut the brownies into individual squares, wrap each tightly in plastic wrap, then place in a freezer-safe container for up to 3 months. Thaw frozen brownies overnight in the refrigerator while still wrapped to prevent condensation from forming on the chocolate top. For gifting purposes, place individual brownies in mini cupcake liners inside a decorative tin or box—they hold their shape and appearance beautifully, making them perfect for sharing.
I've been making these triple-layer mint brownies for over a decade now, and they never fail to impress. There's something magical about the way the three components work together—the dense fudginess of the brownie, the cool creaminess of the mint layer, and the smooth richness of the chocolate topping. What began as a holiday specialty has become my signature dessert year-round, requested for birthdays, potlucks, and 'just because' moments when something truly special is called for. While they require a bit more effort than your average brownie, the 'wow' factor is absolutely worth it. When people take that first bite and their eyes widen in appreciation, you'll understand why these have earned permanent status in my baking repertoire.
Frequently Asked Questions
- → Can I make these without mint?
- Yes! Skip the mint extract and food coloring in the middle layer for classic chocolate frosted brownies.
- → How do I get clean cuts?
- Use a sharp knife wiped clean between each cut. For extra neat slices, dip the knife in hot water, then dry before cutting.
- → Can I freeze these brownies?
- Absolutely! Wrap tightly and freeze for up to 2 months. Thaw in the refrigerator overnight before serving.
- → Why do my brownies need to cool before adding frosting?
- Hot brownies will melt the frosting, making it impossible to spread evenly and creating a messy middle layer.
- → Can I use a brownie mix instead?
- Yes, you can use a 9x13 family-size brownie mix for the base layer if you're short on time.