
 Pin it
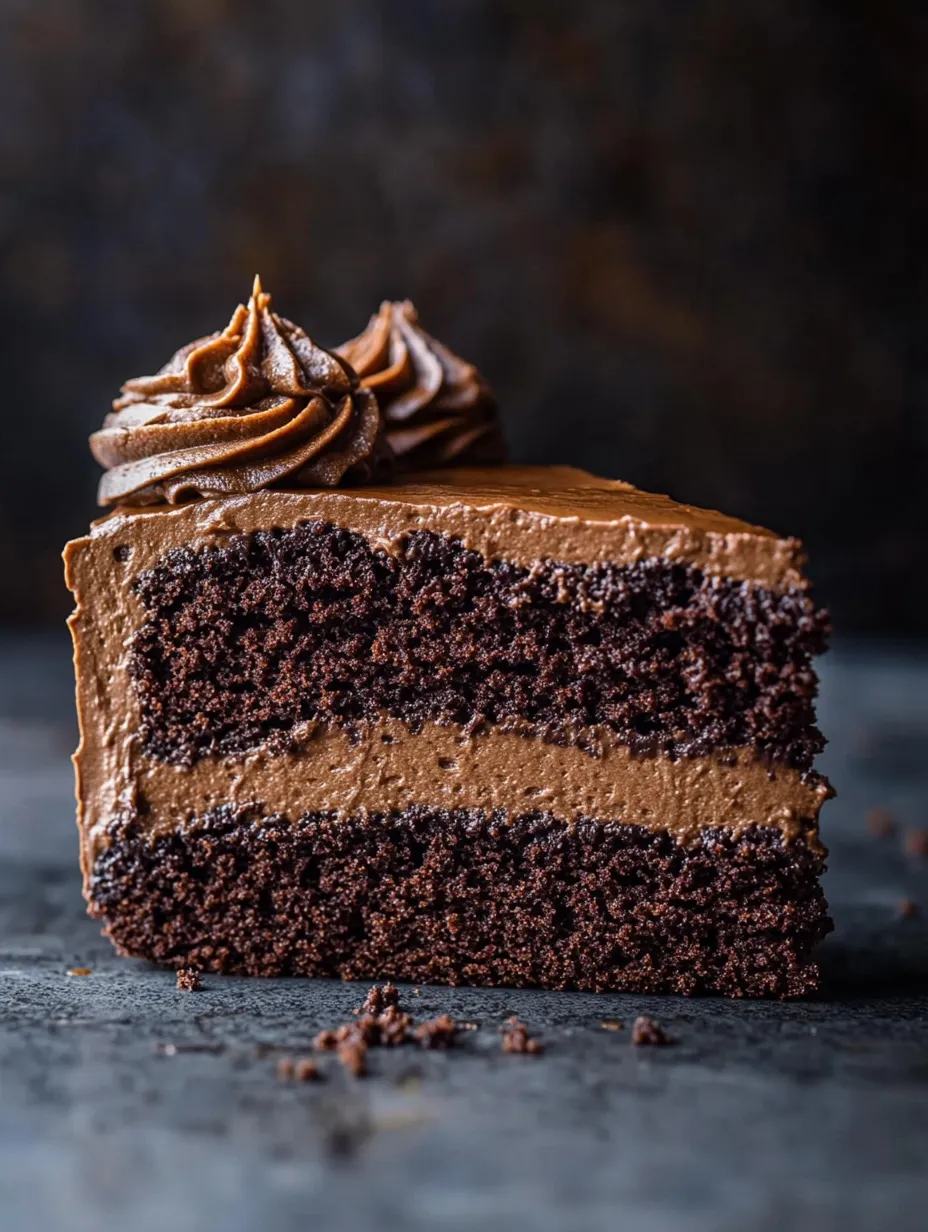
This decadent chocolate cake delivers an explosion of rich chocolate flavor in every bite. The incredibly moist cake layers pair perfectly with a velvety chocolate buttercream frosting that's simply irresistible. What makes this cake truly legendary is the perfect balance of sweetness and chocolate intensity - it satisfies your chocolate craving without being overpowering. Whether you're celebrating a special occasion or simply indulging your sweet tooth, this showstopper dessert never disappoints.
I first made this cake for my daughter's birthday five years ago, and now it's requested for nearly every family celebration. Last Christmas, my normally stoic father-in-law took one bite and declared it the best chocolate cake he'd ever tasted - high praise from someone who rarely comments on food! The first time you slice into it and see that perfect crumb texture, you'll understand why it's earned its legendary status in my family.
Ingredients You'll Need
- 1 cup granulated sugar: Provides the primary sweetness and helps create a tender crumb structure in the cake
- 1/2 cup light brown sugar, packed: Adds moisture and a subtle depth that white sugar alone can't provide
- 1 3/4 cups all-purpose flour: The foundation of the cake; measure by spooning into measuring cups and leveling for accuracy
- 3/4 cup unsweetened cocoa powder: Use natural cocoa powder (not Dutch-processed) for the right chemical reaction with the leavening agents
- 1 1/2 teaspoons baking powder: Provides the initial lift that helps create a light texture
- 1 1/2 teaspoons baking soda: Works with the acidic ingredients to create rise and an even crumb structure
- 1 teaspoon salt: Enhances the chocolate flavor and balances sweetness
- 2 large eggs plus 1 egg yolk, room temperature: Provide structure, richness, and help bind the ingredients together
- 1/2 cup sour cream, room temperature: The secret to incredible moisture that lasts for days
- 1/2 cup whole milk, room temperature: Creates a tender crumb when combined with the other wet ingredients
- 1/2 cup vegetable or canola oil: Ensures the cake stays moist longer than butter alone would allow
- 2 teaspoons vanilla extract: Enhances the chocolate flavor with its warm aromatic notes
- 1 cup hot coffee (or boiling water): Blooms the cocoa powder, intensifying the chocolate flavor dramatically
- 8 ounces semi-sweet or bittersweet chocolate, chopped: The star of the buttercream frosting, providing deep chocolate flavor
- 1 1/2 cups unsalted butter, softened to room temperature: Creates the creamy base for the buttercream
- 3 cups confectioners' sugar, sifted: Sweetens the frosting while contributing to its smooth texture
- Chocolate sprinkles (optional): Add a fun decorative touch and subtle textural contrast
 Pin it
Step-by-Step Cooking Instructions
- Prepare Your Baking Space:
- Position an oven rack in the center position and preheat your oven to 350°F (175°C). This temperature is crucial for proper rise and texture development. While the oven heats, prepare two 9-inch round cake pans by spraying them generously with non-stick baking spray. For easy removal, cut parchment paper circles to fit the bottoms of your pans, press them in place, and spray again. This double insurance prevents any sticking and heartbreak when removing your beautiful cake layers.
- Mix the Dry Ingredients:
- In a large mixing bowl, whisk together granulated sugar, light brown sugar, flour, cocoa powder, baking powder, baking soda, and salt. Spend at least 30 seconds thoroughly combining these ingredients to ensure even distribution of the leavening agents. This prevents any pockets of bitterness or uneven rising. The mixture should be a uniform light brown color with no visible streaks of cocoa or white flour remaining.
- Combine the Wet Ingredients:
- In a separate medium bowl, whisk the eggs, egg yolk, sour cream, milk, oil, and vanilla extract until completely blended. The mixture should be smooth and have a consistent pale yellow color. The room temperature ingredients are crucial here – cold ingredients won't incorporate properly and can cause the batter to separate or the cake to bake unevenly.
- Create Your Cake Batter:
- Pour the wet ingredient mixture into the bowl with the dry ingredients. Using a rubber spatula, gently fold the mixtures together until just combined with a few streaks of flour still visible. Don't overmix at this stage as it can develop too much gluten, resulting in a tough cake. Now comes the magic: slowly pour in the hot coffee (or hot water), stirring continuously. The batter will thin considerably – this is exactly what you want! The hot liquid blooms the cocoa powder, intensifying the chocolate flavor and creating a silky-smooth batter.
- Bake to Perfection:
- Divide the batter evenly between your prepared cake pans. Gently tap each pan on the counter a few times to release any large air bubbles. Place both pans on the center rack of your preheated oven and bake for 26-30 minutes. The cakes are done when a toothpick inserted into the center comes out clean or with just a few moist crumbs attached. Resist the urge to open the oven door before the 25-minute mark, as temperature fluctuations can cause uneven rising.
- Cool Properly:
- Allow the cakes to cool in their pans for exactly 10 minutes – any less and they might fall apart, any more and they could stick. Run a butter knife around the edges to loosen, then carefully invert onto cooling racks. Gently peel off the parchment paper and allow the cakes to cool completely before frosting. This cooling period is non-negotiable – frosting warm cakes will result in melted frosting and sliding layers.
- Prepare the Chocolate Buttercream:
- While the cakes cool, melt the chopped chocolate in a heatproof bowl over simmering water (double-boiler method) or in 30-second increments in the microwave, stirring between each interval. Allow the melted chocolate to cool until just barely warm to the touch. In a large bowl using a hand mixer or in the bowl of a stand mixer fitted with the paddle attachment, beat the softened butter on medium-high speed for 3-4 minutes until pale and fluffy. Gradually add the sifted confectioners' sugar, about 1/2 cup at a time, beating well after each addition and scraping down the sides of the bowl as needed. After all sugar is incorporated, increase speed to medium-high and beat for an additional 2 minutes until light and fluffy. Add the vanilla extract and cooled melted chocolate, then beat on medium speed until completely incorporated and silky smooth.
- Assemble Your Masterpiece:
- Place one cake layer on a serving plate or cake stand. If needed, use a serrated knife to level the top of the cake for a flat surface. Spread about 1 cup of the chocolate buttercream evenly over this first layer. Top with the second cake layer, flat side up. Use the remaining frosting to cover the top and sides of the cake. For a rustic look, create swirls with the back of a spoon; for a smoother finish, use a bench scraper or offset spatula. If desired, decorate with chocolate sprinkles while the frosting is still soft so they adhere properly.
My husband always questioned my insistence on using coffee in chocolate cake until I did a side-by-side comparison for him. The coffee-enhanced version had noticeably deeper flavor and remained moist longer. Now he's the one reminding me not to skip this crucial ingredient! I've found that dark roast coffee works best, but in a pinch, even instant coffee dissolved in hot water makes a significant difference compared to plain water.
Chocolate Selection Matters
The quality of chocolate you choose dramatically impacts the final taste of your buttercream. I've experimented with everything from premium chocolate bars to standard baking chips, and there's a noticeable difference. For everyday occasions, a good quality semi-sweet chocolate like Ghirardelli works beautifully. For special celebrations, splurging on Valrhona or Callebaut transforms the frosting into something truly extraordinary. The percentage of cacao is also important - anything between 55-70% offers the perfect balance of sweetness and chocolate intensity.
Make-Ahead Magic
This cake actually benefits from being made in stages. The cake layers can be baked up to two days ahead and stored, tightly wrapped in plastic, at room temperature. They'll remain perfectly moist thanks to the oil in the recipe. For longer storage, freeze the cooled layers for up to two months. The buttercream is best made within 24 hours of serving, though once the cake is assembled, it keeps beautifully for up to three days in a cake keeper at room temperature, or up to a week refrigerated (though the texture is best when served at room temperature).
Serving Suggestions
While this cake is certainly perfect on its own, pairing it with the right accompaniments elevates the experience even further. A scoop of vanilla bean ice cream provides wonderful temperature and flavor contrast. Fresh raspberries or strawberries add a bright, acidic note that cuts through the richness. For an adults-only dessert, a shot of espresso or small glass of port wine complements the deep chocolate flavors beautifully.
 Pin it
Troubleshooting Tips
Even experienced bakers occasionally encounter issues. If your cake layers sink in the middle, your leavening agents might be expired, or your oven temperature might be inaccurate (an inexpensive oven thermometer is worth its weight in gold). If your frosting seems too stiff, add a tablespoon of cream or milk; if it's too soft, refrigerate for 15-20 minutes before proceeding. Remember that environmental factors like humidity can affect your results, so don't be afraid to make adjustments as needed.
I've made this cake more times than I can count, and it never fails to bring joy to whoever takes a bite. There's something about the perfect balance of moisture, chocolate intensity, and just-right sweetness that makes people close their eyes and savor the moment. What I love most is how it brings people together - conversations pause, phones get put down, and everyone is present in the simple pleasure of enjoying something truly delicious. Even in our busy household, this cake has the power to create a moment of shared happiness that lingers long after the last crumb is gone.
Frequently Asked Questions
- → Can I make this cake without coffee?
- Yes, you can substitute hot water for coffee. The coffee enhances the chocolate flavor without making the cake taste like coffee, but hot water works fine if you prefer to avoid caffeine.
- → Can I make this cake in advance?
- Absolutely! You can bake the cake layers up to 2 days ahead and store them tightly wrapped at room temperature. The frosting can be made 1 day ahead and refrigerated. Bring to room temperature before using.
- → Why is my cake dry?
- The most common reasons are overbaking or inaccurate measurements. Use the toothpick test and remove the cake when a few moist crumbs still cling to it. Also, measuring flour by weight rather than volume gives more consistent results.
- → Can I turn this into cupcakes?
- Yes! This recipe will make about 24-30 cupcakes. Fill liners 2/3 full and bake at 350°F for 18-20 minutes. The frosting recipe will be enough for all the cupcakes.
- → How do I store leftover cake?
- Store covered in the refrigerator for up to 5 days. Let slices come to room temperature before serving for best flavor and texture. You can also freeze individual slices, well-wrapped, for up to 2 months.