
 Pin it
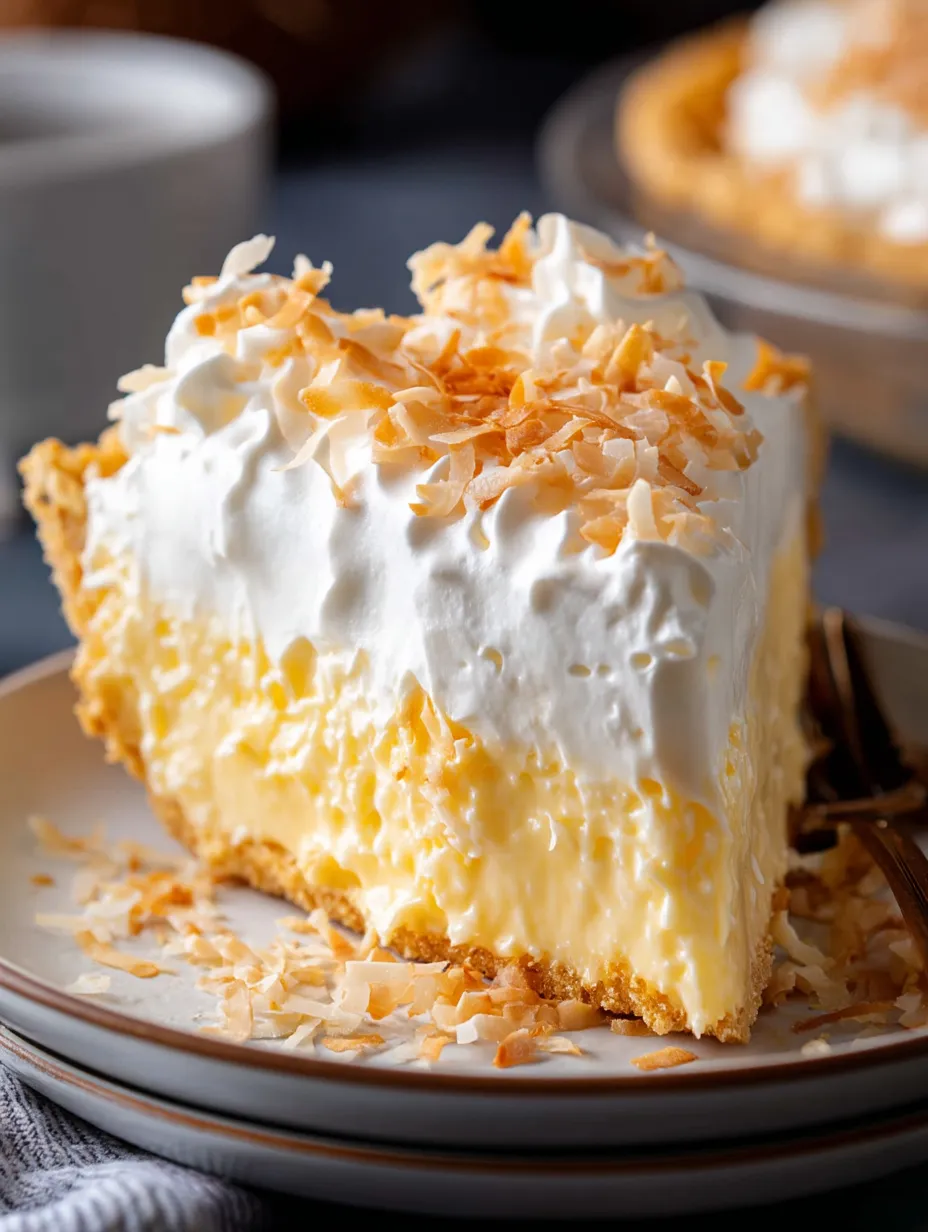
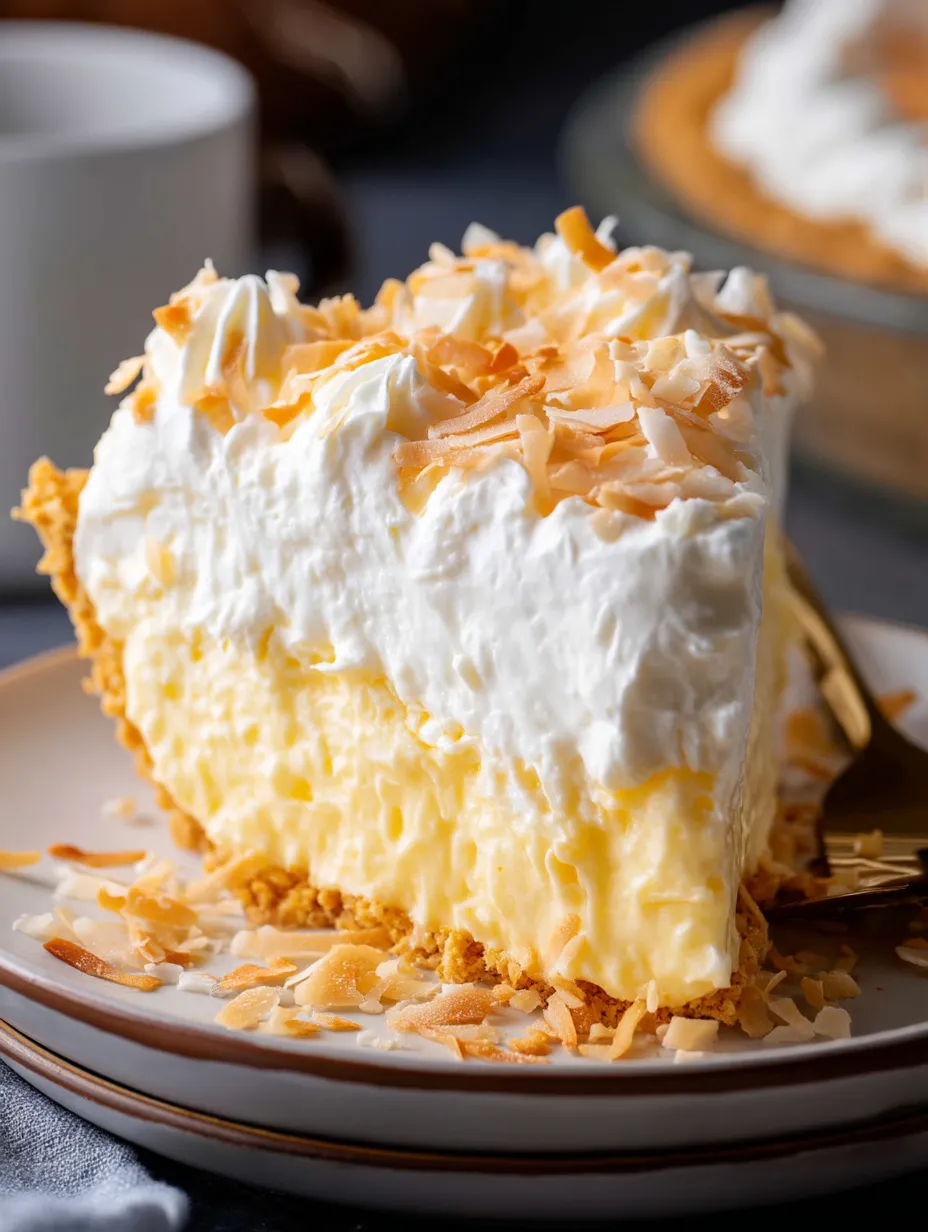
This luxurious No Bake Coconut Cream Pie delivers tropical indulgence without ever turning on your oven. The velvety coconut filling, reminiscent of island getaways, sits atop a buttery graham cracker crust that provides the perfect contrasting crunch. Crowned with pillowy whipped cream and a scattering of toasted coconut, each slice offers multiple layers of texture and flavor that build on the coconut theme without becoming overwhelming. Perfect for warm weather entertaining or anytime you crave something special without the fuss, this pie proves that impressive desserts don't require complicated techniques or hours in the kitchen.
I first created this recipe during a particularly brutal summer heatwave when the thought of turning on my oven felt like torture. With family coming for dinner and a promise of dessert already made, I needed something special that wouldn't raise the kitchen temperature another degree. This pie was born of necessity but quickly became one of my most requested recipes. When I served it that evening, my brother-in-law—who typically passes on dessert—asked for seconds and then requested I make it for his birthday the following month. What began as a heat-wave solution has become my signature dessert, especially during summer gatherings when its cool, creamy texture is particularly refreshing. I've even converted several "I don't like coconut" skeptics with this pie, as the flavor is present but perfectly balanced rather than overwhelming.
Ingredients
- 1½ cups graham cracker crumbs (about 10 full crackers): Creates the sturdy, sweet base. Look for fresh, crisp crackers without any staleness. When crushed, they should have a uniform, sand-like texture without large chunks for the most even crust.
- ⅓ cup unsalted butter, melted: Binds the crust together while adding rich flavor. European-style butter with higher fat content produces an even more flavorful result. The butter should be completely melted but not hot when mixed with the crumbs.
- 2 tablespoons granulated sugar: Sweetens the crust slightly without making it cloying. Fine granulated sugar distributes most evenly throughout the crumbs. This small amount enhances the graham flavor while helping the crust hold together.
- 1 can (13.5 oz) full-fat coconut milk: Provides the rich, creamy base for the filling. Look for coconut milk that's thick and creamy when the can is shaken. The cream should be well-incorporated with the liquid for the smoothest texture.
- 1 package (3.4 oz) instant vanilla pudding mix: Creates structure and helps the filling set properly. The vanilla flavor complements the coconut beautifully. Ensure the package isn't expired for the best setting power.
- 1½ cups sweetened shredded coconut, divided: Delivers authentic coconut flavor and texture. Look for moist, fresh coconut without any dryness or off smells. The sweetened variety balances the filling perfectly, while reserving some for garnish creates visual appeal.
- 1 teaspoon vanilla extract: Enhances and rounds out the coconut flavor. Pure extract rather than imitation offers the most complex notes. The vanilla should have a rich aroma without any alcohol overtones.
- 1½ cups heavy whipping cream: Creates a luxurious topping that balances the rich filling. Look for cream with at least 36% fat content for the best whipping results. The cream should have no off smells and whip to stiff peaks easily.
- ¼ cup powdered sugar: Sweetens the whipped cream topping without making it grainy. Fresh, lump-free sugar incorporates most smoothly. Sift if necessary to ensure a silky-smooth topping.
- ½ teaspoon coconut extract (optional): Intensifies the coconut flavor in the whipped topping. A little goes a long way, so measure carefully. This addition helps carry the coconut theme through every component of the pie.
 Pin it
Step-by-Step Instructions
- Step 1:
- Prepare the graham cracker crust with precision - Begin by combining 1½ cups graham cracker crumbs, ⅓ cup melted butter, and 2 tablespoons sugar in a medium bowl. Stir with a fork until the mixture resembles wet sand and holds together when pressed between your fingers. The texture should be uniform throughout, with no dry pockets of crumbs. Transfer this mixture to a 9-inch pie plate, using the bottom of a measuring cup to press firmly and evenly across the bottom and about 1½ inches up the sides. Pay special attention to the corners where the bottom meets the sides, ensuring there are no thick spots that could crumble when serving. The pressure you apply is important – too light and the crust will be crumbly; too firm and it becomes dense and hard. The perfect crust has an even thickness of about ¼ inch throughout. Place the prepared crust in the refrigerator to chill and firm up while you make the filling. This cooling time helps the butter solidify, creating a sturdy base that won't become soggy when the filling is added.
- Step 2:
- Toast coconut for enhanced flavor - Preheat a dry skillet over medium-low heat. Add ½ cup of the sweetened shredded coconut to the skillet, reserving the remaining cup for the filling. Stir constantly as the coconut begins to turn golden brown, about 3-5 minutes. This is a process that requires attention – coconut can go from perfectly toasted to burnt in seconds, so don't step away from the stove. You're looking for a range of colors from light gold to deeper amber, which creates the most complex flavor. Once most of the coconut has taken on a golden hue, immediately transfer it to a plate to cool completely. Spread it out in a thin layer to stop the cooking process. This toasted coconut will be used as the garnish for your finished pie, adding both visual appeal and a wonderful nutty flavor that complements the creamy filling. The contrast between the toasted garnish and the untoasted coconut in the filling creates layers of flavor that make this pie special.
- Step 3:
- Create the coconut filling base - In a large mixing bowl, pour the entire can of coconut milk. If the cream has separated from the liquid, whisk until smooth and fully incorporated. The coconut milk should be at room temperature for the smoothest blending. Add the package of instant vanilla pudding mix and whisk vigorously for about 2 minutes until the mixture begins to thicken. You'll notice the texture change from liquid to a soft pudding consistency. Make sure there are no dry pockets of pudding mix hiding in the bowl, as these would create lumps in your finished pie. The pudding mix not only thickens the filling but also stabilizes it, allowing for clean slices when the pie is served. This quick-setting action is what makes this no-bake pie possible.
- Step 4:
- Incorporate coconut and flavor enhancers - Add 1 cup of the untoasted shredded coconut and the teaspoon of vanilla extract to the pudding mixture. Fold these ingredients in gently using a rubber spatula, making sure the coconut is evenly distributed throughout the filling. The folding motion – down through the middle, across the bottom, and up the side of the bowl – preserves the thickening that has already occurred while incorporating the new ingredients. The shredded coconut adds texture to what would otherwise be a completely smooth filling, creating interest in each bite. The vanilla extract enhances the natural sweetness of the coconut while adding depth to the overall flavor profile. Continue folding until everything is well combined but avoid overmixing, which could break down the structure created by the pudding mix.
- Step 5:
- Transfer the filling with care - Remove the chilled graham cracker crust from the refrigerator. The crust should feel firm to the touch, indicating the butter has solidified. Pour the coconut filling into the prepared crust, using a spatula to spread it into an even layer that reaches the edges of the crust. Smooth the top as much as possible for the most professional appearance. If any filling gets on the upper edges of the crust or the rim of the pie plate, clean it away with a damp paper towel for the neatest presentation. The filling should come nearly to the top of the crust but leave enough room for the whipped cream topping that will be added later. Once the filling is evenly distributed, cover the pie loosely with plastic wrap, being careful not to let the wrap touch the surface of the filling, which could mar its smooth appearance.
- Step 6:
- Chill thoroughly for proper setting - Place the assembled pie in the refrigerator and chill for at least 4 hours, though overnight is ideal for the best texture and flavor development. This extended chilling time allows the filling to set completely and the flavors to meld together. The pie needs to be thoroughly chilled all the way to the center for proper slicing – rushing this step will result in a filling that's too soft and slices that don't hold their shape. During this time, the coconut in the filling softens slightly as it absorbs moisture from the pudding mixture, creating a more unified texture. The graham cracker crust also benefits from this resting period, as it firms up without becoming soggy, striking the perfect balance between crunch and tenderness.
- Step 7:
- Prepare the whipped cream topping - About 30 minutes before serving, begin preparing the whipped cream topping. Place a large mixing bowl and beaters in the freezer for about 10 minutes first – cold equipment helps achieve the best volume in whipped cream. Pour the cold heavy whipping cream into the chilled bowl and begin beating on medium speed. Once the cream starts to thicken slightly, gradually add the powdered sugar and the optional coconut extract if using. Increase the speed to medium-high and continue beating until stiff peaks form – when you lift the beaters, the cream should hold its shape without drooping. Be careful not to overbeat, which can turn the cream grainy or even begin to separate into butter. The perfect whipped cream has a glossy appearance and a luxurious, smooth texture that holds peaks without being too rigid.
- Step 8:
- Apply the topping artistically - Remove the chilled pie from the refrigerator. The filling should be completely set, with no jiggle when gently shaken. Spoon the whipped cream onto the center of the pie, then use an offset spatula or the back of a spoon to spread it toward the edges in a decorative pattern. You can create swirls, peaks, or a smooth finish – each gives the pie a different but equally appealing appearance. Leave a small border of the coconut filling visible around the edge for the most attractive presentation, allowing the layers to be seen. The whipped cream should be generous enough to create a substantial layer but not so thick that it overwhelms the coconut filling, which remains the star of this dessert. The cream adds both visual appeal and a lighter textural component that balances the denseness of the filling.
- Step 9:
- Add the finishing touches - Sprinkle the reserved toasted coconut over the whipped cream topping, distributing it evenly for the most attractive presentation. The golden color of the toasted coconut creates beautiful contrast against the white whipped cream, immediately signaling the flavor of the pie to anyone who sees it. This garnish also adds a subtle crunch that contrasts with the creamy components, creating another layer of textural interest. For an even more special presentation, you can arrange the toasted coconut in a pattern – perhaps a ring around the edge or a central mound – rather than scattering it randomly. This final touch transforms a simple pie into something that looks professionally crafted.
- Step 10:
- Serve at the perfect temperature - For the best flavor and texture, allow the garnished pie to sit in the refrigerator for about 15-30 minutes before serving. This brief rest allows the toasted coconut to slightly soften where it contacts the whipped cream, preventing it from falling off when sliced. When ready to serve, use a sharp knife dipped in hot water and wiped dry between cuts to create the cleanest slices. The pie should be served cold but not freezing – about 15 minutes at room temperature after removing from the refrigerator allows the flavors to bloom fully on the palate. Each slice should show distinct layers of crust, coconut filling, and whipped cream topping, crowned with the toasted coconut garnish. The contrast of textures and the graduated flavors of coconut from mild to intense create a dessert experience that's far greater than the sum of its simple parts.
The finished pie should showcase a perfect balance of textures and flavors: the crunchy graham cracker crust providing a sturdy base, the creamy coconut filling offering rich tropical flavor, and the cloud-like whipped cream topping adding lightness, all crowned with the nutty crunch of toasted coconut.
Perfect for Warm Weather Entertaining
What makes this No Bake Coconut Cream Pie particularly special is how it solves the perennial problem of summer entertaining. When temperatures soar, the last thing anyone wants is to heat up the kitchen with a hot oven, yet we still crave impressive desserts for gatherings with friends and family.
I discovered the true value of this recipe during a Fourth of July gathering at our lakeside cottage. With temperatures hovering near 90 degrees and the small kitchen already warm from food preparation, turning on the oven was simply not an option. This pie saved the celebration, coming together quickly in the morning and chilling while we enjoyed a day of swimming and boating. When served after the evening barbecue, its cool, creamy texture was the perfect counterpoint to the hot day and grilled meal.
What's particularly wonderful about this dessert for entertaining is how it can be completely prepared a day in advance, freeing you to focus on other aspects of hosting. The flavors actually improve with an overnight rest in the refrigerator, as the coconut fully infuses the filling and the crust reaches that perfect balance between crisp and tender. When guests arrive, you have a stunning dessert ready to go with no last-minute preparation beyond perhaps adding the final toasted coconut garnish.
The tropical flavors also make this pie perfect for themed gatherings. For summer luaus or pool parties, I sometimes add a garnish of small paper umbrellas or edible hibiscus flowers. During holiday seasons, a ring of strawberry slices around the edge adds festive color while complementing the coconut flavor beautifully.
Versatile Serving Options
One of the aspects I love most about this pie is its versatility in terms of presentation and serving options, allowing it to transition seamlessly from casual family dessert to elegant dinner party finale.
For everyday family enjoyment, I often serve the pie simply, with perhaps a light dusting of additional toasted coconut or a sprinkle of chocolate shavings. A bowl of fresh berries on the side allows family members to customize their serving according to preference. My husband particularly enjoys adding fresh raspberries, while my daughter prefers sliced strawberries—the slight acidity of the berries provides a wonderful contrast to the sweetness of the pie.
When entertaining guests for more formal occasions, I elevate the presentation by serving individual slices on chilled dessert plates, accompanied by a small scoop of mango sorbet and a mint sprig garnish. The vibrant orange of the sorbet against the white and golden tones of the pie creates a stunning visual, while the tangy mango flavor complements the coconut beautifully. Sometimes I'll add a light drizzle of raspberry coulis across the plate for additional color and flavor contrast.
For tropical-themed gatherings or summer parties, I transform the dessert into a dessert bar experience, serving the basic pie alongside bowls of various toppings—fresh pineapple chunks, toasted macadamia nuts, chocolate shavings, and different fruit sauces. Guests enjoy creating their own custom combinations, and the interactive nature of the dessert becomes a conversation starter.
During holiday seasons, particularly Christmas, I've developed a festive variation by adding a thin layer of cranberry sauce between the crust and filling. The tart cranberry creates a beautiful ruby layer visible when the pie is sliced, and the flavor provides a wonderful contrast to the sweet coconut. A garnish of sugared cranberries and mint leaves transforms this summer favorite into a holiday-worthy dessert.
I learned about the importance of using full-fat coconut milk through a memorable kitchen disaster. Trying to create a lighter version of this pie for a diet-conscious friend, I substituted light coconut milk in the filling. After the recommended chilling time, I went to slice and serve the pie only to discover a filling with the consistency of soup that ran across the plates when cut. We ended up serving it in bowls with spoons, jokingly calling it "deconstructed coconut cream pie." While still delicious, it lacked the impressive presentation and proper texture that makes this dessert special. Now I always emphasize that the full-fat coconut milk is essential for the chemical reaction with the pudding mix that creates the proper set. For those concerned about calories, I suggest smaller slices rather than ingredient substitutions that compromise the fundamental structure of the dessert.
 Pin it
Creative Variations To Consider
While the classic version of this No Bake Coconut Cream Pie is perfect as is, I've developed several variations over the years that offer delightful twists for different occasions and preferences.
For chocolate lovers, I sometimes create a chocolate-coconut version by adding 2 tablespoons of cocoa powder to the graham cracker crust mixture and substituting chocolate pudding mix for the vanilla. The chocolate and coconut flavors complement each other beautifully, reminiscent of a popular candy bar. I finish this variation with chocolate shavings mixed with the toasted coconut on top for an even more decadent presentation.
During summer months when fresh limes are abundant, I enjoy creating a coconut-lime version by adding 1 tablespoon of lime zest and 2 tablespoons of fresh lime juice to the filling mixture. The bright citrus notes cut through the richness of the coconut, creating a refreshing variation that's perfect after spicy meals. I garnish this version with thin lime slices in addition to the toasted coconut for both flavor and visual appeal.
For those who prefer a more traditional presentation, I occasionally use a vanilla wafer crust instead of graham crackers. The subtle vanilla flavor in the cookies enhances the overall coconut-vanilla profile of the pie. This simple swap creates a noticeably different but equally delicious foundation for the creamy filling.
When serving to guests who enjoy textural contrast, I sometimes add a layer of thinly sliced bananas between the crust and filling. The banana flavor pairs naturally with coconut, and the soft fruit provides yet another textural element to the eating experience. This variation must be served within 24 hours of preparation to prevent the bananas from browning.
For special occasions calling for individual desserts, I adapt this recipe to create mini pies using a muffin tin lined with paper cups. The crust and filling are layered in the same way, but the smaller size creates perfect individual portions ideal for buffets or dessert tables where guests may want to sample multiple offerings.
After years of making this pie for family gatherings, potlucks, and dinner parties, I've come to appreciate the joy that comes from creating something truly delicious with such little effort. There's something deeply satisfying about watching someone close their eyes in pleasure after taking their first bite, knowing that the dessert that brought that moment came together without complicated techniques or hours of preparation.
What I treasure most about this recipe is its ability to evoke memories and create connections. When my neighbor from Hawaii tasted it for the first time, she teared up slightly, saying it reminded her of childhood visits to her grandmother who would make coconut desserts from fresh coconuts they gathered together. Food has this remarkable power to transport us across time and distance, connecting us to people and places we love.
I've shared this recipe countless times, written it on index cards for newlyweds starting their recipe collections, and taught it to my own children as one of their first desserts. Its simplicity makes it accessible to cooks of all skill levels, while its impressive results build confidence in the kitchen. In our world of increasingly complex culinary trends, there's something wonderfully refreshing about a dessert that reminds us that sometimes the most satisfying things come from simplicity, quality ingredients, and a little patience as we wait for it to chill to perfection.
Frequently Asked Questions
- → Can I make my own graham cracker crust instead of using store-bought?
- Absolutely! Combine 1½ cups graham cracker crumbs with ⅓ cup melted butter and 3 tablespoons sugar. Press firmly into a 9-inch pie plate and refrigerate for 30 minutes before filling.
- → What if I can't find coconut cream pudding mix?
- If coconut cream pudding mix isn't available, use vanilla pudding mix and add 1 teaspoon of coconut extract. You can also increase the amount of shredded coconut to enhance the coconut flavor.
- → Can I use homemade whipped cream instead of Cool Whip?
- Yes! Whip 2 cups of heavy cream with ¼ cup powdered sugar and 1 teaspoon vanilla until stiff peaks form. Use this in place of the 8 oz whipped topping. Note that homemade whipped cream may not hold up as long, so it's best if served within 24 hours.
- → How far in advance can I make this pie?
- This pie can be made up to 2 days in advance. For best results, add the final layer of whipped topping and toasted coconut just a few hours before serving to ensure it stays fresh and attractive.
- → Can I freeze this coconut cream pie?
- Yes, this pie freezes well! Freeze it without the final whipped topping and coconut garnish. Wrap tightly in plastic wrap and freeze for up to 1 month. Thaw overnight in the refrigerator, then add fresh toppings before serving.