
 Pin it
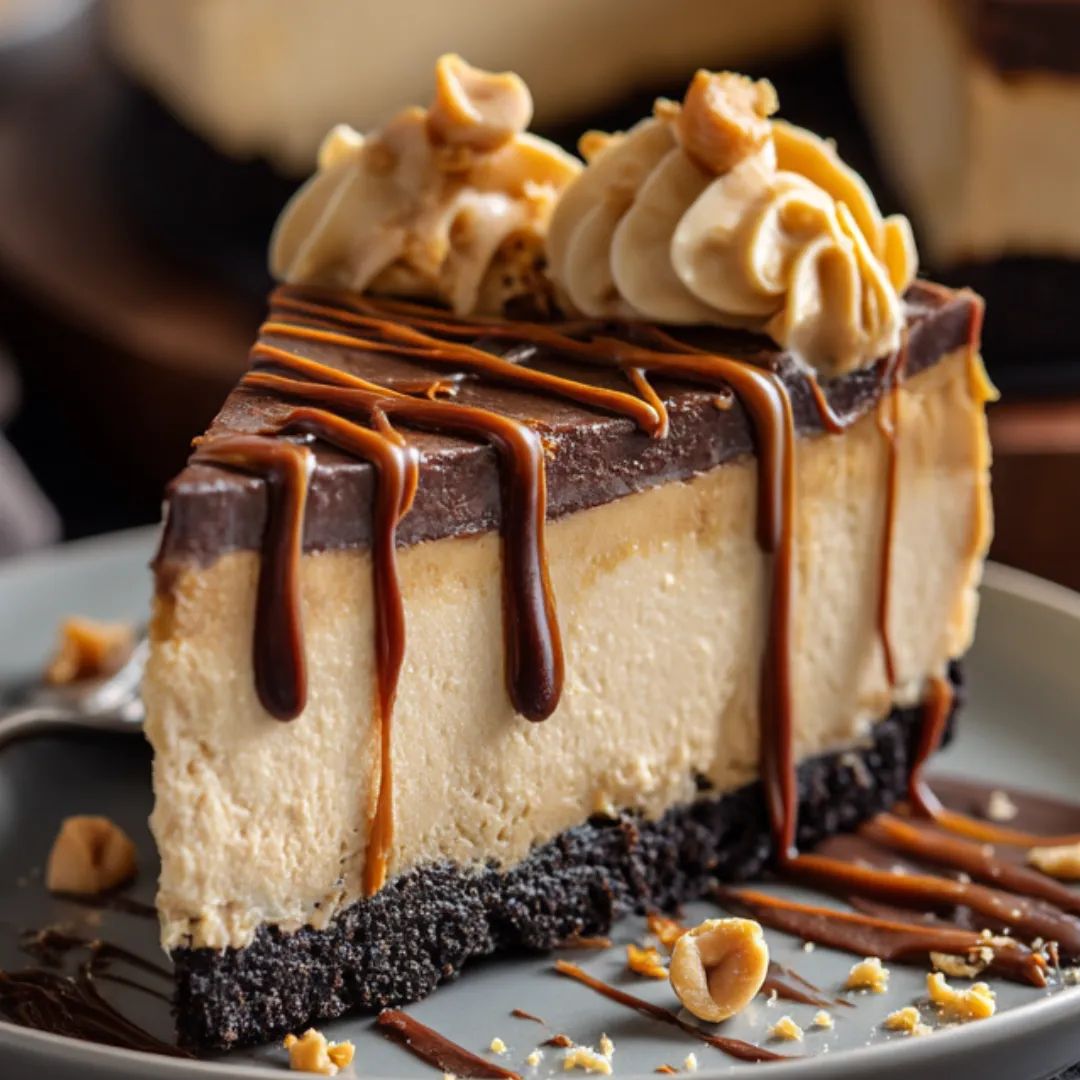
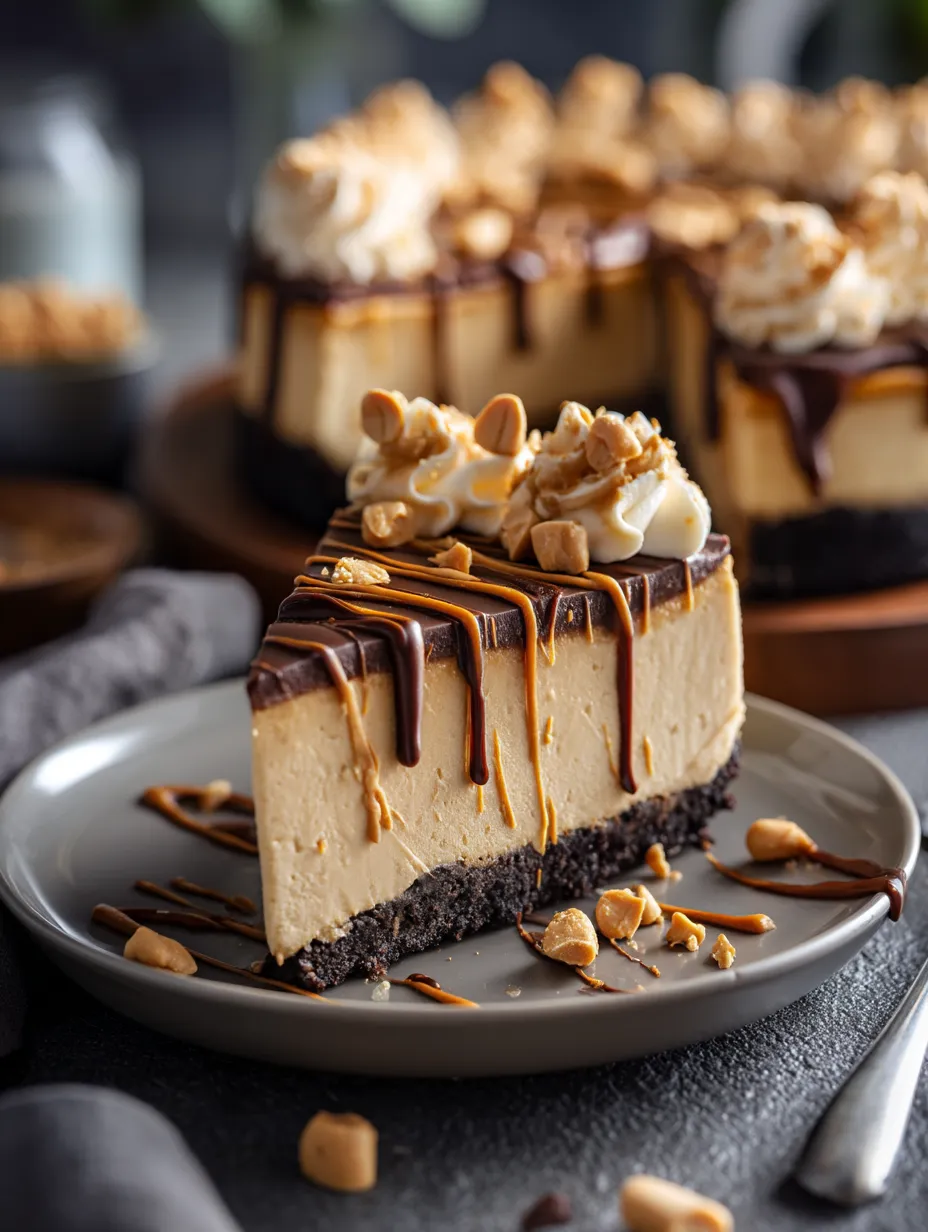
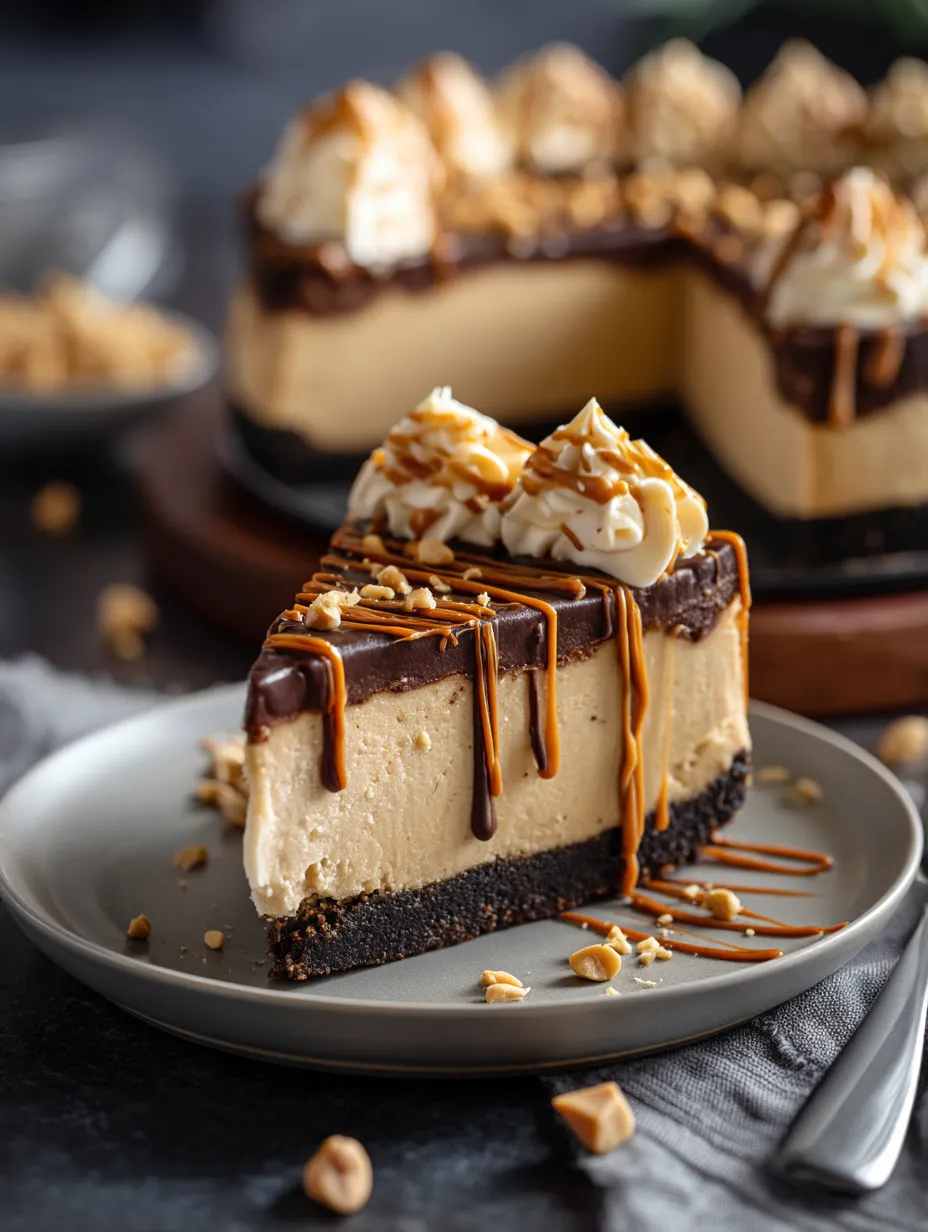
Silky smooth peanut butter filling nestled on a chocolate cookie crust creates a dessert that satisfies deep cravings without any oven time. This no-bake wonder strikes the perfect balance between creamy and crisp, rich and light, sweet and slightly salty. The magic happens as the ingredients come together – cream cheese provides tang and structure, peanut butter brings its distinctive nutty depth, and whipped cream lightens everything to cloud-like perfection. Best of all, this impressive dessert requires nothing more than some mixing, folding, and patience while it chills to set-up perfection.
I made this for my sister's birthday gathering last month, and it completely stole the show from the fancy layer cake I'd also prepared. My nephew, who claims to be a "cheesecake connoisseur" at the ripe age of twelve, declared it the best dessert he'd ever tasted and asked if he could take the leftover slice home. Even my mother-in-law, who typically passes on dessert, helped herself to a second serving and quietly asked for the recipe before leaving.
Essential Ingredients
- Cream cheese: The foundation of any good cheesecake; choose full-fat, brick-style cream cheese for the richest texture and let it soften completely at room temperature for a smooth, lump-free filling. 16 ounces (2 bricks) needed.
- Creamy peanut butter: Opt for conventional creamy peanut butter rather than natural varieties that can separate; brands like Jif or Skippy provide consistent texture and sweetness that works perfectly in this recipe. 1 cup needed.
- Chocolate sandwich cookies: These create a deeply chocolatey base that contrasts beautifully with the filling; no need to remove the cream filling—it helps bind the crust together. 24 cookies (about 14 ounces) needed.
- Heavy whipping cream: Transforms the dense peanut butter-cream cheese mixture into something ethereally light; make sure it's very cold for the best whipping results. 1 cup needed.
- Powdered sugar: Its fine texture dissolves seamlessly into the filling, providing sweetness without the grittiness that granulated sugar might leave behind. ½ cup needed.
 Pin it
Step-by-Step Cooking Instructions
- Step 1:
- Prepare your pan properly – Line the bottom of a 9-inch springform pan with parchment paper, which prevents the crust from sticking. For extra insurance against leaks, wrap the outside of the pan with aluminum foil, especially if your springform doesn't seal tightly. This preparation ensures your cheesecake will release beautifully when it's time to serve.
- Step 2:
- Create the perfect chocolate crust – Place 24 chocolate sandwich cookies in a food processor and pulse until they form fine crumbs with no large pieces remaining. If you don't have a food processor, place the cookies in a heavy-duty zip-top bag and crush them with a rolling pin. Transfer the crumbs to a bowl and pour in ¼ cup of melted unsalted butter. Mix with a fork until the mixture resembles wet sand – it should hold together when pressed but still have a slight crumbly texture.
- Step 3:
- Form and chill the crust – Dump the cookie mixture into your prepared springform pan. Using the bottom of a measuring cup or glass, press the crumbs firmly and evenly across the bottom and about 1 inch up the sides of the pan. Apply firm pressure to create a compact crust that won't crumble when sliced. Place the pan in the refrigerator to chill for at least 30 minutes while you prepare the filling – this hardening process is crucial for a stable base.
- Step 4:
- Prepare the peanut butter filling base – In a large mixing bowl, beat 16 ounces of softened cream cheese with an electric mixer at medium speed until completely smooth, about 2-3 minutes. Scrape down the sides of the bowl several times during mixing to ensure no lumps remain – this attention to detail now prevents texture problems later. Add 1 cup of creamy peanut butter and continue beating until fully integrated with the cream cheese.
- Step 5:
- Add sweetness and flavor – Sift ½ cup of powdered sugar into the peanut butter mixture to prevent any lumps. Add 1 teaspoon of vanilla extract, which enhances the peanut butter flavor without competing with it. Beat again until the mixture is silky smooth and consistent in color, stopping to scrape down the sides and bottom of the bowl to incorporate any unmixed portions.
- Step 6:
- Create lightness with whipped cream – In a separate chilled bowl, whip 1 cup of cold heavy cream until it forms stiff peaks. The cream should stand tall when the beaters are lifted but still look smooth and glossy, not grainy or curdled. This whipped cream will transform the dense peanut butter mixture into a light, mousse-like filling.
- Step 7:
- Master the folding technique – Add one-third of the whipped cream to the peanut butter mixture and gently fold it in using a rubber spatula. Cut through the center of the mixture, scrape along the bottom of the bowl, and fold the mixture over onto itself. Rotate the bowl slightly and repeat until incorporated. Add the remaining whipped cream in two additions, folding just until no white streaks remain. This gentle folding preserves the air bubbles that create the filling's light texture.
- Step 8:
- Assemble and chill the cheesecake – Retrieve the chilled crust from the refrigerator and pour the peanut butter filling onto it. Use an offset spatula to smooth the top into an even layer, making sure to reach the edges while maintaining a level surface. Cover with plastic wrap, being careful not to let it touch the filling. Refrigerate for at least 6 hours, preferably overnight, until the cheesecake is completely set and firm to the touch.
I learned the importance of patient folding after ruining what should have been a beautiful cheesecake for my husband's birthday years ago. In my hurry to finish before he got home, I rushed the folding process and ended up with a dense, heavy cake that tasted great but lacked the ethereal texture that makes this dessert special. My grandmother taught me to fold "like you're handling clouds," and that visual has stayed with me ever since. My daughter now helps me make this cheesecake for family gatherings, and watching her carefully fold the mixture with intense concentration is one of my favorite kitchen memories.
Perfect Topping Combinations
While this cheesecake is delicious on its own, thoughtfully chosen toppings can elevate it to showstopper status. A classic approach is to warm about ¼ cup of peanut butter until pourable, then drizzle it over the surface in a zigzag pattern. Follow with ¼ cup warm chocolate fudge sauce applied in the opposite direction, creating a beautiful crosshatch design.
For textural contrast, sprinkle ¼ cup chopped roasted peanuts around the edge of the cheesecake. The slight saltiness and crunch play beautifully against the smooth, creamy filling. Mini chocolate chips or chocolate curls (about ¼ cup) add another dimension of texture and intensify the chocolate element.
Make-Ahead and Serving Tips
This cheesecake is an entertainer's dream because it actually improves with time. Make it up to three days ahead and keep it covered in the refrigerator. The flavors meld and intensify, and the texture becomes even more velvety.
For the cleanest slices, dip a large, sharp knife in hot water and wipe it dry between each cut. This prevents the filling from sticking to the knife and creates restaurant-quality presentation. Let the cheesecake sit at room temperature for 10-15 minutes before serving to take the chill off and allow the flavors to fully bloom.
 Pin it
Customizing Your Cheesecake
The beauty of this recipe lies in its adaptability. For a more pronounced chocolate element, add ½ cup of mini chocolate chips to the filling before pouring it into the crust. They'll distribute evenly throughout, providing little bursts of chocolate in every bite.
For a more complex flavor profile, replace the vanilla extract with 1-2 tablespoons of bourbon or rum. The alcohol evaporates, leaving behind warm, caramel notes that complement the peanut butter beautifully.
If you prefer a sweeter dessert, increase the powdered sugar to ¾ cup. Conversely, for a more adult palate, reduce it to ⅓ cup to let the natural nuttiness of the peanut butter shine.
I've made this no-bake peanut butter cheesecake more times than I can count, and it never fails to elicit sighs of pleasure from around the table. There's something magical about the way the chocolate and peanut butter complement each other – a combination that somehow feels both sophisticated and comfortingly familiar at the same time. What I love most is how it transforms a casual family dinner into a special occasion or adds the perfect finishing touch to a holiday meal. Even though it's incredibly simple to make, there's something undeniably elegant about serving a perfectly set cheesecake, especially when you reveal that it came together without ever turning on the oven. It's my secret weapon dessert – impressive enough for company but easy enough for an ordinary Wednesday when you just need something extraordinarily delicious in your life.
Frequently Asked Questions
- → Can I make this cheesecake ahead of time?
- Absolutely! This cheesecake is perfect for making ahead. It can be refrigerated for up to 3 days or frozen for up to 1 month. If frozen, thaw overnight in the refrigerator before serving.
- → Can I use crunchy peanut butter instead of creamy?
- Yes, but the texture will be different. Crunchy peanut butter will add small bits of peanuts throughout the filling. Make sure to use a good quality peanut butter that isn't too oily.
- → What if I don't have a springform pan?
- You can use a deep pie dish instead. Line it with parchment paper with some overhang to help lift the cheesecake out, or simply serve it directly from the dish.
- → Why isn't my cheesecake setting properly?
- Make sure you whip the heavy cream to stiff peaks and gently fold it in. Also, the cheesecake needs at least 6 hours to set properly - overnight is even better. Using full-fat cream cheese also helps with setting.
- → Can I make this dessert without dairy?
- Yes, you can substitute dairy-free cream cheese and coconut cream (chilled and whipped) for the heavy cream. The texture may be slightly different, but it will still be delicious.