
 Pin it
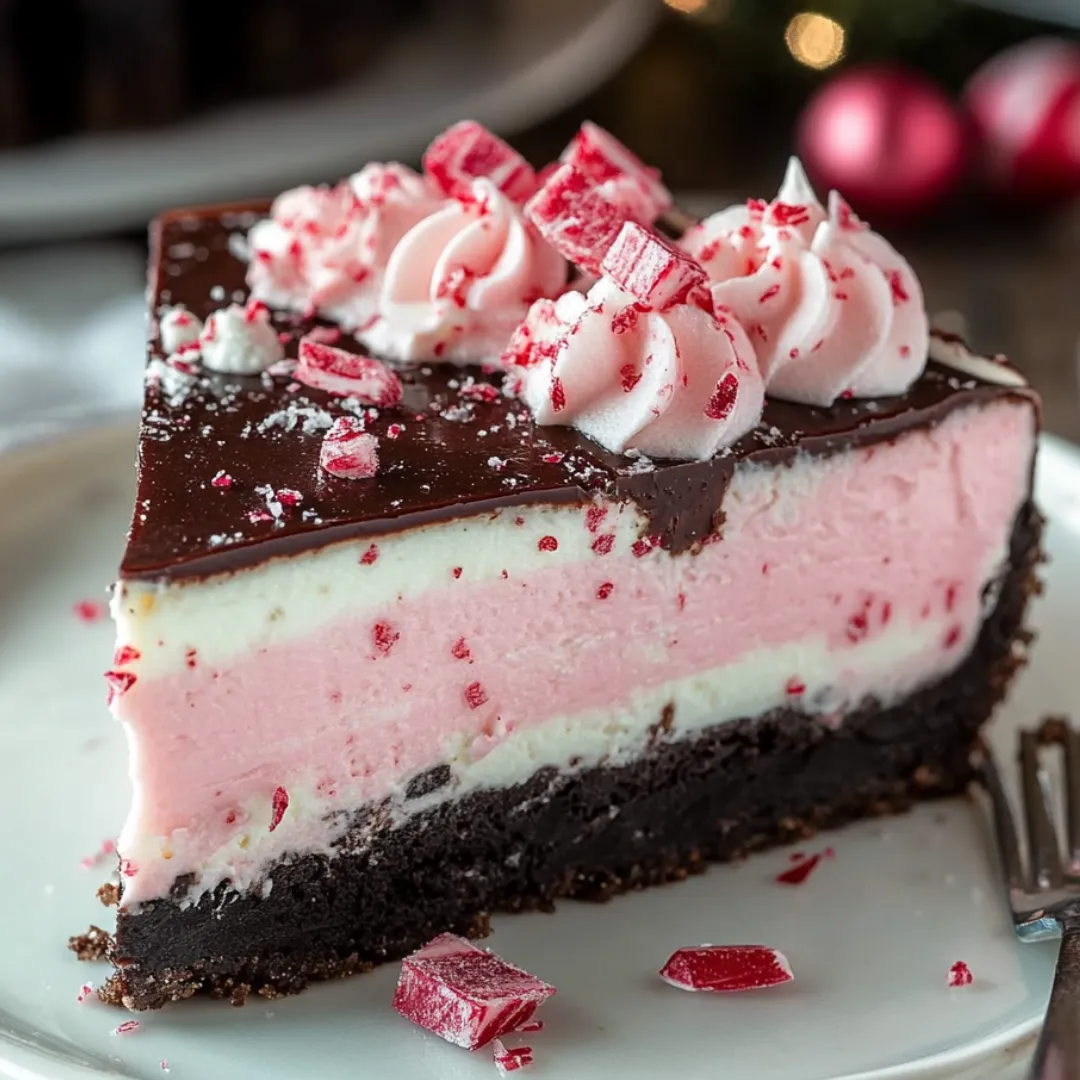
This festive, crowd-pleasing dessert combines the creamy richness of classic cheesecake with refreshing peppermint in a stunning presentation that requires zero baking. The chocolate Oreo crust provides the perfect foundation for the cool, minty filling studded with crushed peppermint candies, while the silky chocolate ganache topping creates an elegant finish. Perfect for holiday entertaining, this make-ahead masterpiece delivers impressive results with minimal effort.
I first served this cheesecake at our family Christmas gathering when I needed a dessert that wouldn't compete for oven space with the holiday dinner. The combination of rich chocolate and refreshing peppermint received rave reviews, with my brother-in-law—who typically passes on dessert—asking for seconds. What I love most is how the crushed peppermint pieces add both flavor and a delightful textural contrast against the silky-smooth filling, making each bite a perfect balance of creaminess and subtle crunch.
Ingredients
- Oreo cookies: Create a chocolatey, slightly bitter base that perfectly complements the sweet, minty filling. Use regular Oreos with the filling intact.
- Cream cheese: The foundation of the cheesecake filling. Full-fat, brick-style provides the richest, creamiest texture.
- Heavy whipping cream: Creates the light, mousse-like texture that makes this no-bake cheesecake so irresistible. Must be cold for proper whipping.
- Peppermint extract: Delivers that signature mint flavor. Pure extract provides cleaner flavor than artificial.
- Crushed peppermint candies: Add both flavor and delightful texture throughout the filling. Traditional red and white peppermints or candy canes work beautifully.
- Bittersweet chocolate: Forms a rich ganache layer that balances the sweetness of the filling. Its slight bitterness enhances the peppermint flavor.
- Red food coloring: Creates festive visual appeal. Gel coloring provides vibrant color with minimal liquid added.
 Pin it
Instructions
- Create the perfect crust:
- Begin by finely crushing 26 Oreo cookies (with their filling) in a food processor until they resemble fine crumbs. Pour in 6 tablespoons of melted unsalted butter and pulse until the mixture resembles wet sand. Every crumb should be moistened, but the mixture shouldn't be soggy. Transfer this mixture to a 9-inch springform pan that has been lightly greased around the edges with cooking spray. Using the bottom of a measuring cup or glass, press the crumbs firmly and evenly across the bottom of the pan, creating a compact layer. A tight, well-packed crust is essential for clean slicing later. Place the crust in the freezer to set while preparing the filling, which helps it hold together when you add the creamy layer.
- Whip up the filling:
- In a large mixing bowl, beat 16 ounces of softened cream cheese with 1 cup of powdered sugar until completely smooth and fluffy, about 2-3 minutes. Ensure there are no lumps of cream cheese remaining, as these won't incorporate later. In a separate chilled bowl, whip 2 cups of cold heavy cream until soft peaks form—the cream should hold its shape but still have a slightly soft texture. Gently fold the cream cheese mixture into the whipped cream using a rubber spatula, being careful not to deflate the air you've incorporated. Once mostly combined, add 1 teaspoon each of peppermint and vanilla extracts. If desired, add a few drops of red food coloring and swirl lightly for a festive marbled effect. Finally, fold in ½ cup of crushed peppermint candies, distributing them evenly throughout the mixture. This gentle folding technique preserves the light, airy texture that makes this cheesecake so special.
- Assemble and chill:
- Remove the crust from the freezer and pour the peppermint cheesecake filling over it, using a spatula to spread it into an even layer. Smooth the top with an offset spatula for a professional finish. Gently tap the pan on the counter a few times to release any large air bubbles trapped in the filling. Cover the cheesecake loosely with plastic wrap, being careful not to let it touch the surface of the filling. Refrigerate for at least 4 hours, but preferably overnight. This extended chilling time is crucial for the cheesecake to properly set and for the flavors to fully develop. Patience here results in perfect slices and maximum flavor.
- Top with ganache and garnish:
- Once the cheesecake is fully set, prepare the chocolate topping. In a medium saucepan over low heat, combine ¾ cup heavy cream, 6 ounces finely chopped bittersweet chocolate, and 1 tablespoon granulated sugar. Stir constantly until the chocolate is completely melted and the mixture is smooth and glossy. Remove from heat and allow to cool for about 10 minutes until slightly thickened but still pourable. Carefully pour the ganache over the chilled cheesecake, using an offset spatula to spread it to the edges if necessary. Work quickly as the cold cheesecake will begin to set the ganache. Before the chocolate layer sets completely, sprinkle additional crushed peppermint candies around the edge for a beautiful presentation. Return the cheesecake to the refrigerator for at least 30 minutes to allow the ganache to set before serving.
I discovered the importance of proper cream cheese temperature after my first attempt resulted in tiny lumps throughout the filling. Now I always make sure the cream cheese is genuinely softened to room temperature, which can take up to two hours depending on your kitchen's warmth. Another game-changing discovery was adding a small amount of vanilla extract alongside the peppermint. This subtle addition rounds out the mint flavor, making it taste more natural and complex—similar to how salt enhances sweetness in other recipes.
Serving and Presentation Ideas
For a stunning holiday dessert table centerpiece, create a ring of fresh mint leaves around the edge of the cheesecake before adding the final sprinkle of crushed peppermint candies. The vibrant green leaves against the red and white create a beautiful Christmas color scheme.
When serving individual slices, consider adding a dollop of lightly sweetened whipped cream and a small candy cane as a garnish. The extra cream adds another layer of luxury while the candy cane provides a festive touch.
For a more elegant presentation, use a vegetable peeler to create chocolate curls from a bar of dark chocolate. Arrange these delicate curls in the center of the cheesecake for a sophisticated finish that will impress your guests.
 Pin it
Storage and Make-Ahead Tips
This cheesecake is the perfect make-ahead dessert, actually improving with time as the flavors meld. You can prepare it up to three days before serving and store it covered in the refrigerator. If you'd like to make it even further in advance, you can freeze the cheesecake (without the ganache topping) for up to one month. Simply wrap the fully set cheesecake tightly in plastic wrap, then in aluminum foil. Thaw overnight in the refrigerator, then add the ganache topping and garnishes before serving.
After making this cheesecake multiple times, I've discovered that briefly freezing it for about 30 minutes after adding the ganache but before serving creates the perfect texture contrast—the filling remains creamy while the chocolate develops a slight snap when cut with a fork. I've also found that crushing the peppermint candies to varying sizes, rather than a uniform powder, creates more interesting texture and visual appeal throughout the filling. These small refinements elevate an already delicious dessert into something truly memorable that guests will talk about long after the holidays are over.
Frequently Asked Questions
- → Can I make this cheesecake ahead of time?
- Yes! This cheesecake is perfect for making 1-2 days ahead. The flavors actually develop and improve with time in the refrigerator.
- → How strong is the peppermint flavor?
- With 1 teaspoon of peppermint extract, the flavor is noticeable but not overwhelming. If you prefer a stronger mint flavor, you can increase to 1.5 teaspoons, but be careful as peppermint extract is quite potent.
- → Can I freeze this cheesecake?
- Yes, this cheesecake freezes well for up to 1 month. Freeze it without the chocolate topping, wrapped tightly in plastic wrap and foil. Thaw overnight in the refrigerator, then add the chocolate topping before serving.
- → What kind of peppermint candies work best?
- Traditional candy canes or round peppermint candies (like Starlight mints) work well. For the filling, crush them finely. For the garnish, you can leave some pieces slightly larger for visual appeal.
- → What can I substitute for the Oreo crust if I don't like chocolate?
- You can use graham crackers or vanilla wafers instead of Oreos for a non-chocolate crust. Use the same amount of crumbs (2 ½ cups) and keep the butter quantity the same.