
 Pin it
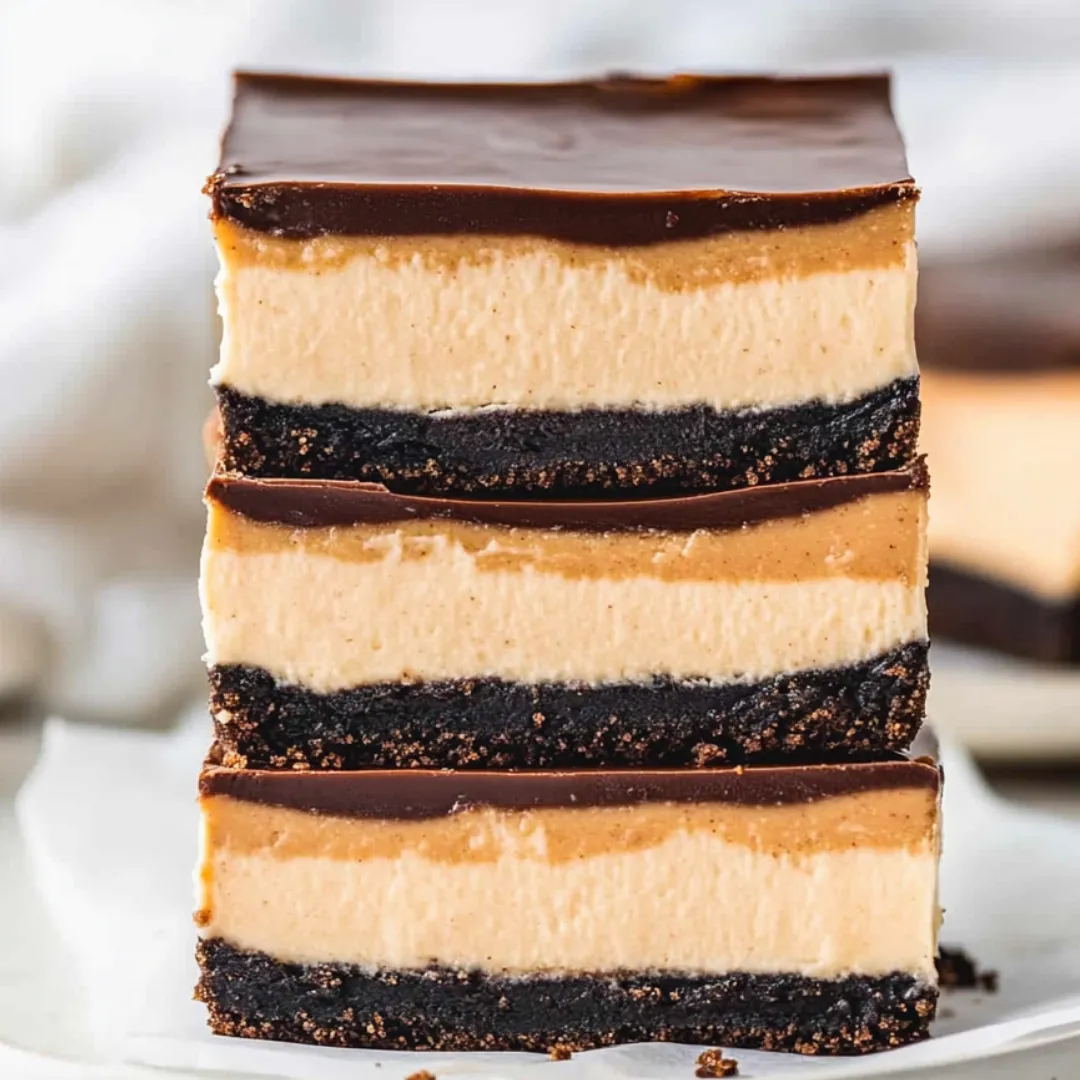
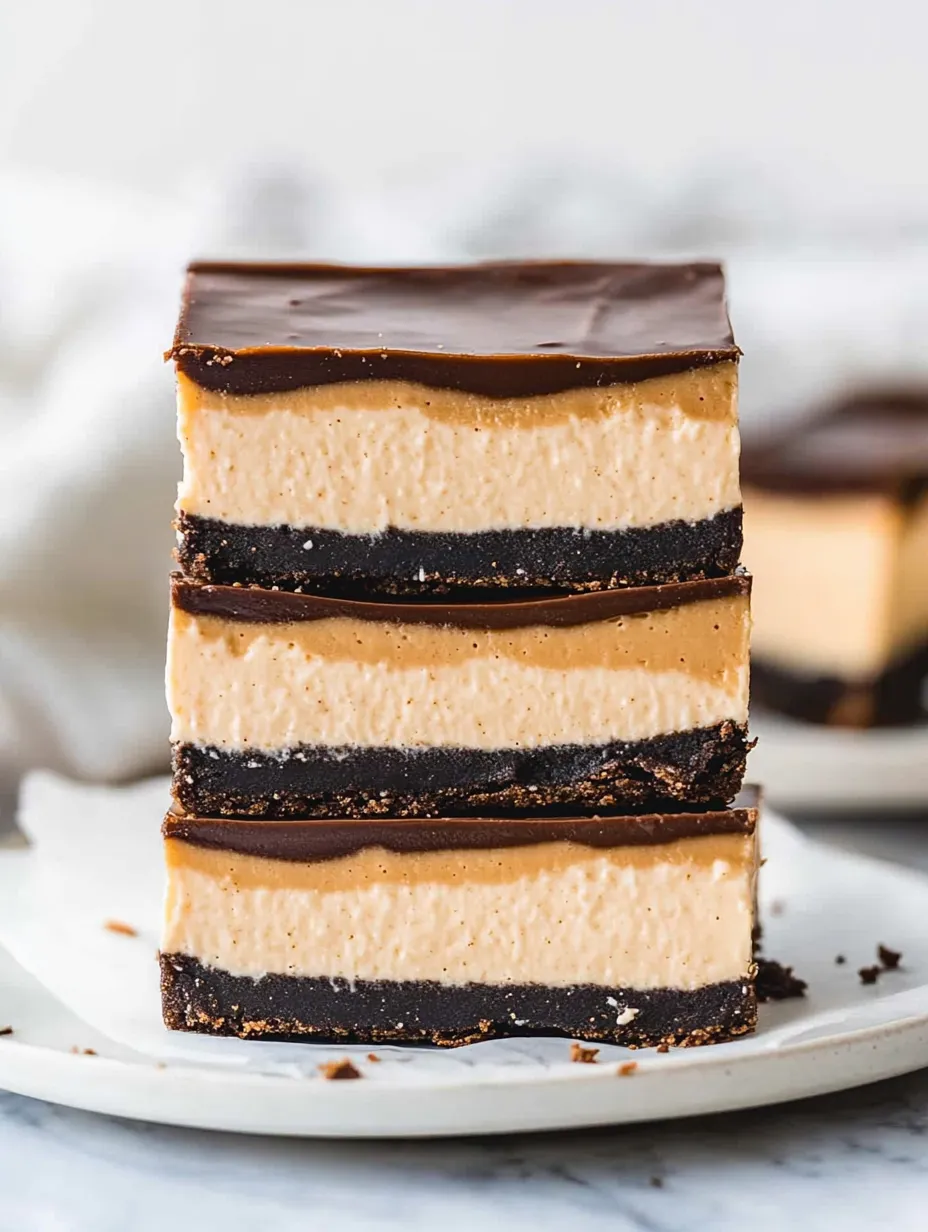
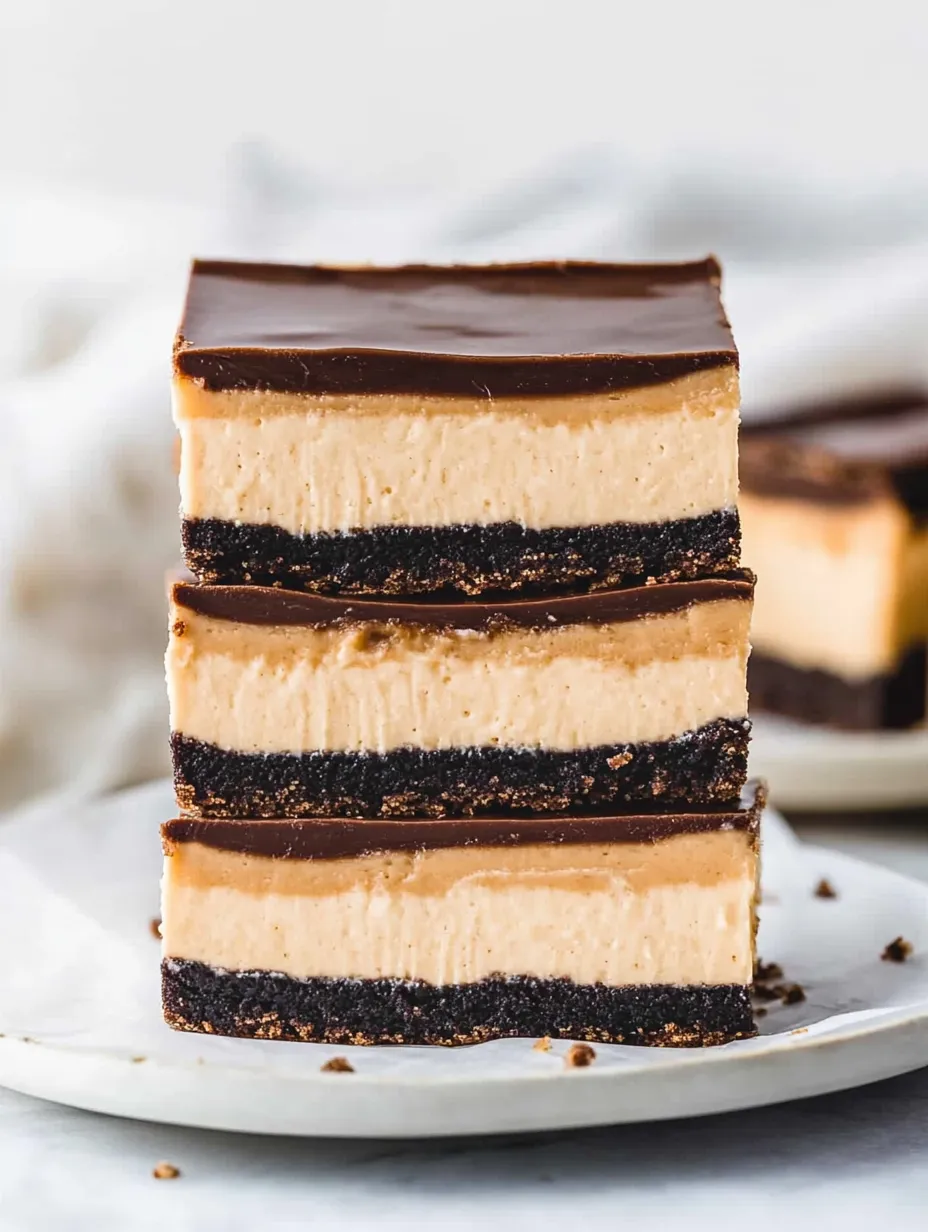
These decadent peanut butter cheesecake bars transform three beloved flavors into one irresistible dessert that satisfies multiple cravings at once. The magic happens in the perfect harmony of textures—a crunchy chocolate cookie base that provides a sturdy foundation, a creamy peanut butter cheesecake center with just the right balance of tang and sweetness, and a glossy chocolate ganache topping that adds a final touch of indulgence. Unlike traditional round cheesecakes that can be fussy and prone to cracking, these bars bake more evenly and eliminate the need for a water bath, making them accessible even for those new to cheesecake baking. Each bite delivers the nostalgic flavor combination of chocolate and peanut butter elevated to a sophisticated dessert experience that's impossible to resist.
I discovered this recipe during my quest to create the perfect dessert for my sister's birthday gathering. She's a devoted peanut butter cup fan, but I wanted something more sophisticated than candy. When I unveiled these bars at her celebration, her eyes widened with the first bite, and she immediately requested the recipe. What truly surprised me was watching my cheesecake-averse nephew return for seconds and then discreetly wrap a piece to take home. Now these bars have become my most-requested contribution to family gatherings, proving that sometimes the most beloved recipes come from trying to please someone special.
Essential Ingredients
- Cream Cheese: The foundation of any great cheesecake, providing that signature tangy creaminess. This recipe specifically calls for brick-style cream cheese rather than the spreadable kind in tubs, which contains additives that prevent proper setting. Room temperature cream cheese is non-negotiable—cold cream cheese will create lumps that no amount of mixing can remedy, while properly softened cream cheese creates that silky-smooth texture essential to perfect cheesecake.
- Peanut Butter: The star flavor that transforms ordinary cheesecake into something special. Use conventional creamy peanut butter (like Jif or Skippy) rather than natural or whipped varieties. Natural peanut butter's oil separation causes texture and setting issues, while whipped contains too much air for proper structure. The stabilizers in conventional peanut butter actually help maintain the cheesecake's structure while delivering reliable flavor.
- Oreo Cookies: Create the perfect chocolate crust with minimal effort. Using whole cookies—filling and all—eliminates the need for additional sugar in the crust while providing the perfect sweetness and stability. The classic chocolate wafers complement the peanut butter filling beautifully, creating that beloved chocolate-peanut butter combination from the first bite.
- Sour Cream: The secret ingredient that creates the perfect cheesecake texture. It lightens the dense cream cheese and peanut butter mixture, creating a silkier mouthfeel while adding subtle tang that balances the sweetness. Full-fat sour cream is preferred for its richness and consistency, though reduced-fat will work in a pinch if that's all you have available.
- Eggs: Provide essential structure and binding, allowing the cheesecake to set properly during baking. Room temperature eggs incorporate more evenly into the batter, reducing the risk of overbeating (a common cause of cracks). The proteins in eggs coagulate during baking, transforming the liquid batter into a silky, sliceable dessert with the perfect amount of stability.
- Dark Chocolate: Creates a luxurious ganache topping that complements the sweet-tangy filling. Using chocolate with around 50% cacao content provides the ideal balance—dark enough to contrast with the sweet filling but not so bitter that it dominates. Higher quality chocolate will melt more smoothly and provide more complex flavor than baking chips.
- Heavy Cream: Transforms solid chocolate into a pourable ganache that sets to the perfect consistency. The high fat content creates that silky-smooth mouthfeel and beautiful shine that makes the bars look professional. No substitutions here—lower fat alternatives will result in a ganache that's too thin or won't set properly.
 Pin it
Step-by-Step Cooking Instructions
- Prepare Your Baking Environment:
- Position an oven rack in the center of your oven and preheat to 325°F (160°C). This moderate temperature allows the cheesecake to bake gently and evenly, reducing the risk of cracks and ensuring a creamy texture throughout. Lightly spray a 9x13 inch glass or ceramic baking dish with cooking spray. Glass or ceramic conducts heat more gently than metal, which helps prevent the dreaded overbrowned edges and undercooked center that can plague cheesecakes.
- Create the Perfect Crust:
- Place 34 Oreo cookies (about 3 rows from a standard package) in a food processor and pulse until they become fine crumbs. Alternatively, place them in a heavy-duty zip-top bag and crush with a rolling pin—a therapeutic process that yields equally good results. Transfer the crumbs to a bowl and pour in 1/2 cup melted unsalted butter, stirring until the mixture resembles wet sand. Press this mixture firmly and evenly into the bottom of your prepared pan, creating a level base for your cheesecake. The back of a measuring cup makes an excellent tool for compacting the crust.
- Pre-Bake the Crust:
- Place the pan in your preheated oven and bake for exactly 10 minutes. This brief baking period sets the crust and begins to develop those deep chocolate flavors, while preventing the sogginess that can occur with unbaked cookie crusts. Remove the pan from the oven after baking but keep the oven on at the same temperature for the filling. Allow the crust to cool slightly while you prepare the cheesecake filling.
- Create the Cheesecake Base:
- In a large bowl (the largest you have—this makes a substantial amount of batter), beat 24 ounces of room-temperature cream cheese and 1 cup granulated sugar with an electric mixer until completely smooth and creamy, about 2-3 minutes. Thoroughness at this stage is crucial—any cream cheese lumps now will remain in the final product. Stop the mixer frequently to scrape down the sides and bottom of the bowl with a rubber spatula, ensuring no pockets of unmixed cream cheese remain hidden.
- Incorporate the Peanut Butter:
- Add 1 1/4 cups creamy peanut butter and 1 teaspoon vanilla extract to the cream cheese mixture. Beat on medium speed until completely incorporated and smooth. Again, stop and scrape the bowl several times during this process. The mixture will be quite thick at this stage—this is expected and will ensure your final bars have a pronounced peanut butter flavor rather than just a hint.
- Add the Sour Cream:
- Mix in 3/4 cup room-temperature sour cream until the batter is smooth and uniform. The sour cream lightens the texture while adding complexity to the flavor profile. Make one final pass with your spatula along the bottom and sides of the bowl to ensure everything is well incorporated before moving to the next step.
- Incorporate the Eggs Carefully:
- In a small bowl, lightly whisk 3 large room-temperature eggs just until blended. With your mixer on low speed—this is important—gradually add the beaten eggs to the cheesecake batter, mixing just until incorporated. Over-mixing after adding eggs introduces too much air into the batter, which can cause cracks during baking. The goal is incorporation without aeration.
- Fill and Bake:
- Pour the prepared filling over the pre-baked crust, spreading it into an even layer with your spatula. Tap the pan gently on the counter a few times to release any large air bubbles trapped in the batter. Place the pan in your preheated oven and bake for 35-40 minutes. The cheesecake is done when the edges appear set but the center still has a slight jiggle when the pan is gently nudged. If you see large cracks forming, your cheesecake is definitely done—perhaps slightly overdone—so remove it immediately.
- Cool With Care:
- The cooling process is as crucial as the baking for achieving perfect texture. Turn off the oven and open the door about 6 inches, allowing the cheesecake to begin cooling gradually in the residual warmth. Let it rest this way for 30 minutes—this slow cooling prevents the drastic temperature change that can cause the dreaded cheesecake crack. Then remove the pan from the oven and continue cooling at room temperature until completely cooled, about 1-2 hours.
- Chill Thoroughly:
- Once the cheesecake has reached room temperature, cover the pan carefully with foil or plastic wrap and refrigerate for at least 6 hours, preferably overnight. This extended chilling period is non-negotiable—it allows the flavors to meld and the texture to set perfectly. Patience here will be rewarded with cleaner slices and better flavor.
- Create the Ganache Topping:
- After the cheesecake has chilled completely, prepare the chocolate ganache. Finely chop 8 ounces of dark or semi-sweet chocolate—the smaller the pieces, the more easily they'll melt. Place the chopped chocolate in a heatproof bowl. Heat 1/2 cup heavy cream in a small saucepan until it just begins to simmer with small bubbles forming around the edge, but before it comes to a full boil. Pour the hot cream over the chocolate and let it sit undisturbed for 2-4 minutes, allowing the heat to begin melting the chocolate. Then whisk gently until completely smooth and glossy. If some stubborn chocolate pieces remain unmelted, microwave in 15-second intervals, whisking between each, until perfectly smooth.
- Finish and Serve:
- Pour the still-warm ganache over the chilled cheesecake, working quickly to spread it into an even layer before it begins to set. Return the pan to the refrigerator for at least 30 minutes to allow the ganache to set completely. To serve, use a sharp knife (not a table knife) to cut into squares or rectangles. For the cleanest cuts, dip your knife in hot water and wipe it dry between slices. These bars will maintain their quality for up to 5 days stored in the refrigerator, though they rarely last that long.
The Art of Baking Peanut Butter Cheesecake Bars
My first attempt at these bars taught me a valuable lesson about patience. Eager to serve them at a dinner party, I rushed the chilling process and tried to cut them after only two hours in the refrigerator. The result was a delicious but messy dessert that required spoons rather than the neat, hand-held bars I'd envisioned. Now I always make these a day ahead, not just for convenience but because I've discovered they truly do taste better after that overnight rest. The peanut butter flavor becomes more pronounced yet somehow better integrated with the tangy cheesecake base, creating a more harmonious final product worth every minute of that wait.
My first attempt at these bars taught me a valuable lesson about patience. Eager to serve them at a dinner party, I rushed the chilling process and tried to cut them after only two hours in the refrigerator. The result was a delicious but messy dessert that required spoons rather than the neat, hand-held bars I'd envisioned. Now I always make these a day ahead, not just for convenience but because I've discovered they truly do taste better after that overnight rest. The peanut butter flavor becomes more pronounced yet somehow better integrated with the tangy cheesecake base, creating a more harmonious final product worth every minute of that wait.
Perfect Portioning Technique
Achieving those pristine, bakery-worthy cuts makes a significant difference in presentation. For the cleanest slices, chill the bars thoroughly first—cold cheesecake cuts more cleanly than room temperature. Fill a tall container with hot water and dip your long, sharp knife into it for about 10 seconds, then wipe completely dry before each cut. Make each slice in one smooth, decisive motion rather than sawing back and forth, which can tear the delicate cheesecake. For fancier occasions, consider cutting smaller pieces—these bars are rich enough that a 2-inch square often satisfies even dedicated dessert enthusiasts.
Garnishing Inspirations
While these bars are perfect as-is, special occasions might call for additional embellishments. A light dusting of cocoa powder creates an elegant finish, while a drizzle of warmed peanut butter (thinned with a touch of neutral oil) creates dramatic contrast against the chocolate ganache. For textural interest, consider sprinkling chopped roasted peanuts or miniature peanut butter cup pieces along the perimeter. During holiday seasons, gold or bronze edible shimmer dust applied sparingly to the ganache before it fully sets creates a festive touch that elevates these bars to celebration status.
Storage Strategies
These bars maintain their quality remarkably well under proper storage conditions. Keep them refrigerated in an airtight container, where they'll remain delicious for up to five days. For longer storage, these bars freeze beautifully—cut them into individual portions, wrap each tightly in plastic wrap, then aluminum foil, and freeze for up to three months. Thaw frozen pieces overnight in the refrigerator while still wrapped to prevent condensation from forming on the surface. Allow them to sit at room temperature for 15-20 minutes before serving for the best flavor and texture experience.
 Pin it
Serving Suggestions
While these bars stand perfectly on their own, pairing them with complementary elements creates a more elaborate dessert experience. A scoop of vanilla bean ice cream alongside creates temperature contrast that heightens the flavor experience. For coffee enthusiasts, a shot of espresso or small cup of strong coffee creates a sophisticated pairing that cuts through the richness. When serving as part of a dessert buffet, consider offering small glasses of ice-cold milk nearby—the classic accompaniment to chocolate and peanut butter never disappoints.
These peanut butter cheesecake bars have become my signature dessert over the years, requested for birthdays, potlucks, and holiday gatherings. What I love most about them is how they transform familiar flavors into something that feels special enough for celebrations yet comfortable enough for everyday indulgence. The combination of chocolate and peanut butter will always have nostalgic appeal, but the creamy, tangy cheesecake element elevates it to something truly memorable. While they require a bit of patience with the chilling time, the actual hands-on preparation is straightforward enough for even novice bakers to master. When you see people closing their eyes with that first bite, savoring the perfect balance of flavors and textures, you'll understand why these bars have earned their place as a perennial favorite.
Frequently Asked Questions
- → Can I make these ahead of time?
- Yes! Make the cheesecake the day before serving and chill overnight. Add the ganache topping the morning you plan to serve them.
- → Why can't I use natural peanut butter?
- Natural peanut butter can separate and release oils into the cheesecake, affecting the texture and potentially making it greasy.
- → How do I know when the cheesecake is done?
- The edges should be set but the center should still have a slight wobble. If you see large cracks forming, it's definitely done.
- → Can I freeze these cheesecake bars?
- Yes! Wrap individual slices or the whole uncut cheesecake tightly and freeze for up to 3 months. Thaw overnight in the refrigerator.
- → Why do ingredients need to be room temperature?
- Room temperature ingredients mix together smoothly without lumps, creating a silky cheesecake texture. Cold ingredients can result in a lumpy batter.