
 Pin it
These Raspberry Lemon Tart Bars bring together the perfect balance of sweet and tart flavors in an elegant yet approachable dessert. The buttery shortbread crust provides a delicious foundation for the silky, bright lemon filling that's topped with juicy raspberries that burst with flavor in every bite. The contrasting textures create a multi-dimensional treat that manages to be both refreshing and indulgent simultaneously. Whether served at a summer garden party or as a colorful finish to a winter meal, these vibrant bars brighten any occasion with their beautiful ruby and golden hues.
I first made these bars for a spring brunch with friends, nervous about trying a new recipe for company. The moment I set them on the table, they became the centerpiece of conversation—their vibrant colors catching everyone's eye. After the first bite, conversation stopped entirely as everyone savored the perfect sweet-tart balance. My friend Melissa, who typically avoids desserts, asked for the recipe before even finishing her portion. What surprised me most was how the simple combination of lemon and raspberries created something that tasted so sophisticated. Now these bars have become my signature dessert, requested for everything from baby showers to holiday gatherings, proving that sometimes the most straightforward flavor combinations make the most memorable desserts.
Ingredients
- 1½ cups all-purpose flour: Forms the foundation of your buttery crust. Look for unbleached flour for the best flavor. The flour should feel cool to the touch and have no lumps. For the most accurate measurement, spoon the flour into your measuring cup rather than scooping directly from the bag.
- ½ cup granulated sugar: Adds sweetness to the crust without overwhelming it. Choose pure cane sugar with small, uniform crystals for the smoothest texture. The sugar should be free-flowing without any clumps.
- ¼ teaspoon salt: Enhances flavor and balances the sweetness. Fine sea salt or kosher salt provides cleaner flavor than table salt. This small amount makes a significant difference in the overall taste profile.
- ¾ cup cold unsalted butter, cubed: Creates the flaky, tender texture in the shortbread base. European-style butter with higher fat content produces an even richer result. The butter must be very cold—straight from the refrigerator—to achieve the proper texture.
- 4 large eggs: Provides structure and richness to the lemon filling. Room temperature eggs incorporate more smoothly than cold ones. Farm-fresh eggs with bright yellow-orange yolks will give your filling the most beautiful color.
- 1½ cups granulated sugar (for filling): Balances the tartness of the lemon juice. The amount might seem substantial, but it's necessary to offset the acidity while maintaining that bright lemon flavor.
- ⅓ cup all-purpose flour: Thickens the filling to the perfect consistency. Measure carefully—too much will make your filling pasty, while too little will leave it runny.
- ⅔ cup fresh lemon juice (about 4-5 lemons): Provides the signature tangy flavor. Always use fresh-squeezed juice rather than bottled for the brightest taste. Roll the lemons firmly on the counter before juicing to extract maximum juice.
- 2 tablespoons lemon zest: Adds intense lemon flavor and aroma. Zest only the yellow outer layer, avoiding the bitter white pith beneath. Organic lemons are preferable since you're using the outer peel.
- 2 cups fresh raspberries: Creates beautiful color contrast and sweet-tart flavor. Look for berries that are plump, vibrant red, and without mushiness or mold. If using frozen berries, do not thaw them before using.
- Powdered sugar for dusting (optional): Adds a beautiful finishing touch and subtle sweetness. Sift the sugar to avoid clumps on your beautiful bars.
 Pin it
Step-by-Step Instructions
- Step 1:
- Prepare your baking dish properly - Begin by preheating your oven to 350°F (175°C). Select a 9x13-inch baking pan with straight sides for the cleanest edges on your bars. Line it with parchment paper, leaving an overhang on the long sides to create handles for easy removal later. The parchment should be pressed firmly into the corners without wrinkling to prevent the crust from forming irregularly. Lightly grease any exposed parts of the pan with butter or cooking spray. This thorough preparation ensures your bars will release cleanly and maintain their shape when cut.
- Step 2:
- Make the crust with cold ingredients - In a food processor, combine the flour, ½ cup granulated sugar, and salt with a few quick pulses to mix evenly. Add the cold butter cubes and pulse about 10-15 times until the mixture resembles coarse sand with some pea-sized butter pieces still visible. These small butter chunks are crucial for creating a flaky, tender crust. If you don't have a food processor, you can use a pastry cutter or two knives to cut the butter into the dry ingredients. The mixture should hold together when squeezed in your palm but still appear somewhat crumbly. Keep everything as cold as possible during this process—warm butter will create a tough rather than tender crust.
- Step 3:
- Form and pre-bake the crust - Transfer the crust mixture to your prepared baking pan. Using clean hands or the bottom of a measuring cup, press the mixture firmly and evenly across the bottom of the pan. Take your time with this step—an uneven crust will bake unevenly. For the most professional result, press the mixture slightly up the sides of the pan (about ¼ inch) to contain the filling completely. Use a fork to prick the crust all over, which prevents bubbling during baking. Place the pan in the preheated oven and bake for 15-18 minutes until the edges are just beginning to turn golden. The center may still look slightly underdone, which is perfect—it will finish cooking with the filling. Remove from the oven but maintain the oven temperature for the filling stage.
- Step 4:
- Create the lemon filling while the crust bakes - While the crust is baking, prepare the vibrant lemon filling. In a large mixing bowl, whisk the eggs until smooth and slightly frothy. Gradually add the 1½ cups sugar, whisking continuously until well combined and slightly thickened. The mixture should ribbon off the whisk when lifted. Add the ⅓ cup flour and whisk until no lumps remain—this is crucial for a smooth filling. Finally, add the fresh lemon juice and zest, whisking to incorporate completely. The mixture will be quite thin at this point, but it will thicken during baking. Let the filling rest for 5 minutes to allow the flour to absorb some liquid while the crust finishes baking.
- Step 5:
- Assemble with care and attention - Once the crust has pre-baked, remove it from the oven and allow it to cool for just 5 minutes. This brief cooling prevents the hot crust from cooking parts of the filling upon contact. Pour the lemon filling evenly over the warm crust, using a spatula to ensure it reaches the corners. The warm crust helps the filling begin to set at the edges, creating a good seal. Now comes the beautiful part—gently scatter the raspberries evenly across the surface of the filling. They will sink slightly but should remain partially visible. For the most attractive appearance, place some berries cut-side up to show their vibrant centers.
- Step 6:
- Bake until perfectly set - Return the pan to the oven and bake for 22-25 minutes until the filling is set around the edges but still has a slight wobble in the center, similar to how you'd judge a cheesecake. The filling will continue to firm up as it cools. Avoid overbaking, which can cause the filling to crack and become rubbery rather than silky. The perfect bar has a just-set texture that's neither too firm nor too loose. You'll know it's done when the edges are slightly puffed and the center no longer appears liquid but still has some movement when the pan is gently shaken.
- Step 7:
- Cool completely for the perfect texture - Place the baking pan on a wire rack and allow the bars to cool completely to room temperature, which takes about 1-2 hours. This cooling period is non-negotiable—cutting into warm bars will result in a messy, runny filling. As the bars cool, the filling will set properly and the flavors will deepen and meld. For the cleanest cuts, refrigerate the cooled bars for at least 1 hour after they've reached room temperature. This firms everything up even more and makes slicing much cleaner and more precise.
- Step 8:
- Remove and slice with precision - Once completely cooled and chilled, use the parchment paper handles to carefully lift the entire slab out of the baking pan and onto a cutting board. For the cleanest cuts, use a long, sharp knife dipped in hot water and wiped clean between each cut. Cut into 16 bars (4 rows by 4 rows) for standard-sized servings, or 20 smaller bars for more petite treats. Clean your knife after each cut for the most professional-looking edges. The bars should have a clear definition between the shortbread crust and the lemon filling, with raspberries peeking through the golden surface.
- Step 9:
- Garnish for visual appeal - Just before serving, dust the bars lightly with powdered sugar using a fine-mesh sieve. This not only adds a touch more sweetness but creates a beautiful snowy finish that makes the vibrant raspberry color pop even more. If you're serving these for a special occasion, consider adding a small mint leaf or an extra fresh raspberry to each bar for an elegant presentation. The powdered sugar will gradually dissolve into the bars, so it's best to add it shortly before serving for the most attractive appearance.
- Step 10:
- Serve at the right temperature - These bars are best served slightly chilled but not ice cold—about 15-20 minutes out of the refrigerator provides the perfect temperature and texture. At this point, the filling maintains its structure while the flavors are most pronounced. If served too cold, the buttery crust becomes overly firm and the lemon flavor is muted; too warm, and the bars can be messy to eat. Arrange them on a serving platter with small dessert forks for the most elegant presentation. Stored properly in an airtight container, these bars will keep in the refrigerator for up to 4 days, though the crust will soften slightly over time.
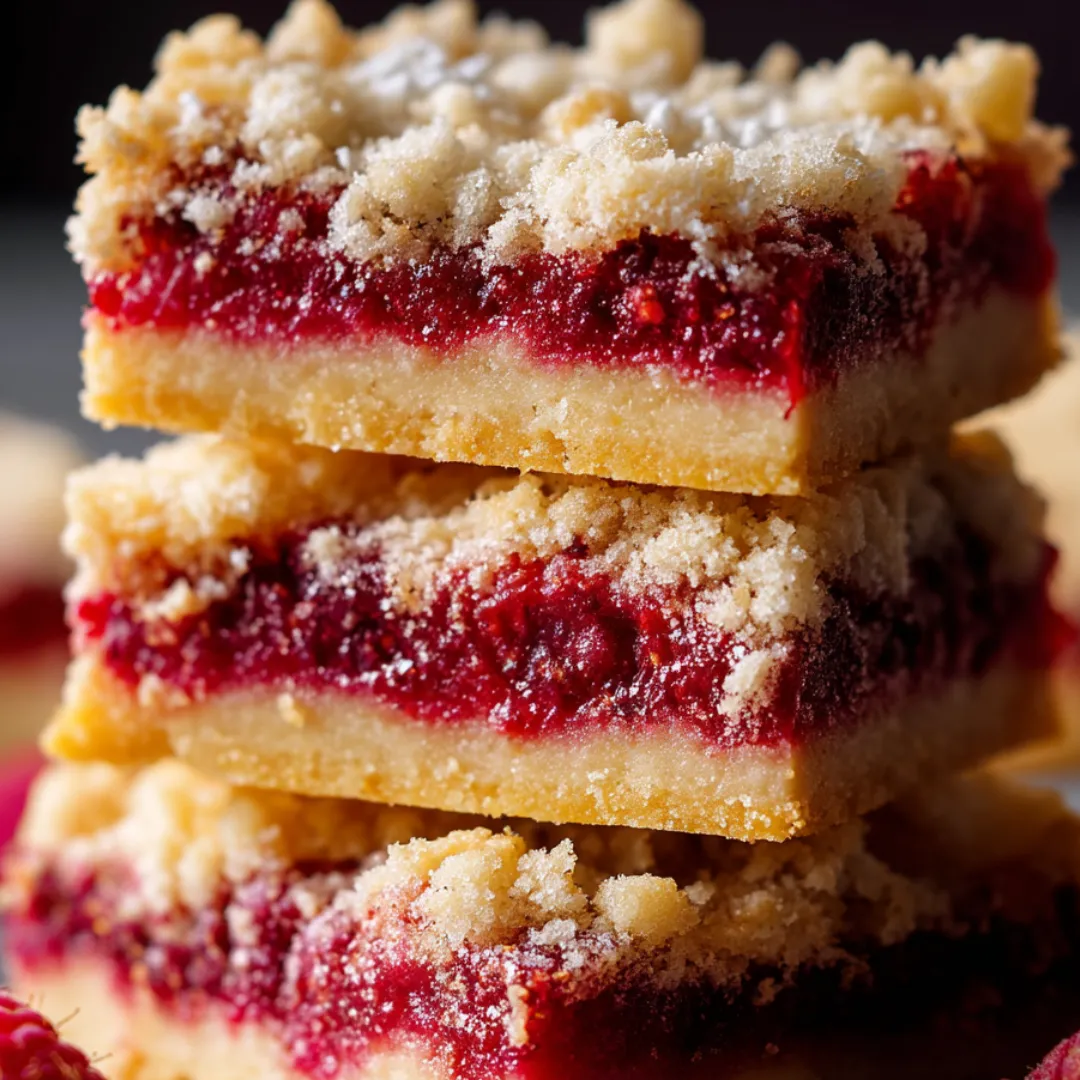
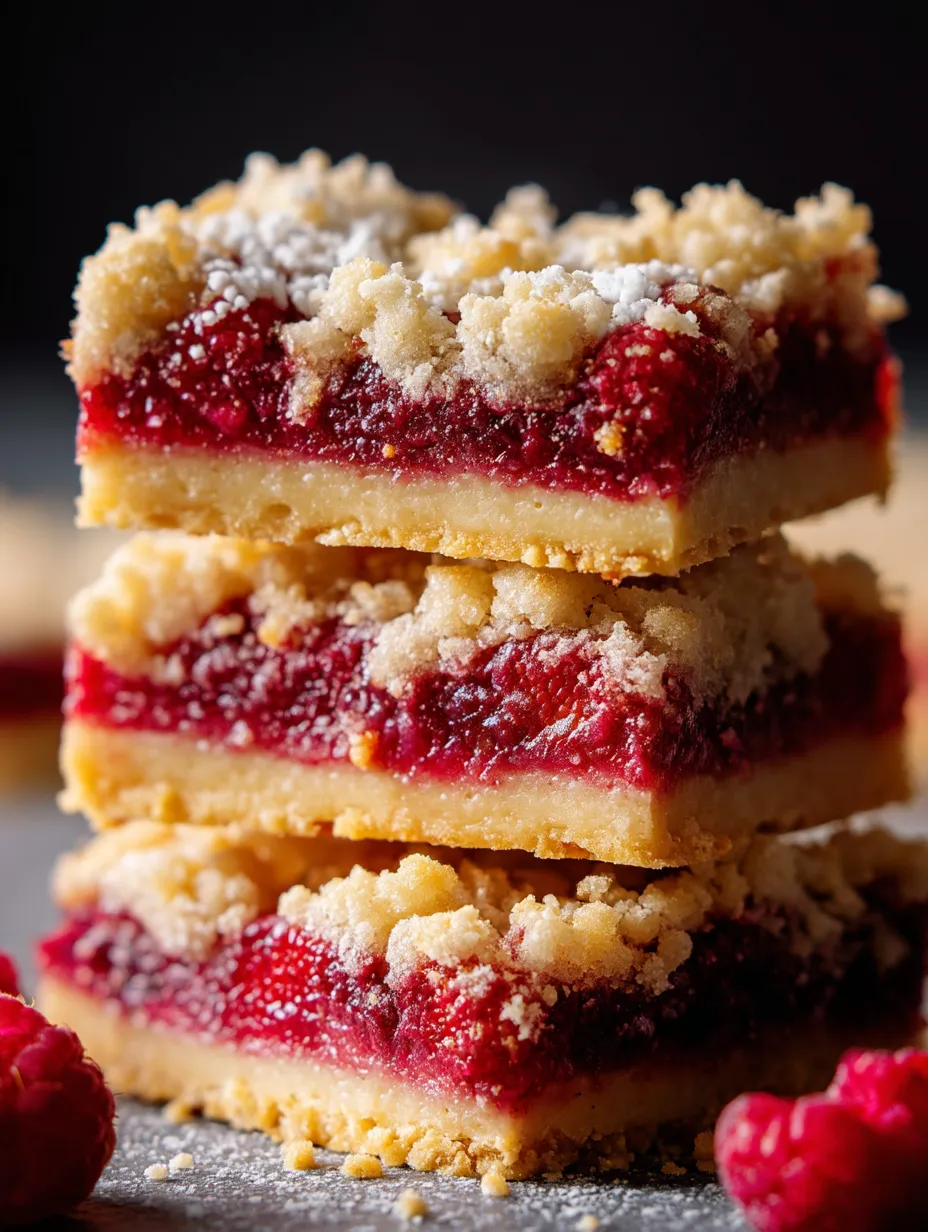
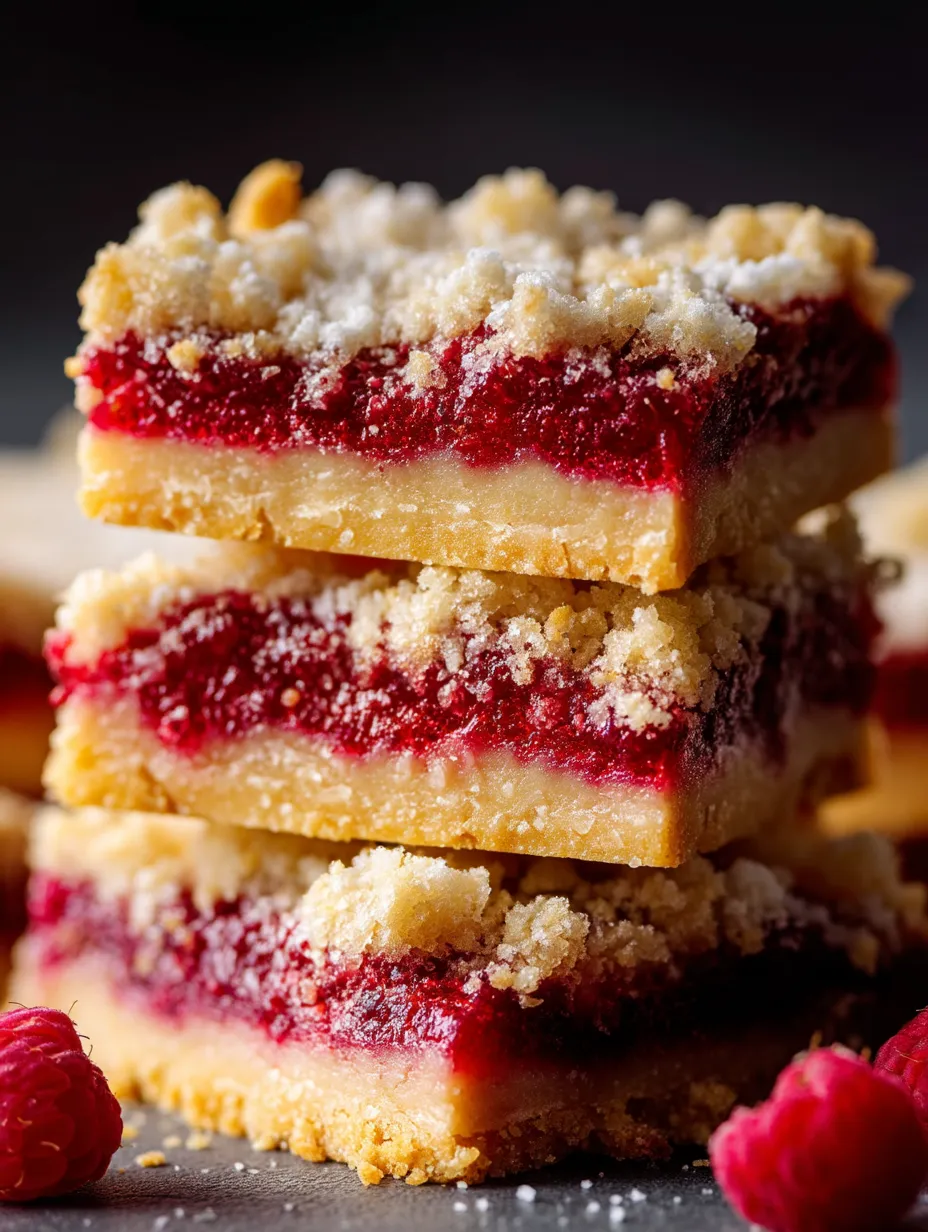
The finished Raspberry Lemon Tart Bars should have a buttery, tender shortbread base supporting a silky, vibrant yellow lemon filling studded with ruby-red raspberries that have released some of their juice into the surrounding areas, creating beautiful rosy swirls throughout the golden surface.
The Perfect Balance of Flavors
What makes these Raspberry Lemon Tart Bars truly special is the impeccable balance they strike between contrasting elements. It's this equilibrium that elevates them from a simple dessert to something memorable and crave-worthy.
The interplay between tart and sweet creates the foundation of these bars' appeal. Lemon provides that bright, mouth-puckering acidity that wakes up your taste buds, while the perfect amount of sugar prevents it from becoming overwhelming. The raspberries add their own complex sweet-tart dynamic, with their natural sugars softened by cooking while still maintaining that characteristic berry tang. This dance between sweet and tart flavors makes each bite interesting and prevents the dessert from becoming one-dimensional.
Texture plays an equally important role in the bars' appeal. The crust provides a satisfying sandy crunch that yields to gentle pressure, creating the perfect base for the silky-smooth lemon filling. The raspberries add another textural element, their tender flesh and tiny seeds creating little bursts of interest throughout the smooth filling. Each component maintains its integrity while complementing the others.
I've experimented with the ratios in this recipe extensively, finding that a slightly thicker crust than typical lemon bars provides the ideal foundation for the substantial filling and fruit topping. Too thin, and the crust becomes soggy; too thick, and it overwhelms the delicate balance of flavors above it.
Seasonal Adaptations
One of the aspects I love most about these bars is how they can transition through the seasons with just a few thoughtful adjustments.
In summer, when both lemons and raspberries are at their peak, I make the recipe exactly as written, using the freshest fruits available. The bright flavors capture the essence of summer, making these bars perfect for backyard gatherings or picnics (kept chilled, of course). Sometimes I'll add a few blueberries among the raspberries for a patriotic touch at Fourth of July celebrations.
During fall, I often add a warming element by incorporating a half teaspoon of ginger or cardamom into the crust. These spices complement both the lemon and raspberry beautifully while adding a subtle seasonal note. For Thanksgiving gatherings, I've arranged the raspberries in a leaf pattern on top, which always draws compliments.
Winter holidays call for a more festive approach. I arrange the raspberries in geometric patterns or even simple Christmas tree shapes on top of the filling before baking. A light dusting of powdered sugar resembles freshly fallen snow, and sometimes I'll add a drop of almond extract to the filling for a subtle holiday flavor that complements the fruity notes.
In spring, I love to garnish these bars with tiny edible flowers like violets or pansies alongside the powdered sugar. The floral visual complements the season of renewal and adds an elegant touch for Easter gatherings or spring bridal showers, where these bars have become my go-to contribution.
I learned the importance of proper raspberry placement through a memorable kitchen mishap. For my sister's baby shower, I decided to create a polka dot pattern with the raspberries. Rushing through the process, I simply dropped them onto the filling from a height, which caused them to sink completely. While still delicious, the visual effect was lost, and the raspberries created pockets of moisture that affected the filling's texture. Now I always place each raspberry deliberately, positioning some with their hollow sides up to create beautiful ruby cups that remain visible after baking. This small detail transforms the bars from tasty to truly beautiful.
 Pin it
Variations for Every Palate
While the classic recipe creates perfect bars, I've developed several variations that offer delightful alternatives depending on the occasion or personal preference.
For those who prefer a more traditional lemon bar with just a hint of raspberry, I reduce the whole raspberries on top and instead swirl 1/4 cup of strained raspberry puree through the lemon filling before baking. This creates beautiful pink marbling throughout the golden filling and distributes the raspberry flavor more subtly.
When serving to guests who love a more pronounced berry flavor, I create a double-berry version by adding 1 cup of blueberries along with the raspberries. The combination creates a gorgeous purple-red mosaic effect on top and adds another layer of flavor complexity that berry enthusiasts adore.
For special occasions requiring a more elegant presentation, I make a version with a thin layer of lemon curd instead of the standard filling, topped with fresh raspberries glazed with warm apricot jam after baking. These bars look like they came from a high-end patisserie but still maintain the beloved flavor combination.
During winter months when fresh raspberries are expensive and less flavorful, I substitute frozen raspberries, being careful not to thaw them before placing on the filling. As they bake, they release their juice more gradually, often creating a beautiful stained-glass effect in the surrounding lemon filling.
For friends who avoid gluten, I create a variation using a simple almond flour crust (2 cups almond flour, 1/4 cup sugar, 1/4 teaspoon salt, and 6 tablespoons melted butter pressed into the pan), and replace the flour in the filling with 2 tablespoons of cornstarch. The result is equally delicious with a slightly nuttier foundation that complements the bright filling.
Over years of making these bars for countless occasions, I've come to appreciate how a relatively simple recipe can bring such consistent joy to people. There's something magical about the way the vibrant colors and flavors can brighten even the dreariest day or add a special touch to a celebration.
I'll never forget making these bars for my grandfather's 90th birthday. He had always loved anything lemon, and as his appetite had diminished with age, we weren't sure he would enjoy much of his celebration meal. When dessert time came, I placed a small Raspberry Lemon Tart Bar in front of him, and for a moment, his eyes lit up with their old sparkle. "Now that looks like something worth tasting," he said, before taking a bite and closing his eyes in appreciation. He finished every crumb and even asked if there might be another he could take home.
It reminded me that food is never just about sustenance—it's about creating moments of pleasure that can cut through life's challenges and connect us to the simple joy of a perfect bite. These bars, with their beautiful balance of sweet, tart, buttery, and fruity notes, have a remarkable ability to create those moments of connection and delight, which makes them far more valuable than their simple ingredients might suggest.
Frequently Asked Questions
- → Can I use frozen raspberries instead of fresh?
- Yes, you can use frozen raspberries. Thaw them first and drain excess liquid, or the bars may become too wet. The texture will be slightly softer than with fresh berries, but the flavor will still be delicious.
- → How long will these bars keep?
- These bars will keep for up to 5 days in an airtight container in the refrigerator. The flavor actually improves after the first day as the lemon and raspberry notes deepen.
- → Can I make these gluten-free?
- Yes, you can substitute the all-purpose flour with a 1:1 gluten-free flour blend. The texture might be slightly different, but most quality gluten-free flour blends work well for shortbread-style crusts.
- → Can I use other berries instead of raspberries?
- Absolutely! Blueberries, blackberries, or strawberries (chopped) would all work wonderfully. Each will give a slightly different flavor profile, but all pair nicely with the lemon filling.
- → Why did my lemon filling crack after baking?
- Cracks can form if the bars cool too quickly or were slightly overbaked. Try cooling them at room temperature before refrigerating, or place them in the oven with the heat turned off and door slightly open after baking to cool gradually.