
 Pin it
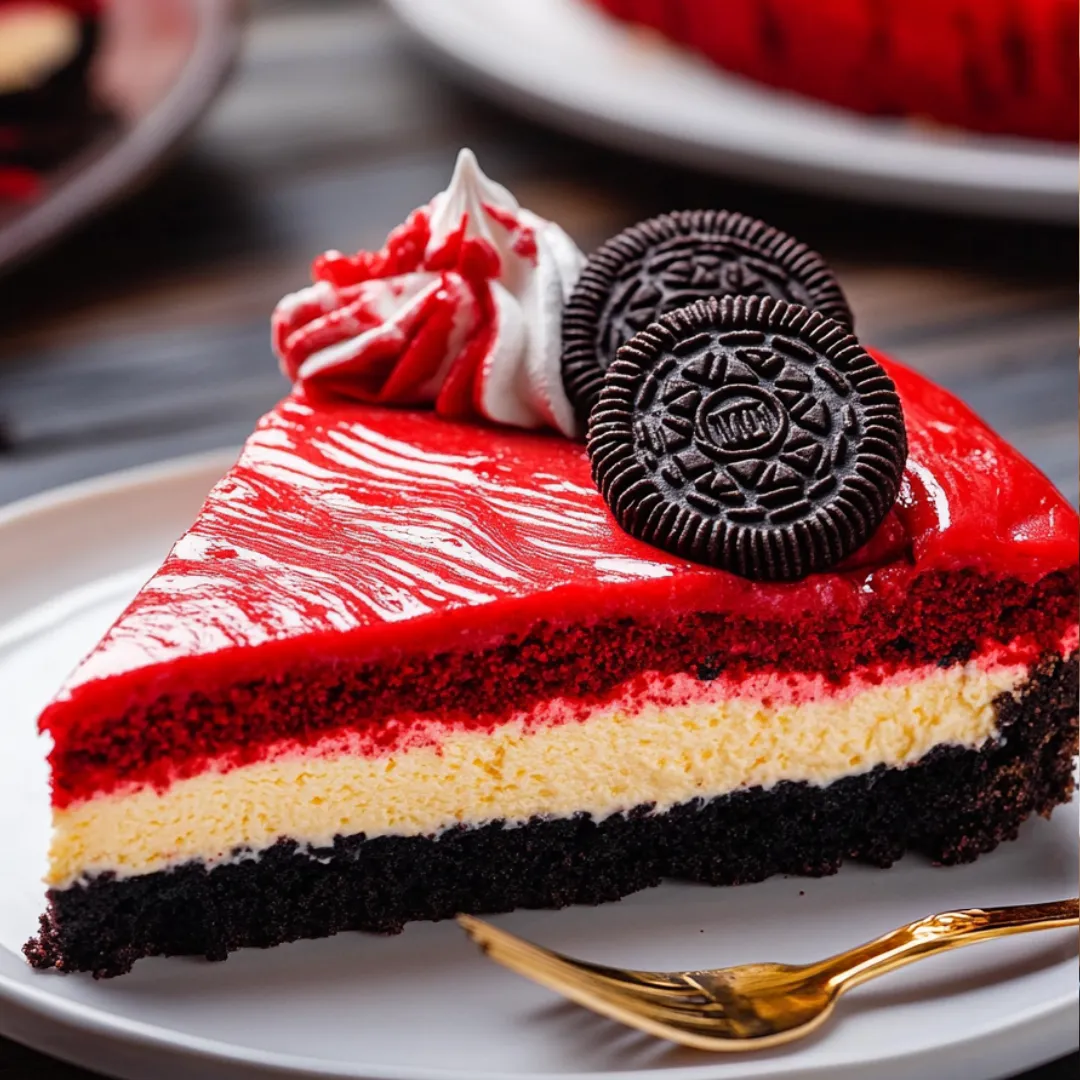
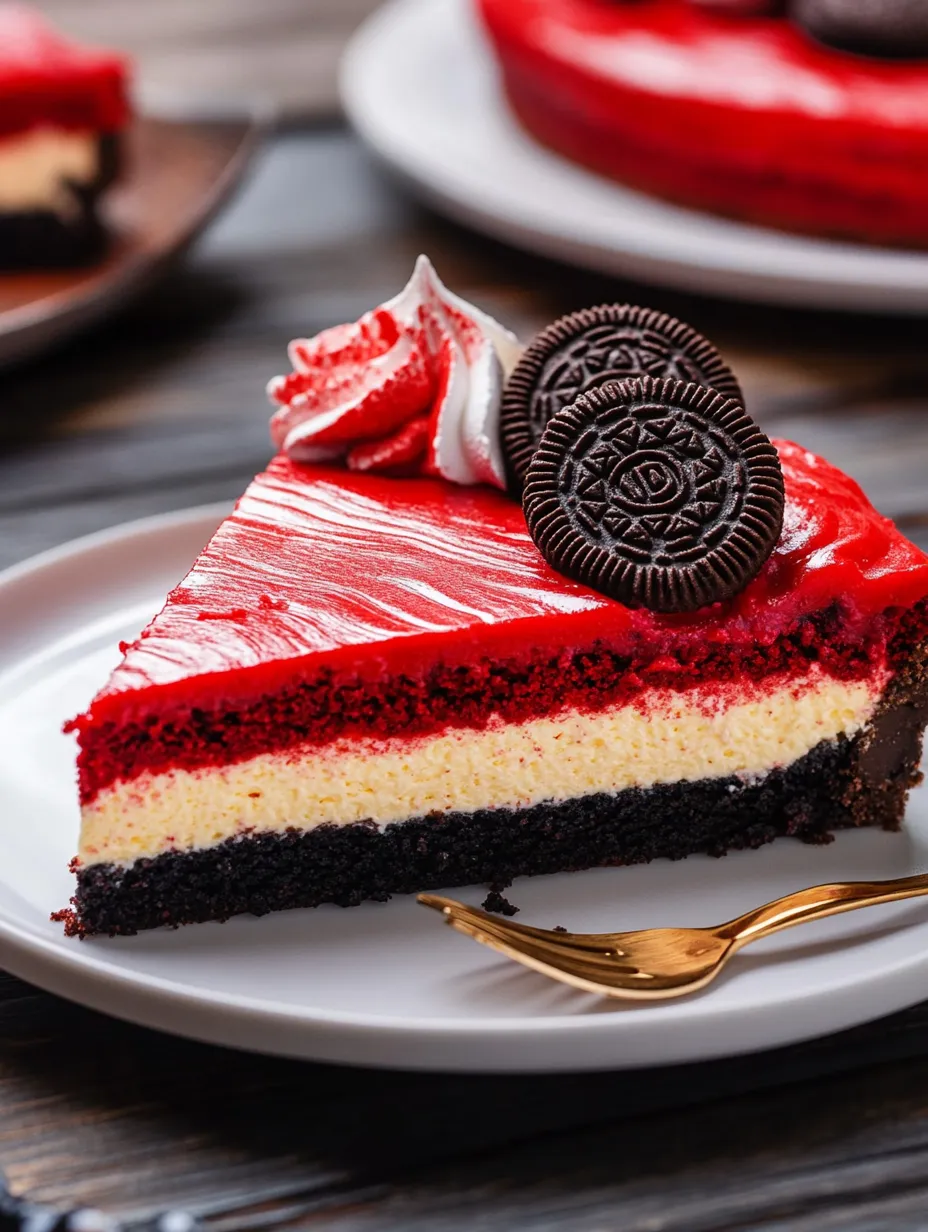
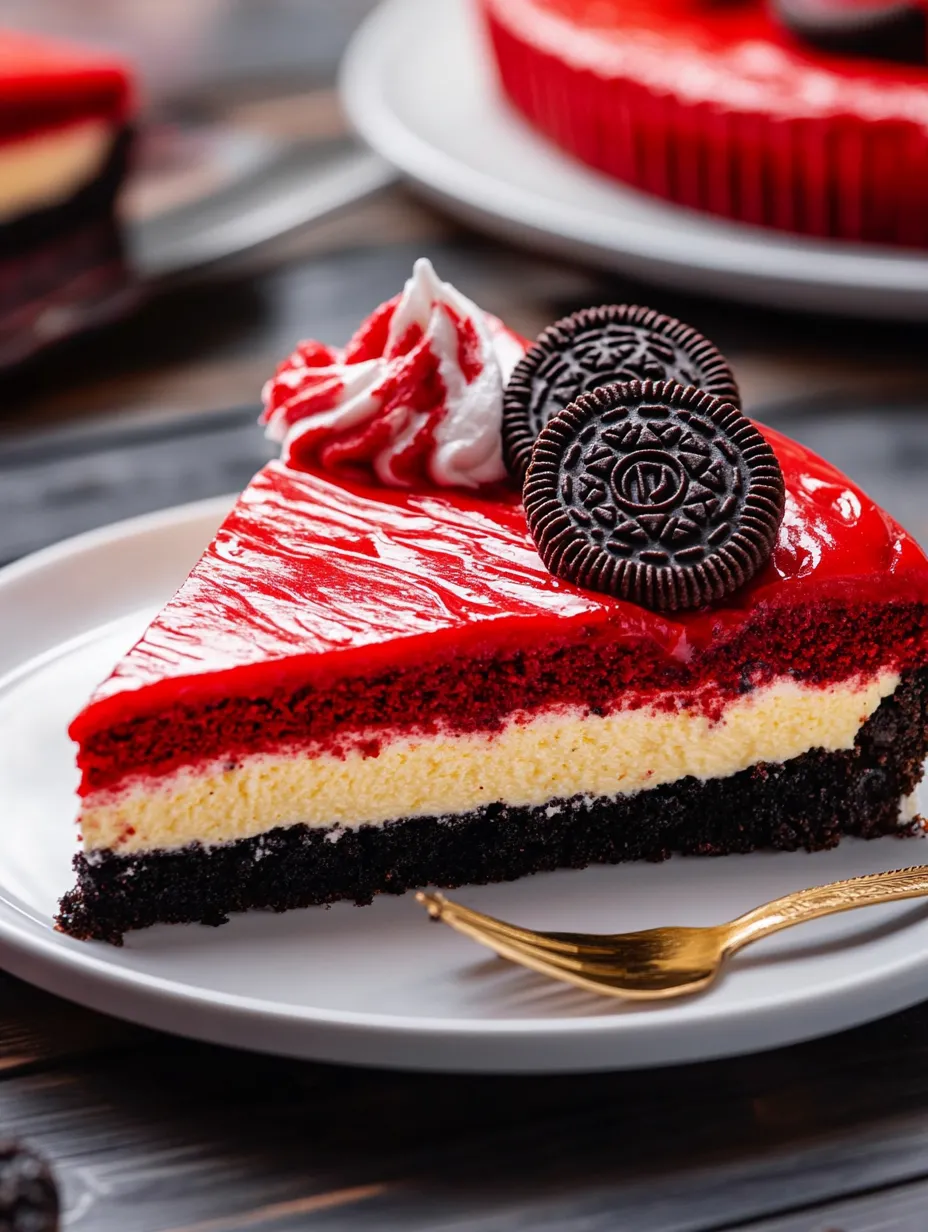
This Red Velvet Oreo Cheesecake is simply irresistible – a perfect marriage of velvety smooth cream cheese, rich chocolate notes, and the beloved crunch of Oreo cookies. The striking red and white layers create a dessert that's as beautiful to look at as it is delicious to eat. The contrast between the crisp Oreo crust and the silky-smooth filling makes each bite a perfect balance of textures and flavors that will impress even the most discerning dessert lovers.
I first made this cheesecake for my sister's birthday party last year, and the moment I brought it to the table, everyone fell silent before erupting in compliments. The rich flavor combines the subtle cocoa notes of red velvet with the tangy creaminess of classic cheesecake. What really surprised me was how the leftovers tasted even better the next day after the flavors had time to fully develop in the refrigerator.
Ingredients You'll Need
- 24 Oreo Cookies: These form the foundation of your crust, providing that distinctive chocolatey flavor that pairs perfectly with red velvet. Don't remove the cream filling – it helps bind the crust together.
- 6 tablespoons Butter, melted: Helps bind the Oreo crumbs and creates that perfectly sliceable crust. Use unsalted butter to control the overall salt content.
- 32 ounces Cream Cheese (4 blocks), softened: The star ingredient that creates that signature cheesecake texture. Always use full-fat cream cheese for the richest flavor and best texture.
- 1½ cups Granulated Sugar: Provides just the right sweetness to balance the tanginess of the cream cheese. Superfine sugar dissolves more easily if available.
- 4 large Eggs, room temperature: These provide structure and richness to the cheesecake. Room temperature eggs incorporate more smoothly into the batter.
- 2 tablespoons Cocoa Powder: Gives the red velvet layer its subtle chocolate flavor. Dutch-processed cocoa provides a smoother, less acidic taste.
- ½ cup Buttermilk: Adds tanginess and moisture to the red velvet layer. The acidity also helps enhance the red color.
- 2 teaspoons Vanilla Extract: Enhances all the other flavors in the cheesecake. Use pure vanilla extract for the best flavor.
- 1 tablespoon Red Food Coloring: Creates that iconic red velvet color. Gel food coloring provides vibrant color without adding excess liquid.
 Pin it
Step-by-Step Cooking Instructions
- Prepare Your Equipment:
- Begin by preheating your oven to 325°F (160°C). Take a 9-inch springform pan and thoroughly grease the bottom and sides with butter or cooking spray. Next, wrap the outside of the pan carefully with a double layer of heavy-duty aluminum foil, ensuring it comes at least halfway up the sides. This crucial step prevents water from seeping in during the water bath baking process. Press the foil firmly against the pan's sides, making sure there are no openings or tears.
- Create the Perfect Oreo Crust:
- Place 24 Oreo cookies in a food processor and pulse until they've transformed into fine crumbs. If you don't have a food processor, place the cookies in a heavy-duty zip-top bag and crush them with a rolling pin. Transfer these crumbs to a medium bowl and pour in the 6 tablespoons of melted butter. Mix thoroughly until the mixture resembles wet sand and no dry crumbs remain. Press this mixture firmly and evenly into the bottom of your prepared springform pan, using the bottom of a measuring cup to compact it. Bake this crust for exactly 10 minutes, then remove it from the oven and set aside to cool while preparing the filling.
- Craft the Red Velvet Layer:
- In a large mixing bowl, beat 16 ounces (2 blocks) of softened cream cheese with ¾ cup of granulated sugar using an electric mixer on medium speed. Continue mixing until the mixture becomes smooth and fluffy, about 2-3 minutes. Add 2 large eggs, one at a time, beating well after each addition and scraping down the sides of the bowl to ensure everything is incorporated evenly. Next, add the cocoa powder, buttermilk, 1 teaspoon of vanilla extract, and red food coloring. Beat on low speed until the mixture is completely smooth and uniform in color, taking care not to overmix. The batter should have a vibrant red color and silky consistency.
- Add the First Layer:
- Pour the red velvet batter over the cooled Oreo crust, using a spatula to spread it evenly. Gently tap the pan on the counter a few times to release any air bubbles trapped in the batter. Set aside while preparing the vanilla layer.
- Prepare the Vanilla Cheesecake Layer:
- In another large bowl, beat the remaining 16 ounces (2 blocks) of softened cream cheese with ¾ cup of granulated sugar until smooth and creamy. Add the remaining 2 eggs one at a time, mixing well after each addition. Stir in the remaining teaspoon of vanilla extract and mix until just combined. The vanilla batter should be smooth and pourable but not overmixed.
- Combine the Layers:
- Very carefully spoon the vanilla cheesecake batter over the red velvet layer. To prevent the layers from mixing, pour the batter over the back of a spoon held just above the red layer, allowing it to gently flow onto the surface. Use a spatula to delicately smooth the top without disturbing the layers beneath.
- Bake with Care:
- Place your springform pan inside a larger roasting pan. Create a water bath by carefully pouring hot water into the larger pan until it reaches about halfway up the sides of the springform pan. This ensures gentle, even heating for a perfectly smooth cheesecake. Carefully transfer this setup to the preheated oven and bake for approximately 60-70 minutes. The cheesecake is done when the edges are set but the center still has a slight jiggle when the pan is gently shaken.
- Cool Gradually:
- When baking is complete, turn off the oven without opening the door and let the cheesecake remain inside for one hour. This gradual cooling helps prevent cracks from forming. After an hour, remove the cheesecake from the water bath, discard the foil, and let it cool completely on a wire rack. Once at room temperature, refrigerate for at least 4 hours, but preferably overnight for the best flavor and texture development.
I learned the importance of the water bath technique from my grandmother, who was known for her perfect cheesecakes. The first time I tried making this recipe without one, the top cracked terribly and the texture was dense rather than creamy. Now I never skip this step! My family particularly loves the contrast between the chocolate Oreo base and the red velvet layer - that hint of cocoa really elevates this cheesecake beyond a basic vanilla version.
Stunning Presentation Ideas
Transform your Red Velvet Oreo Cheesecake into a true showstopper with thoughtful presentation. Consider creating a pattern of whole and halved Oreos around the perimeter of the cheesecake, or pipe rosettes of sweetened whipped cream at regular intervals around the edge. For special occasions, add chocolate curls or shavings over the top, which not only look elegant but also hint at the chocolate notes in the red velvet layer. During the holiday season, a light dusting of edible shimmer or gold dust can create a festive appearance that's sure to impress.
Perfect Pairings
This cheesecake pairs beautifully with several complementary flavors. Serve slices alongside fresh berries – particularly raspberries or strawberries – whose tartness cuts through the richness of the cheesecake. A small scoop of vanilla bean ice cream creates a delightful temperature contrast, while a drizzle of warm chocolate sauce adds another layer of decadence. For an adult gathering, consider offering small glasses of ruby port or a dessert wine like Moscato d'Asti, which harmonize wonderfully with the creamy texture and subtle chocolate notes.
Customization Options
Don't be afraid to make this recipe your own by experimenting with variations. For a more intense chocolate experience, incorporate mini chocolate chips into the red velvet layer or add a middle layer of chocolate ganache. During the holiday season, try adding a hint of peppermint extract to the vanilla layer for a festive twist. For those who prefer natural coloring, substitute the red food coloring with beet powder or concentrated beet juice – you'll get a beautiful burgundy hue with no artificial ingredients.
 Pin it
Storage Solutions
Proper storage is essential for maintaining the quality of your cheesecake. Always store leftovers in the refrigerator, covered loosely with plastic wrap or in an airtight container. The cheesecake will keep well for up to five days, though the crust may soften slightly over time. For longer storage, this cheesecake freezes beautifully – wrap individual slices tightly in plastic wrap, then aluminum foil, and freeze for up to three months. Thaw overnight in the refrigerator for the best texture when serving.
I've been perfecting this recipe for years, and I've discovered that the key to a truly exceptional Red Velvet Oreo Cheesecake lies in the balance of flavors and textures. The first time I served this at a family gathering, my cousin who claimed to dislike cheesecake ended up asking for the recipe! There's something about the combination of that chocolatey Oreo crust with the tangy-sweet cheesecake layers that creates pure dessert magic. While it does require some patience to make, I promise the results are absolutely worth the effort – this is the kind of dessert that creates memories around the table.
Frequently Asked Questions
- → Why do I need a water bath for this cheesecake?
- The water bath provides gentle, even heat and humidity which prevents the cheesecake from cracking, drying out, or becoming rubbery. It's essential for a silky-smooth texture.
- → Can I make this cheesecake without the red food coloring?
- Yes! Without the food coloring, you'll have a chocolate Oreo cheesecake that's equally delicious. The red color is purely aesthetic and doesn't affect the flavor.
- → How do I know when my cheesecake is done baking?
- The edges should be set but the center should still have a slight jiggle (like Jell-O). It will continue to set as it cools. Overbaking can cause cracks and a dry texture.
- → Can I freeze this cheesecake?
- Yes! Freeze it without the ganache and whipped cream toppings. Wrap tightly in plastic wrap followed by foil and freeze for up to 2 months. Thaw overnight in the refrigerator before adding toppings.
- → Why do my ingredients need to be at room temperature?
- Room temperature ingredients blend together more smoothly, resulting in a creamier texture without lumps. Cold ingredients can cause the mixture to separate or become lumpy.