
 Pin it
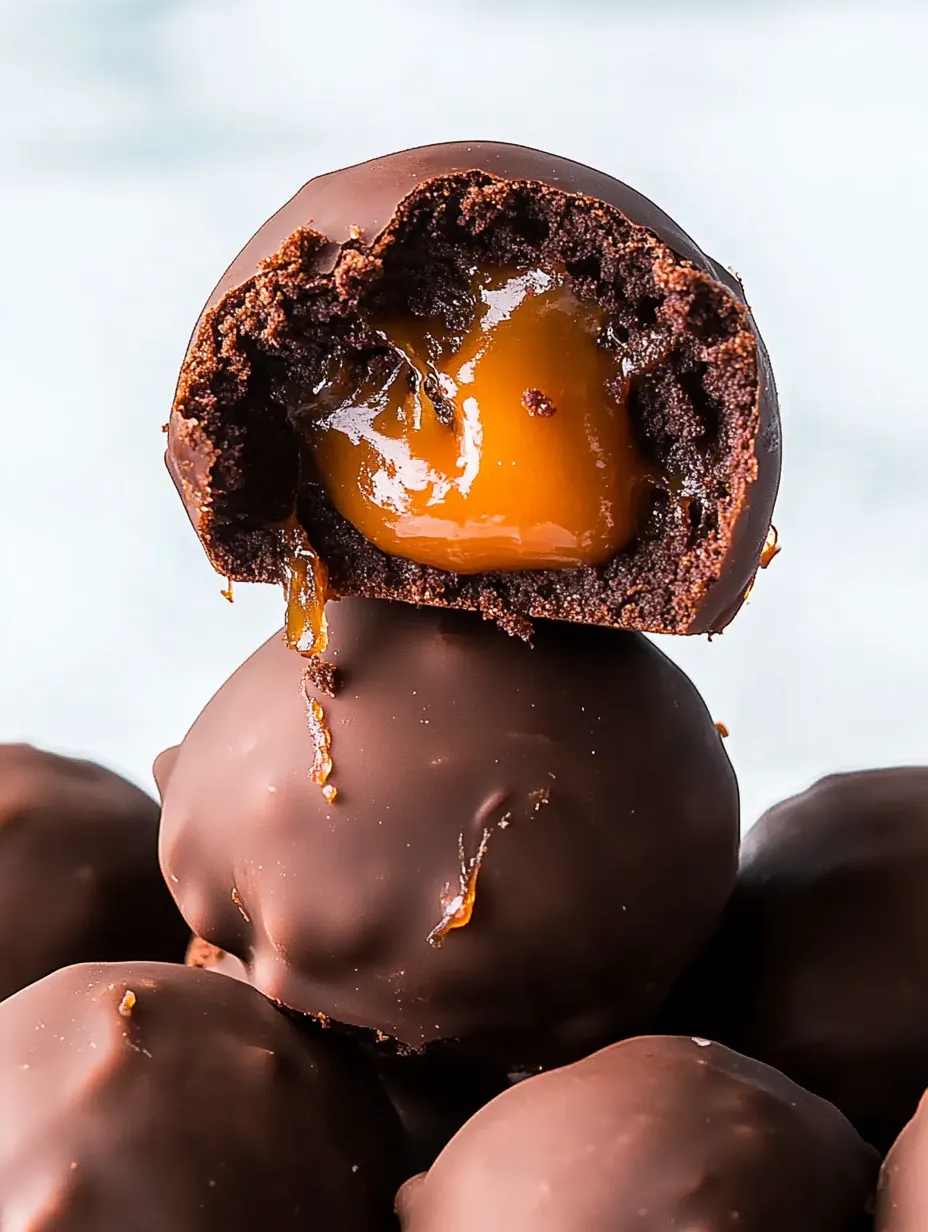
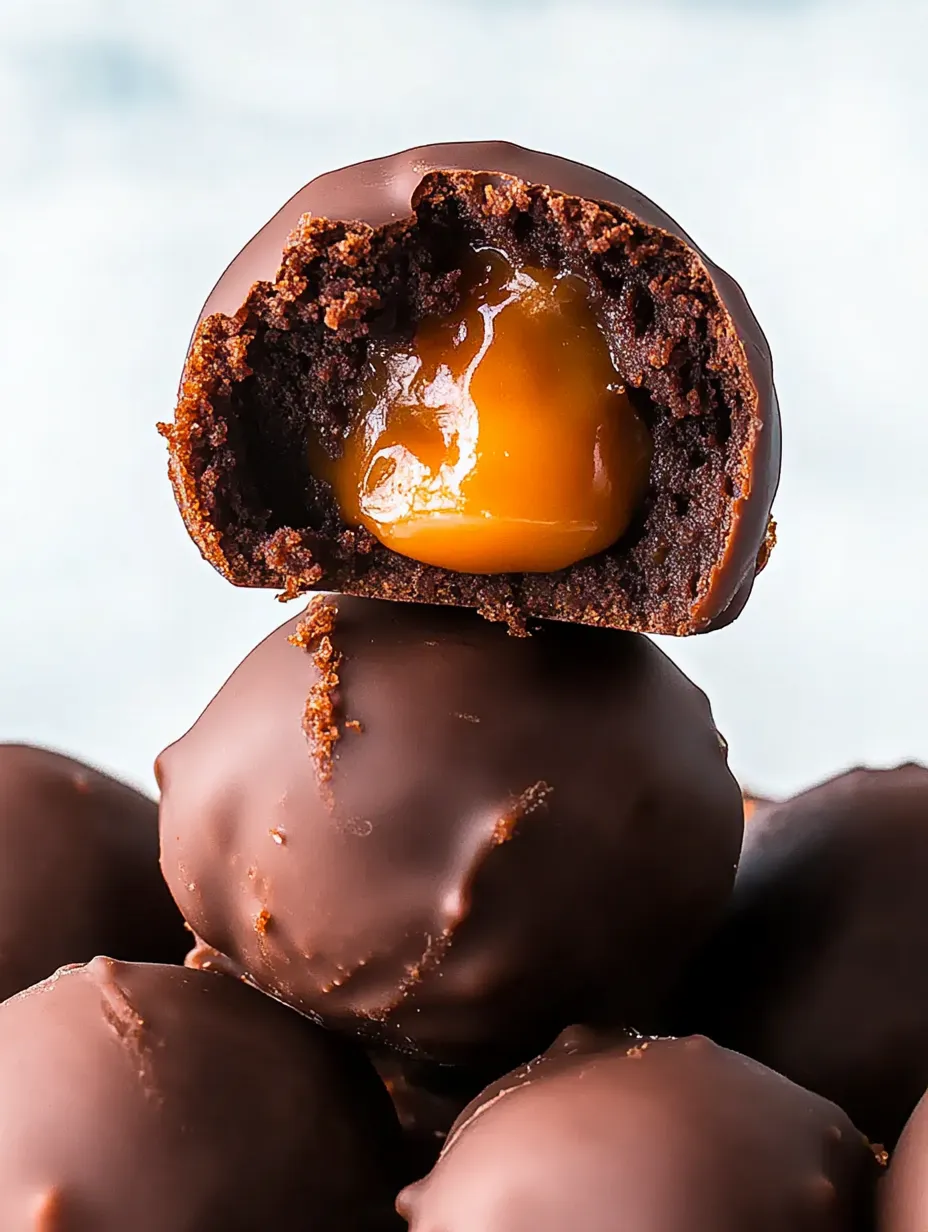
These salted caramel brownie truffles transform even the most disappointing brownie batch into an extraordinary treat that will have chocolate lovers swooning. Imagine biting through a shell of rich dark chocolate to discover a fudgy brownie layer, only to reach the ultimate prize—a molten pocket of salted caramel that oozes with sweet-salty perfection. The contrasting textures create a multi-dimensional dessert experience: the snap of tempered chocolate giving way to soft, tender brownie and finally the flowing caramel center. Perfect for salvaging less-than-perfect brownies or deliberately creating from scratch, these truffles elevate simple ingredients into a dessert worthy of special occasions yet simple enough for satisfying serious chocolate cravings any day of the week.
I developed this recipe during what started as a baking catastrophe. After pulling a tray of disappointingly flat, dense brownies from the oven, I almost tossed the whole batch in frustration. Despite their appearance, the taste was phenomenal, which made the situation even more heartbreaking. Determined not to waste good chocolate, I began crumbling the brownies while contemplating solutions. When I spotted leftover salted caramel in my refrigerator, inspiration struck. The first time I brought these to a gathering, I watched as the initial polite interest transformed into wide-eyed excitement when someone bit into one and the caramel center revealed itself. I've since witnessed people hoarding them at parties, hiding extras in napkins to take home, and shamelessly asking if there are more batches in the kitchen. What began as a rescue mission for failed brownies has become the most requested dessert in my repertoire, proving that sometimes our greatest culinary triumphs arise from apparent disasters.
Essential Ingredients
- Brownie crumbs: The foundation of these truffles. Whether from a baking mishap or deliberately made, brownies with a dense, fudgy texture work best, as they hold together well when mixed with ganache. Cakey brownies tend to create a softer mixture that's harder to shape.
- Chocolate ganache: Binds the brownie crumbs together and adds silky richness. Use equal parts heavy cream and high-quality chocolate (by weight) for the perfect consistency. Dark chocolate with 60-70% cocoa content provides the ideal balance of sweetness and depth.
- Salted caramel: The star of the show that creates the magical center. Homemade offers the best flavor and texture control, allowing you to adjust the salt level to your preference. The caramel must be thoroughly chilled to maintain its shape during assembly.
- Dark chocolate coating: Forms the protective shell that holds everything together. Couverture chocolate, with its higher cocoa butter content, creates the most professional finish, but good-quality chocolate chips can work in a pinch.
- Flaky sea salt: The finishing touch that enhances both the caramel and chocolate flavors. Maldon or fleur de sel varieties, with their delicate texture and clean flavor, work particularly well for this application.
 Pin it
Step-By-Step Preparation
- Step 1:
- Prepare the brownie mixture with precision - In a large mixing bowl, crumble approximately 500g (about 4 cups) of brownies into fine crumbs using your fingers or a fork. There should be no large chunks remaining. In a separate microwave-safe bowl, prepare a simple ganache by heating 120ml (1/2 cup) heavy cream until steaming but not boiling, then pouring it over 120g (4 ounces) chopped dark chocolate. Let stand for 2 minutes, then stir until completely smooth. Allow the ganache to cool for 5-10 minutes until slightly thickened but still pourable. Pour the ganache over the brownie crumbs and mix thoroughly with a spatula until the mixture resembles a thick, fudgy dough that holds together when pressed. Cover and refrigerate for 30 minutes to firm up slightly for easier handling.
- Step 2:
- Prepare the caramel centers with care - While the brownie mixture chills, remove pre-made salted caramel from the refrigerator. The caramel must be thoroughly chilled—ideally overnight—to a consistency firm enough to roll into balls. Using a teaspoon measure or small cookie scoop, portion out 24 small amounts of caramel onto a parchment-lined tray. With lightly oiled hands to prevent sticking, quickly roll each portion into a ball approximately 1/2-inch in diameter. If the caramel becomes too soft to work with, return it to the refrigerator for 15 minutes before continuing. Once all caramel centers are formed, place the tray in the freezer for 15-20 minutes to ensure they're thoroughly chilled and firm before assembly.
- Step 3:
- Assemble the truffles with technique - Remove the brownie mixture from the refrigerator. Using a tablespoon measure or a 1-inch cookie scoop, portion out the brownie mixture. Roll each portion into a ball, then flatten it into a disc about 2 inches in diameter in the palm of your hand. Work quickly to prevent the mixture from warming too much. Remove the caramel balls from the freezer, and place one in the center of each brownie disc. Carefully fold the edges of the brownie mixture up and around the caramel, pinching to seal completely. Gently roll between your palms to form a perfect ball, ensuring no caramel is visible. Place each completed truffle on a parchment-lined tray. If at any point the mixture becomes too soft to work with, return both the brownie mixture and the partially formed truffles to the refrigerator for 15 minutes before continuing.
- Step 4:
- Chill for structural integrity - Once all truffles are formed, place the entire tray in the refrigerator for at least 1 hour, or ideally in the freezer for 30 minutes. This crucial chilling step ensures the truffles maintain their shape during the dipping process and prevents the caramel center from melting into the coating chocolate. While the truffles chill, clean your work surface and prepare for the coating process.
- Step 5:
- Master the chocolate coating - About 15 minutes before removing the truffles from the refrigerator or freezer, prepare the coating chocolate. In a medium microwave-safe bowl, melt 350g (12 ounces) of dark chocolate in 30-second intervals at 50% power, stirring thoroughly between each interval. Continue until just a few small pieces remain unmelted, then stir until completely smooth, allowing the residual heat to melt the remaining chocolate. This prevents overheating, which can cause the chocolate to seize or bloom later. The chocolate should be glossy and relatively fluid but not too hot—test by dabbing a small amount on your inner wrist; it should feel just warm, not hot.
- Step 6:
- Dip with precision - Remove the chilled truffles from the refrigerator or freezer, working with just 4-5 at a time while keeping the rest cold. This prevents them from warming up too quickly, which could cause the caramel to leak during dipping. Using a fork or specialized dipping tool, drop one truffle into the melted chocolate, quickly roll to coat completely, then lift out, allowing excess chocolate to drip back into the bowl. Gently tap the handle of the fork on the edge of the bowl to encourage excess chocolate to fall away, creating a thinner, more even coating. Carefully slide the coated truffle onto a parchment-lined sheet.
- Step 7:
- Finish with flair - Immediately after dipping each truffle, while the chocolate is still wet, sprinkle a few flakes of sea salt on top. The salt should adhere to the chocolate as it begins to set. Work quickly to maintain the proper temperature of both the truffles and the coating chocolate. If the coating chocolate begins to thicken too much for smooth dipping, gently rewarm it in the microwave for 10-15 seconds at 50% power and stir well before continuing. Once all truffles are coated and garnished, allow them to set completely at room temperature for about 1 hour, or in the refrigerator for 15-20 minutes until the chocolate shell is firm and no longer tacky to the touch.
- Step 8:
- Store for peak experience - For the best flavor and texture development, place the fully set truffles in an airtight container and refrigerate for at least 2 hours before serving. This allows the flavors to meld and the textures to harmonize. The truffles can be stored in the refrigerator for up to 1 week. For optimal tasting experience, remove from the refrigerator 15-20 minutes before serving to allow the caramel center to soften slightly and the chocolate flavors to fully express themselves at a slightly warmer temperature.
The Magic of Texture Contrasts
What makes these truffles truly exceptional is the deliberate layering of textures that creates a multi-dimensional eating experience. Each component plays a crucial role in the overall sensation.
The outer chocolate shell provides the initial crisp snap when bitten, a satisfying contrast to what's inside. Using tempered chocolate (or adding a small amount of coconut oil to melted chocolate if tempering seems too technical) ensures this shell remains stable at room temperature while still yielding easily to a bite.
The brownie layer offers a chewy, fudgy cushion between the shell and center. By mixing brownie crumbs with ganache rather than frosting or simple melted chocolate, we create a texture that's dense enough to contain the caramel while still remaining pleasantly soft.
The caramel center delivers the ultimate textural payoff—a slow-moving, viscous flow that coats the palate with sweet-salty richness. The key is achieving the right consistency: too firm and it becomes chewy rather than flowing; too loose and it won't hold its shape during assembly.
The flaky sea salt finish provides occasional crunchy bursts that contrast with the smoothness of the other elements while simultaneously enhancing their flavors through counterpoint.
I've made these truffles dozens of times since that first failed brownie batch, and I've learned through trial and error what makes the difference between good and exceptional results. My first attempts often resulted in caramel leaking through the brownie layer during assembly. The game-changer was freezing the caramel centers before wrapping them in the brownie mixture. This prevents the caramel from melting into the brownie during handling and creates a more distinct center when you bite into the finished truffle. Another critical discovery was the importance of thoroughly chilling the assembled but uncoated truffles before dipping. When I tried to rush this step, the truffles would soften in the warm chocolate, sometimes falling apart on the dipping fork or losing their round shape. Finally, I experimented with different chocolate-to-cream ratios in the ganache that binds the brownie crumbs. Too much cream created a mixture that was difficult to shape and never quite set properly; too little made the truffles dry and crumbly. The equal-parts-by-weight formula creates the perfect fudgy consistency that holds its shape while remaining pleasantly moist.
 Pin it
Chef's Helpful Tips
- Texture rescue - if your brownie mixture is too dry, add a little more ganache; if too wet, add more crumbs or even a tablespoon of cocoa powder
- Clean dipping - keep a small bowl of warm water nearby to clean your dipping fork between truffles for smoother coating
- Presentation upgrade - for special occasions, place each truffle in a mini cupcake liner and arrange in a gift box for an impressive homemade gift
My final thought on these salted caramel brownie truffles is that they perfectly illustrate how culinary 'failures' often lead to the most spectacular creations. There's something deeply satisfying about transforming a disappointing baking result into something that genuinely wows people. When I see the look of surprise and delight on someone's face as they bite into one of these truffles and discover the flowing caramel center, I'm reminded that sometimes our most memorable cooking triumphs come not from following a recipe perfectly, but from the creative problem-solving that happens when things don't go as planned. These truffles have become my signature dessert not because they're the most technically challenging or because they use rare ingredients, but because they deliver an unexpectedly extraordinary experience from seemingly ordinary components. They're a reminder that with a little creativity and perseverance, we can transform disappointment into delight, both in the kitchen and beyond.
Frequently Asked Questions
- → Can I use store-bought brownies for this recipe?
- Absolutely! Any fudgy brownies will work, whether homemade or store-bought. This recipe is perfect for using up day-old brownies or even brownie baking fails.
- → Can I use store-bought caramel sauce instead?
- Yes, though homemade caramel gives the best flavor. If using store-bought, choose a thick caramel sauce and consider reducing it slightly to make it thicker for easier handling.
- → How do I know when my caramel is the right consistency?
- When cooled, it should be thick enough to roll into a soft ball but still oozy when bitten into. If it's too thin, cook it a bit longer; if too thick, add a splash more cream.
- → Can I freeze these truffles?
- Yes! They freeze beautifully for up to 3 months. Thaw them in the refrigerator overnight before serving for the best texture and flavor.
- → What's the best way to coat the truffles in chocolate?
- Use a fork to dip each chilled truffle into melted chocolate, tap off excess, then place on parchment paper. For extra finesse, drizzle with contrasting chocolate or sprinkle with sea salt before the coating sets.