
 Pin it
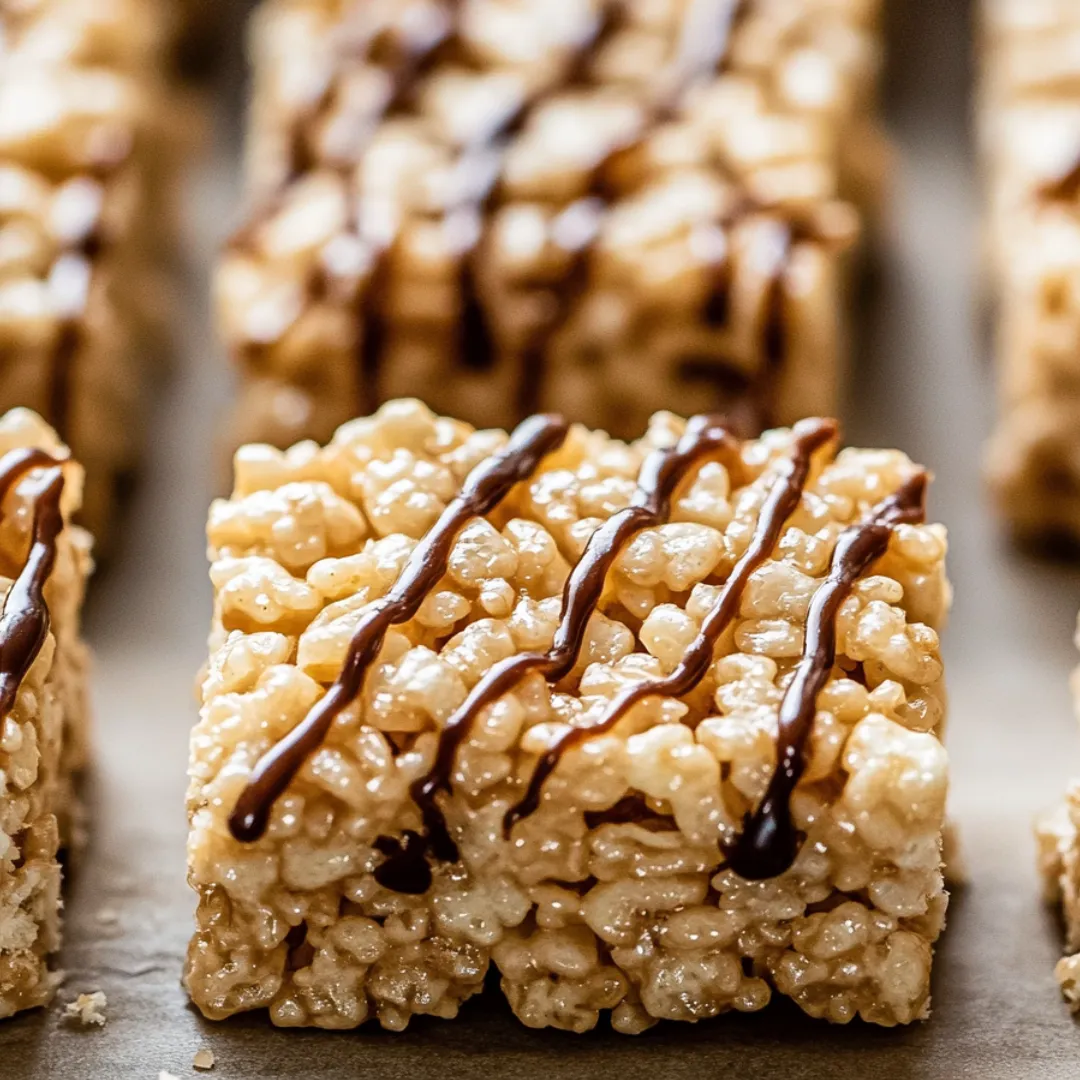
These indulgent bars elevate the classic Rice Krispie treat to extraordinary heights with layers of buttery caramel, rich chocolate, and that perfect hint of sea salt. Each bite delivers an irresistible contrast of textures—from the crispy, marshmallow-coated cereal base to the smooth, chewy caramel center and silky chocolate drizzle on top. The touch of flaky sea salt creates the perfect sweet-salty balance that makes these treats impossible to resist.
I first made these treats for a potluck where I wanted to bring something familiar yet special. While everyone recognized the classic Rice Krispie base, the addition of salted caramel and chocolate transformed them into something extraordinary. My friend's teenage son, who typically avoids 'fancy' desserts, came back for thirds and asked if I could teach him how to make them. The combination of nostalgic comfort and gourmet flavors makes these treats appeal to both children and adults alike.
Ingredients
- Rice Krispies cereal: Creates the crispy, airy foundation. The neutral flavor provides the perfect canvas for the other components.
- Marshmallows: Form the sweet, sticky binding agent for the cereal. Fresh marshmallows create a softer texture than stale ones.
- Caramels: Deliver rich, buttery sweetness in the middle layer. Store-bought caramels provide convenience while ensuring consistent results.
- Sweetened condensed milk: Transforms the caramel layer into a smooth, pourable consistency. Its richness helps the caramel maintain softness even when chilled.
- Butter: Adds richness and helps prevent sticking. Unsalted butter works best, allowing you to control the salt level separately.
- Heavy cream: Creates a silky-smooth chocolate ganache topping. The fat content ensures the chocolate maintains the perfect consistency.
- Milk chocolate chips: Provide a creamy, sweet contrast to the salty caramel. Their mild flavor complements rather than competes with the other components.
- Sea salt: The finishing touch that elevates the entire dessert. Flaky sea salt provides both flavor and visual appeal.
 Pin it
Instructions
- Prepare your workspace:
- Begin by generously buttering a 9×13-inch baking dish, making sure to coat both the bottom and sides completely. This thorough greasing is crucial for easy removal of the finished treats. Alternatively, you can line the dish with parchment paper, leaving an overhang on the sides to create handles for lifting out the entire slab later. Have all ingredients measured and unwrapped before you begin cooking, as the process moves quickly once started. Clear counter space for cooling the finished layers and gather all necessary tools, including heat-resistant spatulas and multiple saucepans.
- Create the perfect Rice Krispie base:
- In a large saucepan, melt 5 tablespoons of butter over medium-low heat, swirling occasionally until completely melted. Add 10 ounces of marshmallows to the melted butter and reduce heat to low. Stir constantly with a heat-resistant spatula, making sure to scrape the bottom of the pan to prevent scorching. Continue stirring until the marshmallows are completely melted and the mixture is smooth and glossy, about 3-4 minutes. Remove from heat and stir in 1 teaspoon of vanilla extract, which adds depth to the marshmallow flavor. Working quickly, add 5 cups of Rice Krispies cereal to the marshmallow mixture, folding gently but thoroughly until every piece of cereal is evenly coated. Transfer the mixture to your prepared baking dish, using a piece of parchment paper or a buttered spatula to press it into an even layer without compacting it too firmly. Allow this layer to cool for about 10 minutes while you prepare the caramel layer.
- Craft the luscious caramel layer:
- In a medium saucepan, combine 10 ounces of unwrapped caramels, one 14-ounce can of sweetened condensed milk, and 5 tablespoons of butter. Heat over medium-low, stirring constantly to prevent sticking and ensure even melting. The mixture will gradually become smooth and uniform as the caramels dissolve into the butter and condensed milk. This process takes patience—about 5-7 minutes of constant attention. Once completely smooth with no visible caramel pieces remaining, remove from heat. Pour this warm caramel mixture evenly over the cooled Rice Krispie layer, using a spatula to spread it into a uniform layer that reaches all the way to the edges. While the caramel is still warm, sprinkle with a generous pinch of sea salt, which will slightly sink into the surface. Allow this layer to cool for about 15 minutes before proceeding to the chocolate topping.
- Finish with chocolate perfection:
- For the final layer, heat 1/2 cup of heavy cream in a small saucepan over medium heat until it just begins to simmer around the edges. Watch carefully—you want it hot but not boiling. Meanwhile, place 6 ounces of milk chocolate chips in a heat-resistant bowl. Once the cream is heated, immediately pour it over the chocolate chips. Let sit for 30 seconds, then gently stir with a whisk or spatula, starting from the center and working outward, until the chocolate is completely melted and the ganache is smooth and glossy. Allow the ganache to cool slightly for about 5 minutes, thickening to a drizzling consistency. Using a spoon or fork, drizzle the chocolate decoratively over the caramel layer in a zigzag pattern. For a finishing touch, sprinkle another small pinch of sea salt over the chocolate drizzle. Allow the entire dessert to cool completely at room temperature, then refrigerate for at least 1 hour before cutting to allow the layers to set firmly. For clean cuts, run a sharp knife under hot water and wipe dry between slices.
I learned about the importance of proper cooling between layers through trial and error. In my first attempt, I poured the warm caramel over the Rice Krispie base too soon, causing the marshmallow to partially melt and the layers to blend together. Now I make sure the base is cool enough to touch comfortably before adding the caramel layer. Another game-changing discovery was the impact of a warmed knife for slicing—it creates professional-looking bars with clean edges instead of the jagged, messy cuts I initially struggled with.
Serving and Storage Tips
These treats reach their perfect texture after cooling completely and then chilling for about an hour. At this point, the caramel is firm enough to hold its shape when cut but still pleasantly chewy, and the chocolate layer has set to a beautiful finish.
For the best presentation, cut into squares or rectangles and arrange on a serving platter. If desired, add a small additional sprinkle of sea salt just before serving to refresh the visual appeal and ensure that sweet-salty contrast is at its peak.
Store any leftovers in an airtight container with parchment paper between layers to prevent sticking. They'll keep at room temperature for 2-3 days, though the texture is best when enjoyed within the first 48 hours. For longer storage, refrigerate for up to a week, but allow them to come to room temperature for about 15 minutes before serving for the optimal chewy texture.
 Pin it
Creative Variations
While this recipe is perfect as written, there are several delicious variations to consider. For a more intense caramel experience, try adding 1/2 teaspoon of ground cinnamon to the caramel layer, which enhances the buttery notes and adds warming depth.
Create a peanut butter lover's version by stirring 1/4 cup of creamy peanut butter into the marshmallow mixture before adding the cereal. Then top with a drizzle of both chocolate and peanut butter ganache for a flavor combination reminiscent of popular candy bars.
For a festive holiday adaptation, add 1/2 cup of crushed peppermint candies to the Rice Krispie base and substitute white chocolate for the milk chocolate drizzle, creating a beautiful peppermint bark-inspired treat.
After making these treats many times, I've discovered that adding a tiny pinch of salt directly to the marshmallow mixture enhances all the flavors without making the base taste salty. I've also found that allowing the caramel layer to set for exactly 15 minutes—not longer—before adding the chocolate creates the perfect level of adhesion between layers while still maintaining distinct textures. These small refinements elevate an already delicious treat into something truly special that looks and tastes professionally made.
Frequently Asked Questions
- → Can I make these treats ahead of time?
- Yes! These treats can be made 1-2 days in advance. Store them in an airtight container at room temperature or in the refrigerator if you prefer a firmer texture.
- → How do I prevent my Rice Krispie treats from getting too hard?
- Don't overheat your marshmallows when melting them, and avoid pressing the mixture too firmly into the pan. Also, make sure to store them in an airtight container to maintain their soft, chewy texture.
- → Can I freeze these treats?
- Yes, they freeze well for up to 2 months. Wrap them individually in plastic wrap, then place in a freezer-safe container. Thaw at room temperature before serving.
- → What type of salt works best for the 'salted' part?
- Flaky sea salt (like Maldon) works best as a finishing salt because it provides a nice crunch and visual appeal. Kosher salt can also work, but avoid table salt as it's too fine and dissolves too quickly.
- → How can I easily cut these treats without making a mess?
- For clean cuts, chill the treats completely first. Then use a sharp knife that's been dipped in hot water and wiped dry between cuts. You can also use a plastic knife, which surprisingly works well with sticky treats!