
 Pin it
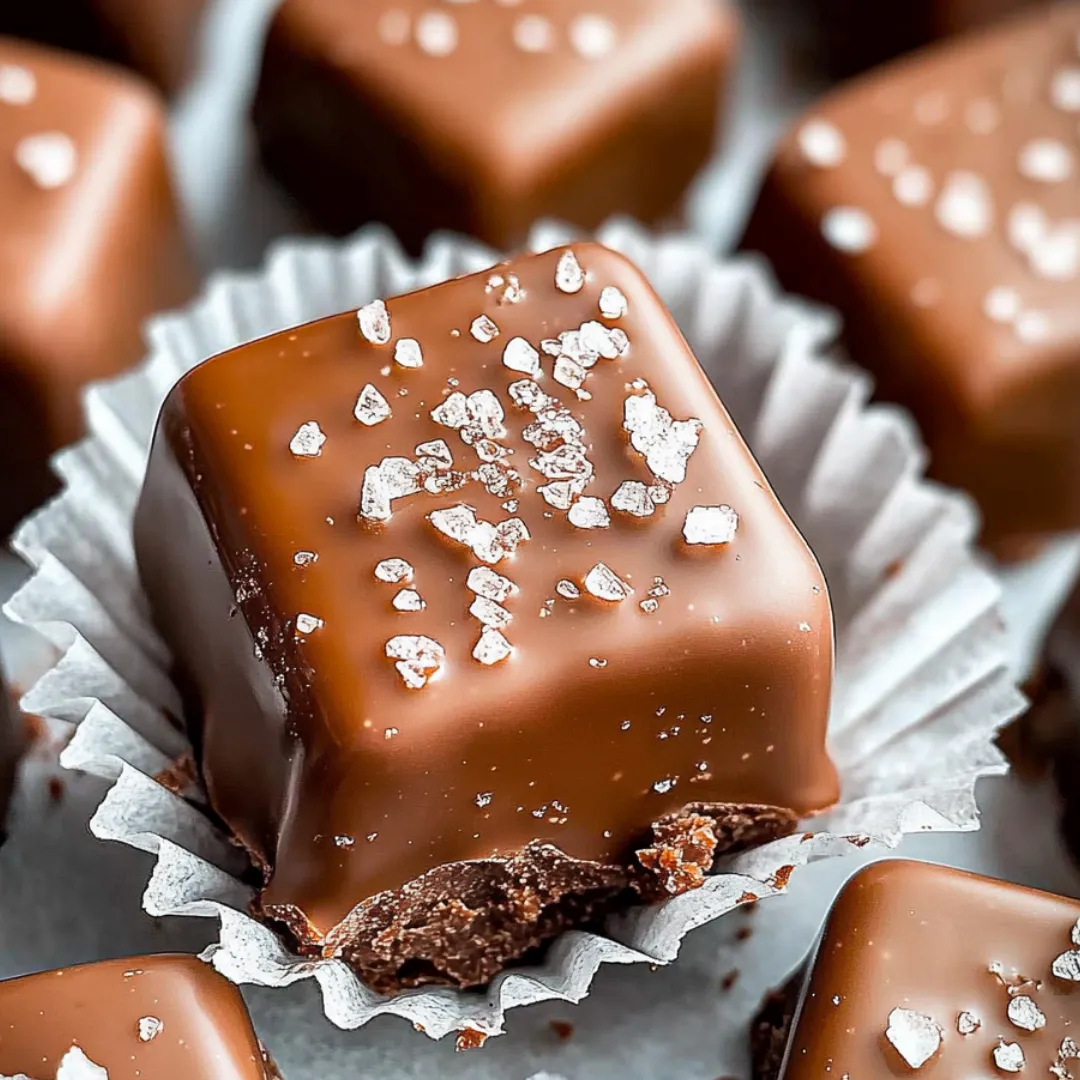
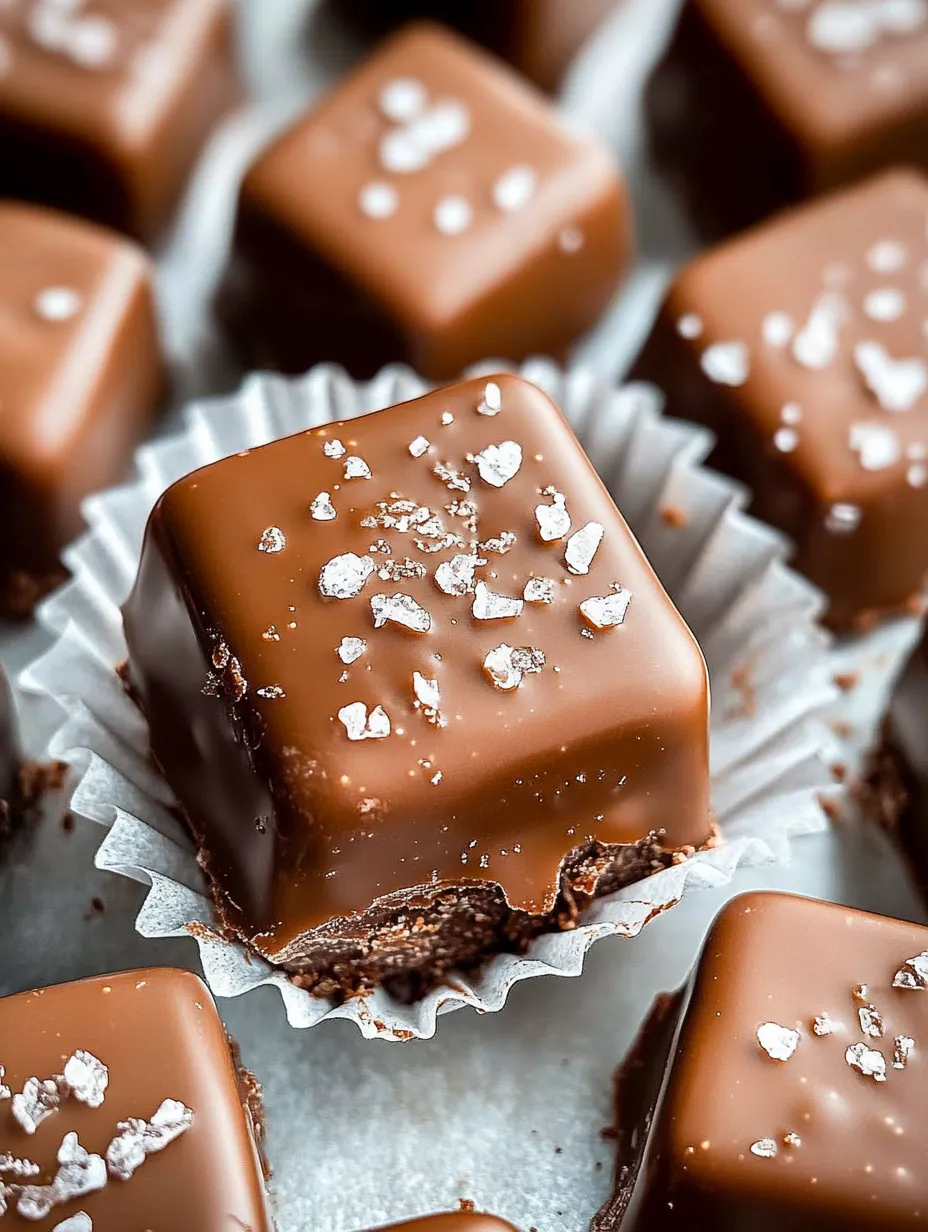
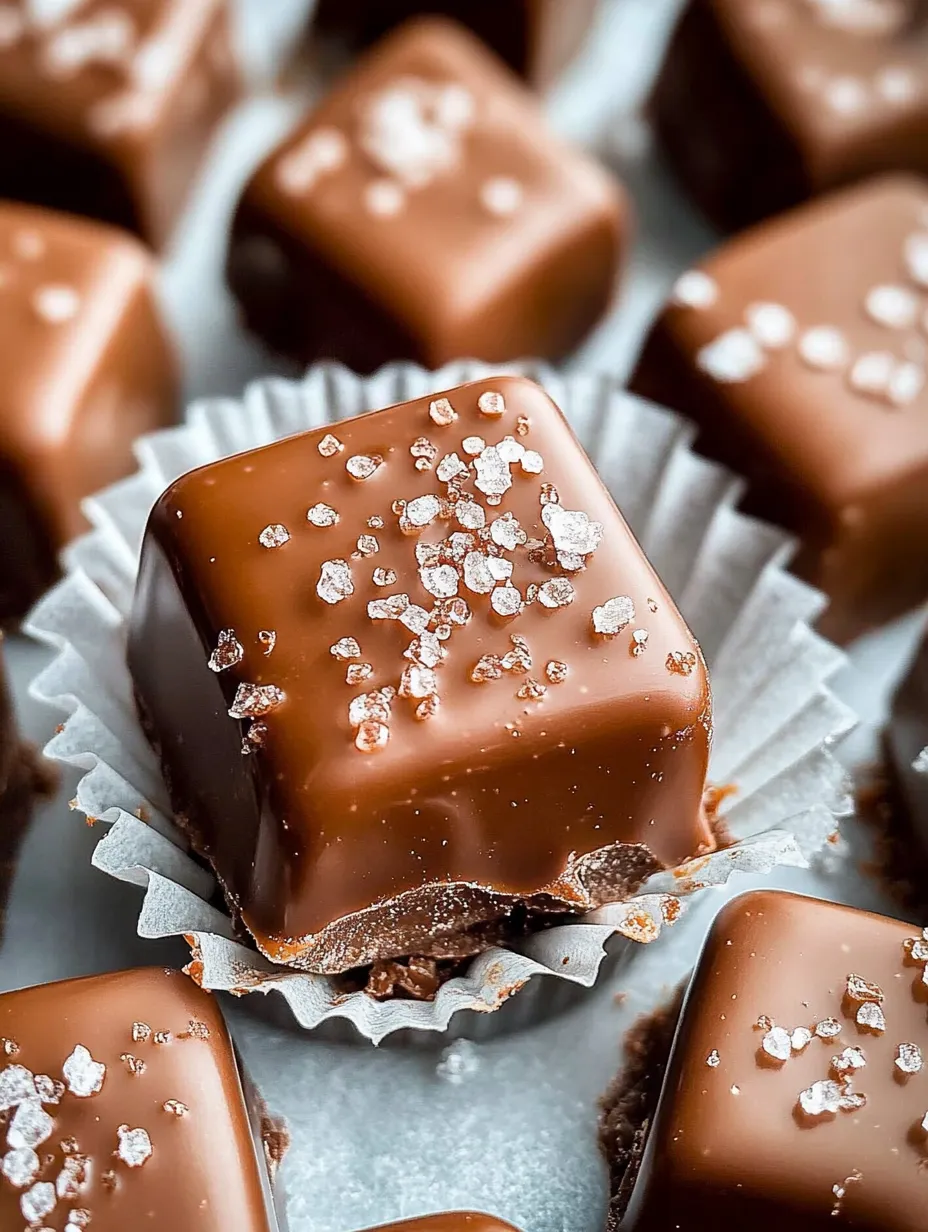
These luxurious salted chocolate caramels transform simple ingredients into an indulgent treat that balances sweet, salty, and chocolatey flavors in perfect harmony. Each square features a smooth, chewy caramel center that yields with each bite, enrobed in a thin layer of rich chocolate and crowned with flaky sea salt crystals that provide both visual appeal and flavor contrast. The combination creates a confection that's equally at home on holiday gift platters, elegant dessert tables, or as a special treat alongside your afternoon coffee. While they look and taste like they came from an artisanal candy shop, these caramels require only basic ingredients and techniques, making them an accessible project for both novice and experienced candy makers.
I first made these caramels as holiday gifts when my budget was tight but I wanted to give something meaningful. The recipients were so impressed that they assumed I'd purchased them from an expensive candy shop! One friend even admitted she hid them from her family to enjoy in secret. Over the years, these have become my signature homemade gift, with friends and family requesting them months in advance. What I love most is seeing the look of surprise when people take their first bite—the perfect chewiness followed by the chocolate melting on their tongue and finishing with that subtle salt sparkle creates an unforgettable flavor moment.
Ingredients You'll Need
- 2 cups Granulated Sugar - Provides the foundation and sweetness for the caramel. Use pure cane sugar for the best results
- 1 cup Corn Syrup - Prevents crystallization and creates the perfect chewy texture. Regular corn syrup (not light) works best
- 1 cup Heavy Cream - Adds richness and creaminess to the caramel. Full-fat is essential here
- 1 cup Unsalted Butter (2 sticks), cubed - Creates a luxurious mouthfeel and flavor. Using unsalted allows better control of the final saltiness
- ¼ cup Semisweet Chocolate Chips - Adds depth and complexity to the caramel mixture. Choose a quality brand for the best flavor
- 1 teaspoon Vanilla Extract - Enhances and rounds out all the other flavors. Pure vanilla extract rather than imitation makes a noticeable difference
- 2 cups Semisweet Chocolate Chips (for dipping) - Creates the outer chocolate shell. You can substitute dark or milk chocolate based on preference
- Flaky Sea Salt (such as Maldon) - Provides the finishing touch that balances sweetness. The flaky texture adds visual appeal and flavor bursts
 Pin it
Step-by-Step Cooking Instructions
- Prepare Your Workspace:
- Before beginning, line an 8×8-inch baking pan with parchment paper, leaving overhang on all sides for easy removal later. Lightly spray the parchment with cooking spray to ensure nothing sticks. Have all ingredients measured and ready, as the process moves quickly once started. Clip a candy thermometer to a heavy-bottomed saucepan (at least 3-quart capacity) so it doesn't touch the bottom of the pan. Working with sugar at high temperatures requires full attention, so eliminate distractions and keep children and pets away from the cooking area.
- Create the Caramel Base:
- Add the granulated sugar, corn syrup, heavy cream, and cubed butter to your prepared saucepan. Place over medium heat and stir gently until the butter melts and sugar dissolves completely. This initial melting process should be done patiently—rushing with high heat risks burning the mixture. Once everything is melted and combined into a smooth liquid, stop stirring. Continued stirring can cause unwanted crystallization. Instead, occasionally swirl the pan gently to ensure even heating.
- Cook to Perfect Temperature:
- Allow the mixture to come to a gentle boil, watching carefully as the temperature slowly rises on your candy thermometer. This process cannot be rushed and typically takes 15-20 minutes to reach the desired temperature. You're aiming for exactly 240°F (115°C), which is the 'soft ball' stage in candy making. This precise temperature ensures the perfect chewy texture—too low results in soft, sticky caramels; too high creates hard candies. As the temperature approaches 235°F, watch very carefully, as it can climb quickly in the final few degrees.
- Add Chocolate and Flavor:
- Once the mixture reaches 240°F, immediately remove it from the heat. Quickly add the ¼ cup chocolate chips and vanilla extract, being careful as the mixture may bubble up slightly. Stir gently but thoroughly with a heat-resistant spatula until the chocolate is completely melted and incorporated, resulting in a smooth, glossy mixture. The chocolate adds depth and complexity to the caramel flavor profile, while the vanilla rounds out the sweetness with its aromatic notes.
- Set the Caramel Properly:
- Pour the hot caramel mixture into your prepared pan in one steady stream, avoiding the temptation to scrape the saucepan sides (which can introduce crystals). If any air bubbles appear on the surface, gently tap the pan on the counter a few times to release them. Allow the caramel to cool at room temperature for about 30 minutes, then transfer to the refrigerator to set completely, which takes approximately 2 hours. The caramel needs to be firm enough to handle but not so cold that it becomes brittle.
- Cut with Precision:
- When the caramel is fully set, use the parchment paper overhang to lift it out of the pan and place it on a cutting board. If it's too rigid to work with, allow it to warm up slightly at room temperature for 10-15 minutes. Spray a sharp, non-serrated knife with cooking spray and make clean, decisive cuts to create 1-inch squares. Wipe and re-spray your knife between cuts for the cleanest edges. For truly professional-looking caramels, measure with a ruler to ensure uniformity. The cutting process requires patience—rushing through this step can result in uneven, messy pieces.
- Add the Chocolate Coating:
- In a microwave-safe bowl, melt the 2 cups of chocolate chips in 30-second intervals, stirring between each heating, until completely smooth. Allow the melted chocolate to cool slightly but remain fluid. Line a baking sheet with parchment paper. Working with one caramel square at a time, dip it halfway into the melted chocolate, or use a fork to fully submerge it for complete coverage. Tap off excess chocolate and place on the lined baking sheet. While the chocolate is still wet, sprinkle each piece with a few flakes of sea salt. Allow the chocolate to set completely at room temperature, approximately 1-2 hours, or speed up the process with 15-20 minutes in the refrigerator.
I learned the importance of temperature precision through a memorable kitchen failure. During my first attempt at these caramels, I got distracted by a phone call just as the thermometer approached 240°F. By the time I returned to the stove, the temperature had soared past 260°F. Determined not to waste ingredients, I continued with the recipe. The resulting 'caramels' were so hard they could have been used as building materials! My husband actually suggested we melt them down to use as roof sealant. Now I treat candy-making like a meditation—phone silenced, family warned not to interrupt, complete focus on the slowly rising mercury. That attention to detail makes all the difference between dentist-friendly treats and potential dental emergencies.
Gifting and Presentation Ideas
Transform these caramels into thoughtful, impressive gifts with minimal effort. For individual wrapping, cut 4-inch squares of wax paper or special candy wrappers, place a caramel in the center, and twist the ends for a classic candy look. For more elegant presentation, place caramels in small paper candy cups and arrange in decorative tins or boxes lined with tissue paper. Add personalized tags with ingredients (important for those with allergies) and a note mentioning they're best enjoyed at room temperature. During holiday seasons, coordinate your packaging with seasonal colors or themes – red and green for Christmas, pastels for Easter, or orange and black for Halloween.
Flavor Variations
While the classic salted chocolate caramel is perfection on its own, subtle variations can create exciting flavor profiles. For a warming autumn version, add ¼ teaspoon of cinnamon and a pinch of nutmeg to the caramel mixture. Coffee lovers will appreciate the addition of 1 teaspoon of espresso powder, which intensifies the chocolate notes. For a sophisticated twist, replace the vanilla extract with 1-2 tablespoons of bourbon or rum, adding complexity and subtle warmth. Orange-infused caramels can be created by adding 1 teaspoon of orange zest to the mixture just before pouring it into the pan. Each variation maintains the basic technique while offering a unique flavor experience.
Texture Adjustments
The final texture of your caramels can be customized based on personal preference. For slightly softer caramels, cook the mixture to 238°F instead of 240°F – this subtle adjustment creates a more yielding bite, perfect for those who prefer a gentler chew. Conversely, cooking to 242-243°F results in firmer caramels that hold their shape better in warmer conditions, making them more suitable for shipping or outdoor events. The corn syrup ratio also affects texture – increasing it by 2 tablespoons creates a more pliable caramel, while reducing it slightly results in a more traditional, firmer candy.
Storage Essentials
Properly stored, these chocolate caramels maintain their quality for weeks, making them perfect for advance preparation. Keep them in an airtight container, with layers separated by parchment paper to prevent sticking, for up to two weeks at cool room temperature (65-70°F). In warmer environments, refrigeration is recommended, but always bring them to room temperature before serving for the ideal texture and flavor experience. For longer storage, they can be frozen for up to three months – wrap them individually first, then place in a freezer-safe container. Thaw overnight in the refrigerator, then bring to room temperature before enjoying.
 Pin it
Troubleshooting Common Issues
Even experienced candy makers occasionally encounter challenges. If your caramels turn out too soft, they likely didn't reach the target temperature – next time, verify your thermometer's accuracy by testing it in boiling water (it should read 212°F at sea level). For caramels that are too hard, the mixture was overheated – consider investing in a digital thermometer with an alarm function for better monitoring. Grainy texture indicates sugar crystallization, usually caused by stirring after the sugar has dissolved or by sugar crystals on the side of the pan – prevent this by washing down the sides of the pan with a wet pastry brush before the mixture boils. For chocolate coating that looks dull or streaky, the chocolate was likely overheated or exposed to moisture – next time, melt it more gently and ensure all utensils are completely dry.
My favorite memory with this recipe involves a last-minute holiday party where I needed an impressive dessert but had no time for shopping. Digging through my pantry, I found the exact ingredients for these caramels. While they cooled, I transformed a plain tin box with leftover wrapping paper and ribbon. The caramels were the hit of the event, with one guest—a professional chef—asking for my 'supplier' because they 'couldn't possibly be homemade.' That moment taught me that sometimes the most appreciated contributions come from necessity and simplicity rather than elaborate planning. Now I always keep these basic ingredients on hand for culinary emergencies—they've saved many occasions and created countless sweet memories.
Frequently Asked Questions
- → Why do my caramels need to reach exactly 240°F?
- This temperature (soft ball stage) ensures the perfect chewy texture. Lower temperatures result in softer, sometimes runny caramels, while higher temperatures create harder, more toffee-like candies.
- → Can I make these without a candy thermometer?
- While a candy thermometer provides the most accurate results, you can use the cold water test. Drop a small amount of the mixture into cold water - it should form a soft, pliable ball that flattens when removed from the water.
- → How do I prevent my caramels from sticking together?
- Individually wrap each caramel in wax paper or parchment paper after the chocolate has set completely. Alternatively, place them in mini candy cups and store in a single layer.
- → Can I use different types of salt for the topping?
- Flaky sea salt is recommended because it provides a nice textural contrast and visual appeal. Kosher salt can work in a pinch, but table salt is too fine and will dissolve too quickly.
- → How can I tell when my caramels are properly set?
- Properly set caramels should be firm to the touch but still have some give when pressed. They should hold their shape when cut but not be brittle or too soft.