
 Pin it
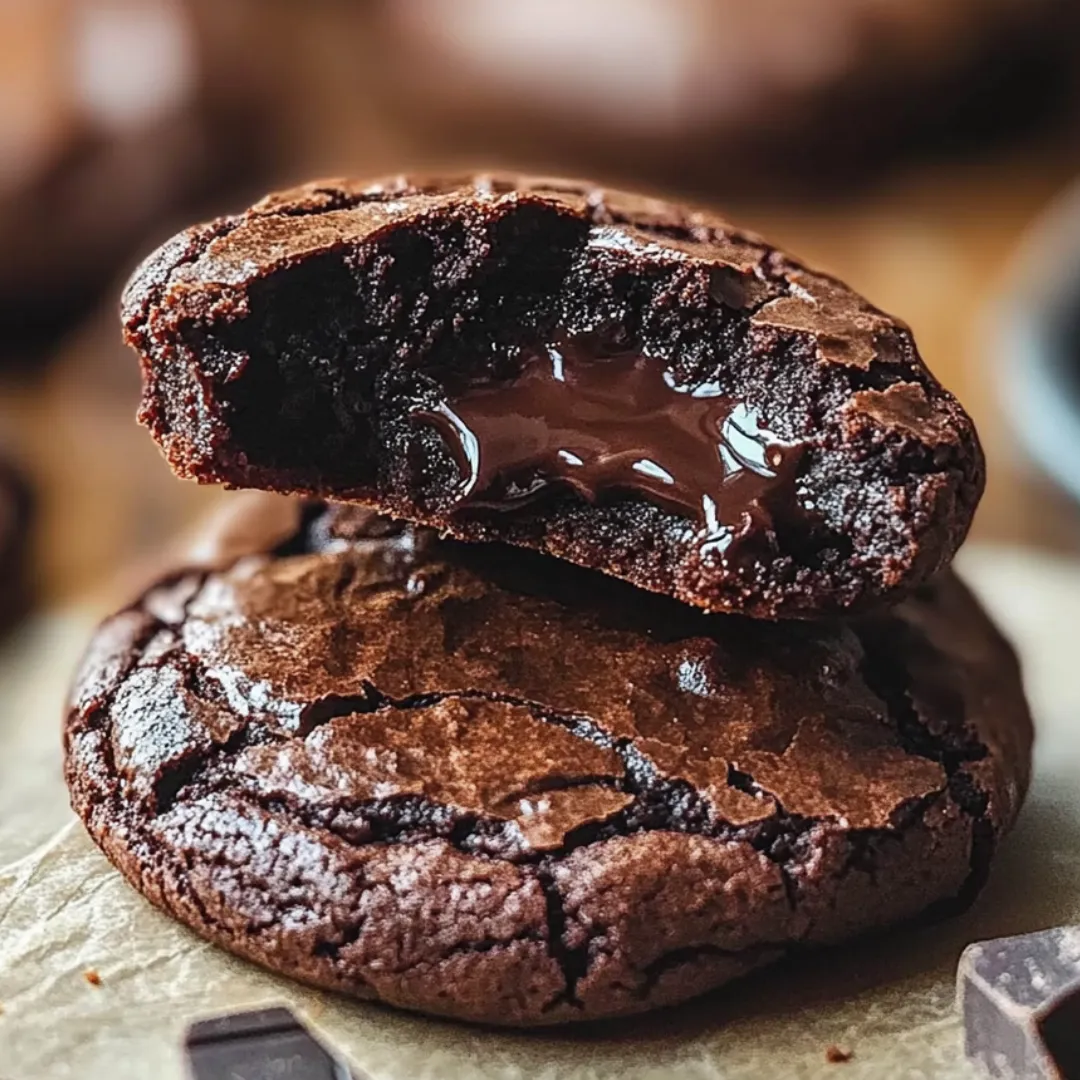
These decadent chocolate lava brownie cookies deliver the ultimate chocolate experience with their fudgy exterior and molten center that creates an irresistible flow of rich chocolate with each bite. The contrasting textures – crisp edges giving way to a chewy middle and finally that gooey lava core – make these treats particularly special. Perfect for serious chocolate lovers, these impressive cookies combine the best qualities of brownies and lava cake in one hand-held indulgence.
I first encountered something similar at a high-end bakery while traveling for work. The memory of that warm, gooey center haunted me for weeks afterward, and I became determined to recreate it at home. After several attempts and some chocolaty kitchen disasters, I finally perfected this recipe. The moment my husband bit into the first successful batch, his eyes widened, and he immediately reached for a second cookie. Now they've become my signature dessert for dinner parties – I make the dough ahead of time and pop them in the oven just before serving for maximum impact.
Key Ingredients
- Semi-Sweet Chocolate Chips: Form both the cookie base and the molten center. High-quality chocolate chips contain the proper balance of cocoa solids and cocoa butter needed for the perfect melting consistency. The 54-60% cacao content offers ideal bittersweet notes that prevent the cookies from becoming cloyingly sweet.
- Unsalted Butter: Creates tenderness and adds richness to the cookie dough. The fat content helps achieve that perfect brownie-like texture while preventing the cookies from becoming cakey.
- Unsweetened Cocoa Powder: Intensifies the chocolate flavor and contributes to the fudgy texture. Dutch-processed cocoa works best for its smoother flavor profile and darker color.
- Brown Sugar: Adds moisture and depth with its molasses notes, creating that classic chewy brownie texture. The hygroscopic nature of brown sugar helps keep the cookies soft days after baking.
 Pin it
Step-by-Step Instructions
- Prepare Your Workspace:
- Begin by preheating your oven to 350°F (175°C) and lining a baking sheet with parchment paper. Parchment prevents sticking and makes cleanup easier, especially important with these gooey cookies. Having everything ready before starting ensures a smooth baking process for these time-sensitive treats.
- Create the Chocolate Base:
- In a medium saucepan over low heat, melt butter and half the chocolate chips together, stirring constantly to prevent scorching. The low, gentle heat allows the chocolate to melt evenly without breaking down its structure. Remove from heat once smooth and allow to cool slightly – about 5 minutes – so it won't cook the eggs when combined.
- Blend Wet Ingredients:
- In a large mixing bowl, whisk together granulated sugar, brown sugar, eggs, and vanilla extract until the mixture lightens in color and becomes slightly fluffy. This incorporates air into the batter for the right texture. Gradually stir in the melted chocolate mixture until completely incorporated, creating a glossy batter.
- Incorporate Dry Elements:
- In a separate bowl, combine flour, cocoa powder, baking powder, and salt, whisking to distribute the leavening agents evenly. Gradually add this dry mixture to the wet ingredients, folding gently just until no dry streaks remain. Overmixing develops gluten, which would make the cookies tough rather than fudgy.
- Chill for Control:
- Refrigerate the dough for 10-15 minutes to firm it up slightly, making it easier to handle during the shaping process. This brief chilling also allows the flour to hydrate properly, improving both flavor and texture of the finished cookies.
- Create Lava Centers:
- Using a cookie scoop or tablespoon, portion the dough into 1½-inch balls. Flatten each portion in your palm, place 3-4 chocolate chips in the center, then carefully fold and roll the dough around the chips to completely seal them inside. This encapsulated chocolate core will melt during baking to create the signature lava effect.
- Strategic Baking:
- Arrange the cookie balls on the prepared baking sheet, leaving 2 inches between each for spreading. Bake in the preheated oven for exactly 10-12 minutes – the edges should be set but the centers should still look soft and slightly underdone. This precise timing is crucial for achieving the perfect lava consistency.
The Secret to Perfect Lava Centers
Achieving that ideal molten center took me several attempts to master. The key breakthrough came when I realized the importance of temperature control both before and after baking. The first batch I made had chocolate centers that either completely melted into the cookie or remained too solid.
I discovered that the dough needs to be cool when it goes into the oven to prevent the chocolate center from migrating outward during baking. Additionally, the size of the dough ball matters tremendously – too small and the center melts completely into the cookie; too large and the cookie doesn't bake properly before the chocolate center solidifies.
 Pin it
Serving for Maximum Impact
These cookies create the most dramatic effect when served warm, about 5-10 minutes after removing from the oven. The first time I made them for friends, I timed the baking so they'd emerge from the oven just as we finished dinner. The anticipation built as the chocolate aroma filled the dining room, and when I demonstrated breaking open the first cookie to reveal the flowing center, my guests actually applauded.
For an extra-special presentation, I sometimes dust the cookies with powdered sugar just before serving, which creates a beautiful contrast against the dark chocolate cookie. A small scoop of vanilla ice cream alongside transforms these cookies into a plated dessert worthy of any restaurant.
I learned about the importance of high-quality chocolate through an embarrassing dinner party mishap. Using bargain chocolate chips resulted in centers that separated into greasy puddles rather than flowing smoothly. My foodie friend gently suggested trying a better brand, and the difference was remarkable – the premium chips maintained their integrity while melting beautifully. Now I keep high-quality chocolate stocked specifically for these cookies, considering it an essential investment in the recipe's success.
The technique that revolutionized these cookies for me was discovering the double chocolate approach. My early versions used only cocoa powder in the dough, resulting in cookies that tasted one-dimensional. Incorporating melted chocolate into the batter creates multiple layers of chocolate flavor and improves the texture dramatically. This simple change elevated these from good cookies to memorable ones that friends and family now specifically request for gatherings and celebrations.
Frequently Asked Questions
- → Can I make the dough ahead of time?
- Yes, you can prepare the dough up to 2 days in advance and keep it refrigerated. Allow it to sit at room temperature for about 15 minutes before shaping the cookies.
- → What's the best way to reheat these cookies?
- For the best lava effect, microwave a cookie for 10-15 seconds. You can also warm them in a 300°F oven for about 5 minutes.
- → Can I use different types of chocolate chips?
- Absolutely! Try dark chocolate, milk chocolate, or even white chocolate chips for different flavor variations. You could also use chocolate chunks or mini chocolate chips.
- → How do I know when they're done baking?
- The edges should be set and slightly firm, but the centers should still look soft and underdone. They will continue to cook a bit on the hot baking sheet after removal from the oven.
- → Can I freeze these cookies?
- Yes, you can freeze the shaped, unbaked cookie dough balls for up to 3 months. Bake directly from frozen, adding 1-2 minutes to the baking time. Baked cookies can also be frozen for up to 2 months.