
 Pin it
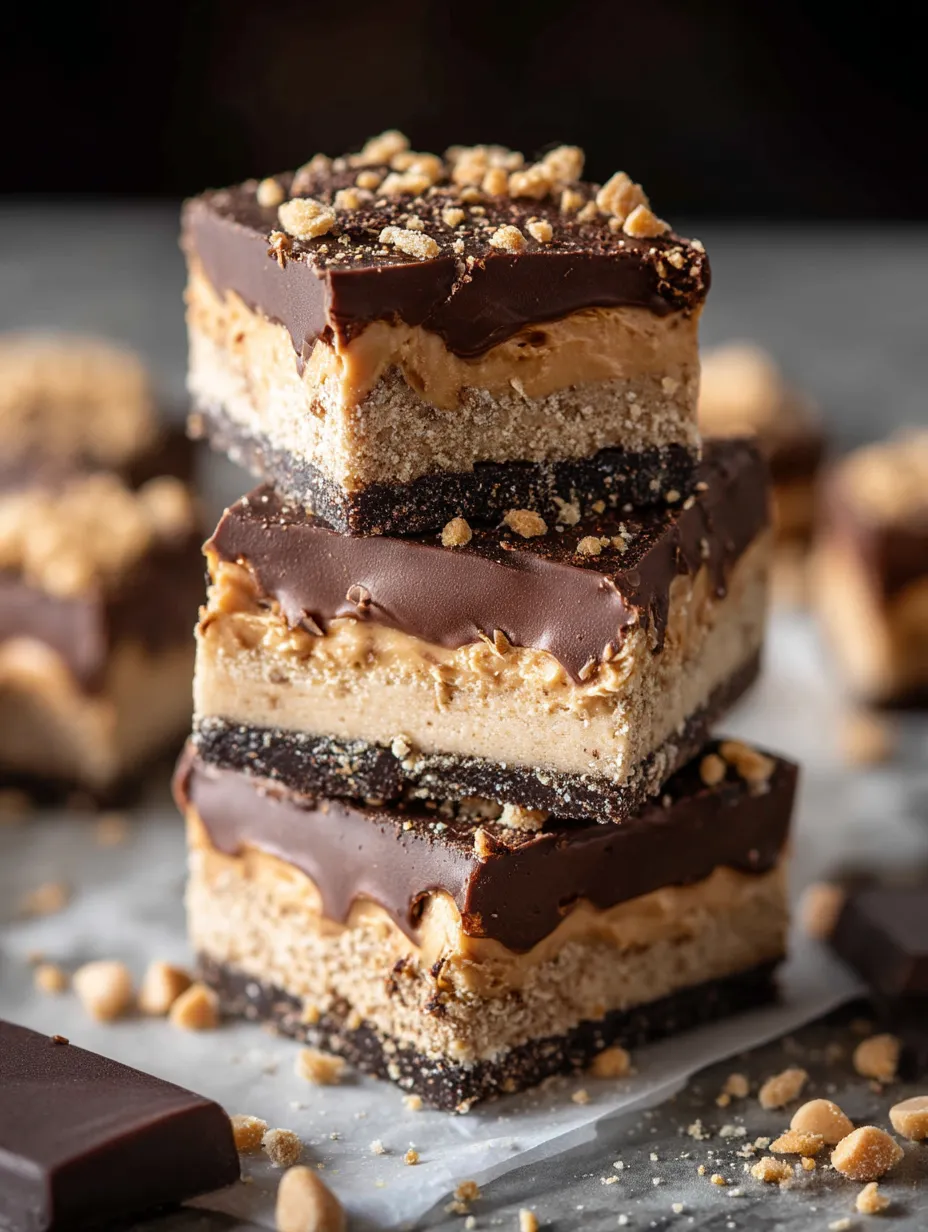
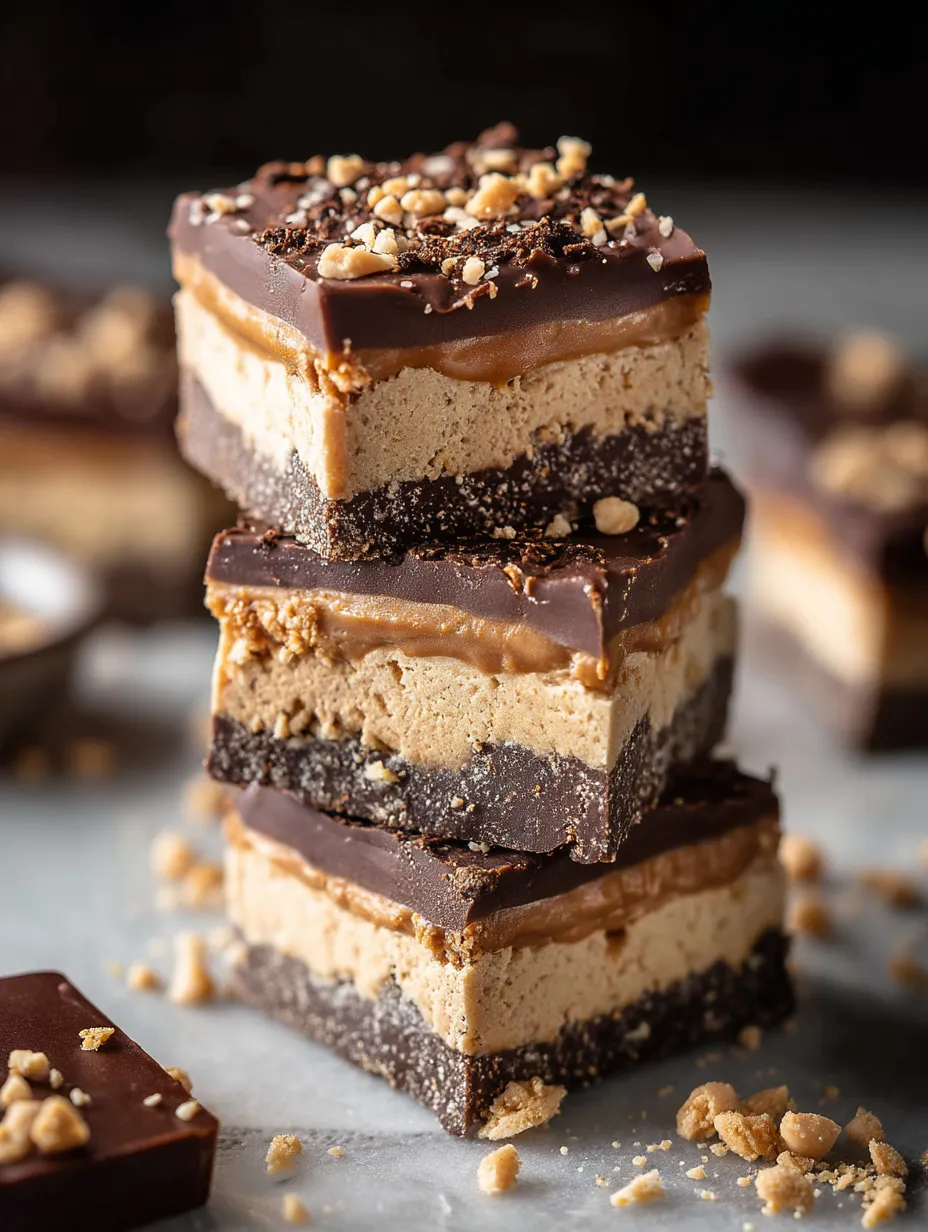
These enchanting Disneyland Peanut Butter Squares recreate the beloved treat from Pooh Corner at the happiest place on earth right in your own kitchen. With layers of crisp graham crackers, creamy peanut butter filling, and smooth chocolate coating, these no-bake squares capture that perfect balance of textures and flavors that make the original so memorable. The simplicity of preparation belies their impressive taste—requiring just a handful of everyday ingredients and no baking whatsoever, these squares deliver pure magic in every bite while bringing a touch of Disney nostalgia to any occasion.
I first discovered these treats during a family trip to Disneyland when my daughter insisted we stop at Pooh Corner for a snack. Standing in line, watching the confectioners work their magic behind the glass, I was captivated by the simple yet meticulous layering of these squares. After purchasing one to share (which quickly turned into buying several more), I was determined to recreate them at home. It took several attempts to get the proportions just right, but the moment I achieved that perfect ratio of peanut butter to chocolate, my family declared them even better than the originals. Now, whenever we can't make it to the park but need a touch of Disney magic, these squares transport us straight to Main Street with just one bite. They've become our traditional movie night treat during Disney marathons, and friends always request I bring them to gatherings—often asking for the recipe with a gleam in their eye that says they too want to capture a bit of that Disney experience at home.
Ingredients
- 12 graham cracker sheets: Creates the sturdy, crisp layers that sandwich the filling. Look for fresh, unbroken crackers with a good snap when broken. The crackers should smell sweet and toasty, not stale. Traditional honey graham crackers provide the most authentic flavor.
- 1 cup creamy peanut butter: Forms the heart of the filling with its rich, nutty flavor. Commercial brands like Jif or Skippy work best here as they maintain their structure when chilled. The peanut butter should be smooth and well-blended, not separated with oil on top.
- ½ cup unsalted butter, softened: Adds richness and helps create the perfect consistency in the filling. The butter should be soft enough to blend easily but not melted. Leave it at room temperature for about 30 minutes before using.
- 2 cups powdered sugar: Sweetens the filling while providing structure. Fresh, lump-free sugar incorporates most smoothly. Sift if it appears at all lumpy to ensure a silky-smooth filling.
- 1 teaspoon vanilla extract: Enhances the flavor with subtle warmth. Pure vanilla extract rather than imitation offers the most authentic taste. The extract should have a rich aroma without alcohol overtones.
- 2 cups semi-sweet chocolate chips: Creates the smooth chocolate coating. High-quality chips with at least 45-60% cacao content offer the best balance of sweetness and chocolate flavor. The chips should be glossy and uniform in size.
- 2 teaspoons shortening: Helps create a smooth, easy-to-cut chocolate layer. Vegetable shortening works best as it solidifies well at room temperature and helps prevent the chocolate from cracking when cut. The shortening should be fresh with no off odors.
 Pin it
Step-by-Step Instructions
- Step 1:
- Prepare your work area properly - Begin by lining a 9×9-inch square baking pan with parchment paper, leaving an overhang on at least two sides to create handles for easy removal later. This step is crucial for achieving neatly cut squares. Make sure the parchment paper is pressed into the corners without wrinkling to ensure even layers. A metal pan conducts cold better than glass for this no-bake recipe, helping the layers set more quickly and evenly. Before starting, ensure all ingredients are at the appropriate temperature – softened butter should indent easily when pressed but still hold its shape, while peanut butter should be at room temperature for smooth blending.
- Step 2:
- Create the base layer with precision - Arrange 6 of the graham cracker sheets in a single layer on the bottom of your prepared pan. You'll need to break some of the crackers to fit them snugly against each other, creating a solid base with no gaps. Unlike a traditional crust, these crackers remain whole rather than being crushed, providing that authentic Disney texture. Take care to fit the pieces together like a puzzle, breaking along the perforated lines when possible for the cleanest edges. This careful arrangement creates the foundation for your squares and ensures each bite has the perfect ratio of cracker to filling to chocolate.
- Step 3:
- Prepare the chocolate coating with care - In a microwave-safe bowl, combine the chocolate chips and shortening. Microwave in 30-second intervals at 50% power, stirring thoroughly between each interval until the mixture is completely smooth and glossy. This gentle melting prevents the chocolate from overheating, which can cause it to seize or develop a dull appearance. The shortening helps create a smoother consistency that sets well but isn't too brittle when chilled. The finished chocolate should be thin enough to pour but thick enough to coat a spoon. Reserve approximately two-thirds of this chocolate mixture for the top layer, using the remaining third for the next step.
- Step 4:
- Create the first chocolate layer - Pour one-third of the melted chocolate mixture over the graham cracker base, using an offset spatula or the back of a spoon to spread it into a thin, even layer that completely covers the crackers. Work quickly but carefully to ensure the chocolate remains smooth and doesn't begin to set before you've finished spreading it. This thin chocolate layer creates a moisture barrier that keeps the crackers crisp while adding that first hit of chocolate flavor. Allow this layer to set slightly while preparing the filling, about 5-10 minutes at room temperature, which gives it time to firm up enough that the peanut butter layer won't sink into it.
- Step 5:
- Mix the peanut butter filling to perfection - In a large mixing bowl, combine the creamy peanut butter and softened butter. Using an electric mixer on medium speed, beat until completely smooth and well-incorporated, about 2 minutes. Add the vanilla extract and mix to combine. Gradually add the powdered sugar, about half a cup at a time, continuing to beat after each addition until fully incorporated. The mixture will become increasingly thick and may seem dry at first, but continue mixing until it comes together into a smooth, stiff filling that holds its shape. The finished texture should be similar to a soft cookie dough – firm enough to spread without being runny. If the mixture is too sticky, add additional powdered sugar, one tablespoon at a time, until the desired consistency is reached.
- Step 6:
- Add the peanut butter layer carefully - Scoop the peanut butter filling onto the chocolate-coated graham crackers. Using clean hands (slightly dampened to prevent sticking) or a silicone spatula, gently press and spread the filling into an even layer, making sure it reaches all the way to the edges of the pan. Take care not to disturb the chocolate layer beneath. The peanut butter layer should be level and smooth, with no air pockets or uneven areas. This middle layer is the star of these squares, so ensure it's distributed evenly for consistent flavor in every bite. The thickness should be about twice that of the graham crackers, creating the perfect proportion of fillings that makes these squares so special.
- Step 7:
- Add the second graham cracker layer - Arrange the remaining 6 graham cracker sheets on top of the peanut butter filling, breaking pieces as needed to create a complete layer that mirrors the base. Gently press the crackers into the peanut butter filling just enough to help them adhere without pushing too hard, which could cause the filling to squeeze out the sides. This top layer of crackers adds that distinctive sandwich-like structure that makes these squares unique. The crackers should lie flat and cover the entire surface of the peanut butter filling for the authentic Disneyland appearance and texture.
- Step 8:
- Complete with the final chocolate layer - Pour the remaining melted chocolate (reheating briefly if it has begun to thicken) over the top graham cracker layer. Working quickly, use an offset spatula to spread the chocolate into a smooth, even layer that completely covers the crackers and seals in the sides of the squares. This enrobing technique mimics the professional finish of the park treats. For an authentic touch, create subtle ripples in the chocolate surface rather than a perfectly flat finish. If desired, sprinkle a light dusting of crushed graham cracker crumbs over the still-wet chocolate for decoration and added texture that references the original Disneyland version.
- Step 9:
- Chill for the perfect texture - Place the pan in the refrigerator and chill for at least 1-2 hours, or until the chocolate topping is completely set and the peanut butter filling is firm. This chilling time is crucial for achieving clean cuts and the proper texture. The cold temperature solidifies the butter in the filling and sets the chocolate to the perfect consistency – firm enough to hold its shape when cut but not so hard that it cracks or separates from the filling. The squares need this time to develop their structure, so resist the temptation to rush this step, even if the top layer appears set after a shorter time.
- Step 10:
- Cut and serve with precision - Once fully chilled, use the parchment paper handles to lift the entire block out of the pan and onto a cutting board. With a large, sharp knife, cut into squares of your desired size. For the most professional-looking results, warm the knife blade under hot water and wipe it clean between each cut. This prevents the chocolate from cracking and gives you clean, smooth edges. Traditional Disneyland squares are cut quite generously, about 2×2 inches, but you can make them smaller for a larger yield. Once cut, the squares can be served immediately or stored in an airtight container. They're delicious served cold from the refrigerator or allowed to stand at room temperature for about 10 minutes, which softens the filling slightly for a creamier bite.
When properly prepared, these Disneyland Peanut Butter Squares have a distinctive layered appearance: a dark chocolate top and bottom sandwiching the pale peanut butter filling and graham crackers. Each square should hold its shape when handled but yield easily to a bite, with a perfect balance of crunch, creaminess, and rich chocolate flavor.
A Taste of Disney History
What makes these squares so special isn't just their delicious flavor combination, but the nostalgic connection they create to one of Disneyland's most beloved snack locations. Pooh Corner, nestled in Critter Country (previously known as Bear Country), has been delighting park visitors with these treats since the 1980s.
I've always been fascinated by Disney's attention to detail, and these peanut butter squares are no exception. Unlike mass-produced candy bars, these treats maintain a distinctly homemade quality despite being made in a commercial setting. Watching the confectioners at work through the glass window at Pooh Corner, you can see the care that goes into each batch—the precise layering, the careful spreading of peanut butter, the patient waiting for each layer to set before adding the next.
During one memorable visit, my family arrived at park opening and made a beeline for Pooh Corner to get these squares before they sold out (which they often do by afternoon). We struck up a conversation with a cast member who shared that the recipe had remained largely unchanged for decades, with only minor adjustments to accommodate modern ingredients. That commitment to consistency is what allows these treats to become multigenerational memories, with parents introducing their children to the same flavors they enjoyed during their own childhood visits.
What I appreciate most about recreating these at home is how they instantly establish a Disney atmosphere. When I serve them during family movie nights featuring classic Disney films, something magical happens—we're transported beyond our living room to that special feeling of being in the park, where everyday treats become extraordinary experiences.
Perfect Occasions for Sharing
These Disneyland Peanut Butter Squares fit wonderfully into so many different gatherings, making them a versatile addition to your recipe collection.
For Disney-themed birthday parties, I arrange them on a tiered stand alongside other homemade "park foods" like Mickey-shaped pretzels and Dole Whip. The squares are always the first to disappear, especially when I add small paper Disney character picks as decorations. Parents appreciate having a nostalgic treat that connects to their own childhood memories while creating new ones for their children.
During holiday seasons, I often include these squares in gift packages for neighbors and friends. Wrapped in parchment paper and tied with ribbon in seasonal Disney colors (orange and black for Halloween, red and green for Christmas), they become a thoughtful homemade gift that stands out from the usual cookie assortment. I've even had recipients ask if I purchased them directly from the park—the ultimate compliment!
For family road trips, especially those heading toward Disney destinations, I pack these squares as a special surprise. Revealing them halfway through the journey builds excitement and helps children (and adults) manage the anticipation of arrival. There's something particularly magical about enjoying a taste of Disney while you're on your way to experience the real thing.
Movie marathons become more immersive when themed snacks match the films. When we're working our way through Disney classics, these peanut butter squares paired with themed drinks (like blue "Frozen" punch or green "Peter Pan" limeade) help create a full sensory experience that enhances the storytelling.
I learned the importance of proper chocolate preparation through a memorable failure during a Disney-themed birthday party. In a rush, I skipped the shortening and used chocolate chips melted alone. When I tried to cut the chilled squares, the chocolate shattered instead of slicing cleanly, creating a messy presentation that lacked the polished look of the park original. A guest who worked as a pastry chef explained that commercial confectioners use shortening or cocoa butter to create a chocolate coating that remains slightly pliable even when chilled. Now I never skip this crucial ingredient, and my squares cut perfectly every time, maintaining that professional appearance that makes them truly special.
 Pin it
Creative Variations
While the classic recipe captures the authentic Disneyland experience, I've developed several variations that offer delightful twists while maintaining the spirit of the original.
For those who prefer milk chocolate to semi-sweet, a simple swap creates a sweeter, creamier coating that appeals especially to younger palates. I sometimes do a "half and half" version with milk chocolate on top and semi-sweet on the bottom, creating a visual distinction between layers while offering two flavor experiences in one treat.
During holiday seasons, I create a festive version by adding 1/4 teaspoon of peppermint extract to the chocolate coating and sprinkling crushed candy canes on top before the chocolate sets. The subtle mint flavor complements the peanut butter wonderfully, creating a seasonal variation that's particularly appropriate during Christmas at Disney celebrations.
For those who enjoy textural contrast, I sometimes add 1/3 cup of finely chopped peanuts to the peanut butter filling. This creates occasional pockets of crunch within the creamy filling, reminiscent of a crunchy peanut butter experience without compromising the smooth overall texture that defines these squares.
When catering to those with graham cracker preferences or sensitivities, I've successfully substituted chocolate graham crackers for the traditional honey variety. This creates an even more intense chocolate experience while maintaining the distinctive layered structure. The chocolate grahams create a darker, more dramatic presentation that particularly appeals to chocolate enthusiasts.
For an extra-special presentation, I occasionally make a "Mickey version" by using a small Mickey-shaped cookie cutter to create individual servings rather than cutting into squares. The scraps don't go to waste – they're quickly devoured by eager helpers in the kitchen!
Over years of making these Disneyland Peanut Butter Squares, I've come to appreciate how they create connections that go beyond simple dessert enjoyment. When I first started bringing them to family gatherings, I noticed how they sparked conversations among relatives about their own Disney experiences – the first time they visited the park, favorite rides and treats, memories of taking their children or grandchildren.
My sister-in-law, who rarely bakes, asked for the recipe after trying them at a holiday dinner. Months later, she proudly presented her own version at a family picnic, explaining that making these squares with her children had become a monthly tradition. They would prepare a batch while sharing Disney stories and planning their dream future visit to the park.
Perhaps what I love most about these squares is how they capture the essence of what makes Disney special – the ability to transform something simple into an experience that feels magical. In the parks, everything from trash cans to waiting in line is thoughtfully designed to create joy and wonder. These squares embody that same philosophy – ordinary ingredients like graham crackers and peanut butter, arranged with care and attention to detail, become something extraordinary that creates lasting memories and connects us to shared experiences of childhood wonder.
Frequently Asked Questions
- → Can I use crunchy peanut butter instead of creamy?
- Yes! Crunchy peanut butter works great if you prefer more texture in your bars. The filling will have small peanut pieces throughout, adding an extra bit of crunch to contrast with the smooth chocolate layers.
- → What can I substitute for shortening in the chocolate layer?
- You can use coconut oil as a 1:1 replacement for shortening. Alternatively, you can use additional butter, though the chocolate may set slightly softer than with shortening or coconut oil.
- → Can I make these squares ahead of time for a party?
- Absolutely! These squares actually benefit from being made 1-2 days ahead. The flavors meld together and the textures settle, making them even better. Store them in the refrigerator until about 15 minutes before serving.
- → Are these exactly like the ones at Disneyland?
- This is a close copycat version of Disneyland's peanut butter squares. While the exact recipe is a closely guarded secret, many visitors who have tried both say this homemade version captures the magic of the original park treat.
- → Can I freeze these peanut butter squares?
- Yes! These freeze extremely well for up to 3 months. Cut them into individual squares, wrap each in plastic wrap, and store in a freezer-safe container. Thaw in the refrigerator overnight before serving.