
 Pin it
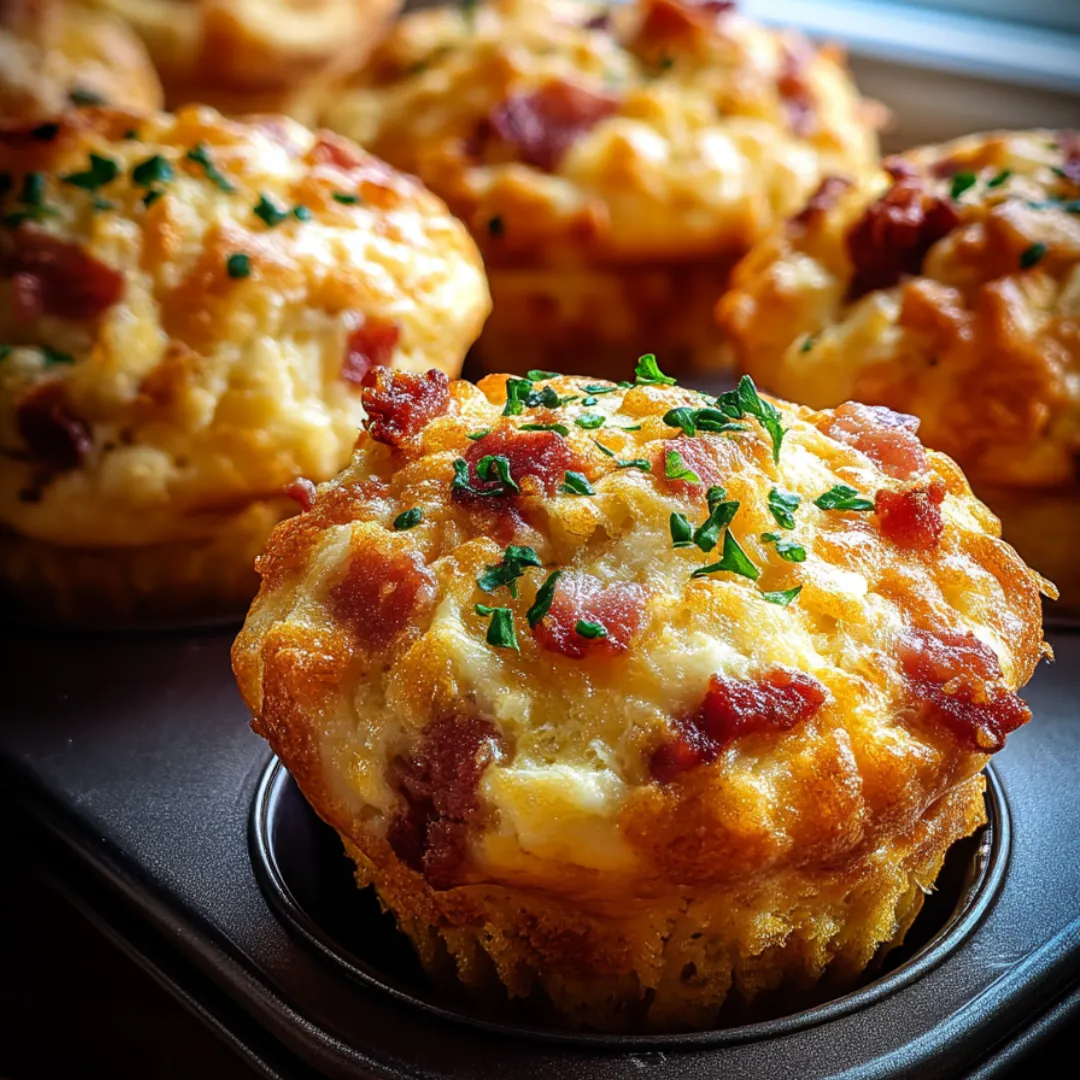
These savory Turkey Bacon & Cheddar Cheese Muffins offer the perfect marriage of smoky turkey bacon and sharp cheddar in a tender, fluffy package. Unlike sweet breakfast muffins that often leave you hungry an hour later, these protein-packed savory treats provide sustained energy through their perfect balance of complex carbohydrates and satisfying protein. Each golden-brown muffin delivers pockets of melted cheese and crispy bacon bits in every bite, creating an irresistible texture contrast between the moist, tender crumb and the savory mix-ins. Whether enjoyed warm from the oven with a pat of butter or grabbed as a protein-rich snack on the go, these versatile muffins bridge the gap between convenient and nourishing in a way few portable foods can manage.
I first created these muffins during a particularly hectic season when my family's morning schedule had us all heading in different directions. The breakfast battle was real—my teenager wanted something she could grab on her way out the door, my husband needed protein to fuel long workdays, and I wanted to ensure everyone was actually eating something substantial before rushing off. After experimenting with various savory muffin combinations, this version with turkey bacon and cheddar emerged as the unanimous favorite. My daughter, who typically skips breakfast entirely, started setting her alarm ten minutes earlier to ensure she had time to warm one up before school. What began as a practical solution to our chaotic mornings has become a family staple that regularly appears not just at breakfast but packed in lunch boxes and served alongside soup for quick dinners. The combination of convenience and actual nutrition makes these muffins one of the most versatile recipes in my regular rotation.
Ingredients
- 1½ cups all-purpose flour: Creates the foundational structure of the muffins. Look for unbleached flour for the cleanest flavor. The protein content in all-purpose flour (typically 10-12%) provides the perfect balance—enough structure to hold the add-ins without becoming tough. The flour should feel soft and powdery with no lumps. This base ingredient forms the canvas for the savory flavors while creating a tender crumb. Properly measured flour (spooned into measuring cups, not scooped) ensures the muffins remain light rather than dense and heavy.
- 1 teaspoon baking powder: Provides primary leavening that creates rise and lightness. Choose aluminum-free varieties for the purest flavor. The powder should be fresh and active—test by dropping a small amount into hot water to see if it bubbles vigorously. This crucial ingredient creates the carbon dioxide bubbles that give the muffins their tender texture. The specific amount is calibrated to give just enough rise without creating domed tops that might overflow during baking.
- ½ teaspoon baking soda: Works with the acidic ingredients to create additional lift and tenderness. The baking soda should be fresh and free-flowing without clumps. This ingredient reacts with the tangy Greek yogurt to create extra leavening power while also contributing to better browning during baking. The combination of baking powder and baking soda creates the perfect rise without leaving any metallic aftertaste that can occur when using too much of either leavener.
- ½ teaspoon salt: Enhances all other flavors while balancing the richness. Kosher or fine sea salt provides the cleanest flavor enhancement. Beyond simply making things taste "salty," this ingredient activates taste receptors that detect other flavors, making the cheese and bacon taste more pronounced. Salt also strengthens gluten formation slightly, providing necessary structure to support the heavy add-ins without making the muffins tough.
- ½ teaspoon garlic powder: Adds savory depth that complements the cheese and bacon. Look for pure garlic powder without added salt or anti-caking agents. Fresh garlic powder should have a strong, aromatic scent when opened. This ingredient provides background savoriness that elevates the entire flavor profile without creating distinct garlic pieces in the muffin. The fine powder distributes evenly throughout the batter for consistent flavor in every bite.
- ½ teaspoon black pepper: Contributes mild heat and aromatic complexity. Freshly ground pepper provides superior flavor to pre-ground. The black specks visible in the batter create visual interest in the finished muffins. This ingredient adds a gentle warmth that builds subtly with each bite rather than immediate heat. The aromatic qualities of fresh pepper enhance the savory character of the muffins in a way that complements both the cheese and bacon components.
- 2 large eggs: Provide structure, moisture, and binding properties. Look for eggs with bright, domed yolks and thick whites, indicating freshness. Eggs at room temperature incorporate more smoothly into the batter. This protein-rich ingredient creates essential structure through coagulation during baking while contributing to the overall protein content of the muffins. The fat in the yolks also adds richness and tenderness to the crumb.
- ½ cup milk (whole or 2%): Creates proper batter consistency and adds moisture. Whole milk provides the richest flavor, though 2% works nearly as well. The milk should be at room temperature for best incorporation. This ingredient creates the right batter fluidity while contributing subtle sweetness through naturally occurring lactose. The fat content in the milk also helps create tender muffins with good moisture retention.
- ¼ cup unsalted butter, melted: Adds rich flavor and tender texture. Use good quality butter with fresh, sweet cream aroma, melted and slightly cooled before adding. The butter should be melted but not hot enough to cook the eggs when combined. This fat component creates tender mouthfeel while carrying the flavors of the other ingredients. The milk solids in butter contribute to better browning and a more complex flavor than oil alone would provide.
- ¼ cup plain Greek yogurt: Provides moisture, tenderness, and subtle tanginess. Choose full-fat or 2% varieties for best texture and flavor. The yogurt should be thick and creamy, not watery or separated. This ingredient adds moisture without excessive liquid, creating a tender crumb while its acidity activates the baking soda for better rise. The protein content in Greek yogurt also contributes to the satisfying nature of these muffins.
- 6 strips turkey bacon, cooked and crumbled: Delivers savory, smoky flavor throughout the muffins. Look for high-quality turkey bacon with visible seasoning and good fat marbling. The bacon should be cooked until fully crisp for the best texture contrast in the finished muffins. This protein-rich ingredient provides satisfying savory bites throughout the muffin while adding visual appeal. The slight chew of the bacon pieces creates textural interest against the soft muffin crumb.
- 1 cup shredded sharp cheddar cheese: Creates pockets of melty, tangy goodness. Choose aged sharp cheddar for the most pronounced flavor impact. Freshly grated cheese melts better than pre-shredded varieties coated with anti-caking agents. This ingredient provides rich, tangy pockets of flavor throughout the muffin while contributing to the protein content. The fat in the cheese also adds moisture and richness to the overall eating experience.
- 2 tablespoons chopped fresh chives (optional): Add bright color and mild onion flavor. Look for vibrant green, firm chives without wilting or yellowing. Chop them just before adding to preserve their volatile flavor compounds. This optional ingredient provides both visual appeal through the green flecks and a fresh, mild onion flavor that complements the bacon and cheese perfectly. The subtle sharpness cuts through the richness of the other ingredients, creating greater flavor complexity.
 Pin it
Step-by-Step Instructions
- Step 1:
- Prepare the turkey bacon properly - Begin by cooking the turkey bacon to perfect crispness, which is essential for both flavor and texture in the finished muffins. Place a large non-stick skillet over medium heat and allow it to warm up completely before adding the bacon strips. Unlike pork bacon, turkey bacon benefits from a touch of cooking spray or a teaspoon of oil in the pan to help it crisp properly, as it contains less natural fat. Cook the strips for 4-5 minutes on the first side until they begin to brown and curl slightly at the edges. Flip each piece and continue cooking for another 3-4 minutes until the bacon is fully crisp but not burnt. Transfer the cooked bacon to a paper towel-lined plate to drain any excess oil and cool slightly. Once cool enough to handle, crumble or chop the bacon into small pieces approximately ¼-inch in size—large enough to provide textural interest in each bite but not so large that they create cutting difficulties in the finished muffins. This proper preparation ensures the bacon maintains its crispy texture and smoky flavor in the finished muffins rather than becoming chewy or soggy.
- Step 2:
- Set up for baking success - Position an oven rack in the center of your oven and preheat to 375°F (190°C). The proper temperature is crucial—too low and the muffins won't rise properly; too high and they'll brown too quickly while remaining underbaked inside. Allow at least 15 minutes for your oven to come to temperature fully, regardless of when the indicator light or beep signals readiness. Prepare a standard 12-cup muffin tin by lining with paper liners or spraying thoroughly with non-stick cooking spray. If using liners, consider lightly spraying them as well, as savory muffins can sometimes stick more than sweet varieties due to the cheese content. For the most even baking, choose a light-colored metal muffin tin rather than dark or non-stick, which can cause too much browning on the bottoms and sides before the centers are fully baked. Having your pan prepared before mixing the batter ensures you can work efficiently and get the muffins into the oven quickly once the wet and dry ingredients are combined.
- Step 3:
- Combine dry ingredients thoroughly - In a large mixing bowl, whisk together the all-purpose flour, baking powder, baking soda, salt, garlic powder, and black pepper until completely incorporated. This thorough mixing is essential for even distribution of the leavening agents and seasonings throughout the batter. Use a whisk rather than a spoon for this step, as the whisking action helps aerate the flour and break up any small lumps, resulting in a lighter-textured muffin. Pay particular attention to the baking powder and baking soda, ensuring there are no small clumps that could create bitter spots in the finished muffins. The dry mixture should appear uniform in color with visible black pepper specks throughout. This careful preparation ensures that each muffin will rise evenly and have consistent flavor. Set the bowl aside while preparing the wet ingredients.
- Step 4:
- Mix wet ingredients to perfect consistency - In a separate medium bowl, combine the eggs, milk, melted butter, and Greek yogurt. The butter should be melted but not hot when added—if it's too warm, it could begin cooking the eggs, resulting in scrambled bits in your batter. Whisk these ingredients together with purpose until completely smooth and uniform, with no streaks of egg white or yogurt visible. This thorough mixing creates a consistent liquid base that will incorporate evenly with the dry ingredients. The smooth wet mixture should have a pale yellow color and medium thickness that coats the back of a spoon. Proper emulsification at this stage helps create an even crumb in the finished muffins rather than uneven pockets or tunnels. Having both your wet and dry mixtures fully prepared before combining them allows you to work efficiently in the next critical step.
- Step 5:
- Combine wet and dry ingredients with minimal mixing - Create a well in the center of the dry ingredients and pour the wet mixture into it all at once. Using a silicone spatula or wooden spoon (not a whisk, which can overwork the batter), fold the ingredients together with broad, gentle strokes, scraping from the bottom of the bowl up and over the top. Continue this folding motion just until no dry flour pockets remain visible—about 10-12 strokes total. The batter will look somewhat lumpy, which is perfect; a smooth batter indicates overmixing. This careful, minimal mixing prevents excess gluten development, which would create tough, tunneled muffins rather than tender ones. Stop folding the moment the dry ingredients are moistened, even if the batter looks less uniform than you might expect. This restraint is perhaps the most crucial technique for creating tender, perfect-textured muffins.
- Step 6:
- Incorporate add-ins gently - Sprinkle the crumbled turkey bacon, shredded cheddar cheese, and chopped chives (if using) over the top of the batter. Using the same folding motion, gently incorporate these add-ins with just 4-5 broad strokes, distributing them evenly throughout the batter without overworking it. The minimal mixing prevents the cheese from completely disappearing into the batter, ensuring you'll get those desirable pockets of melted cheese in the finished muffins. The bacon should be evenly distributed rather than clumped together in certain areas. At this point, the batter should look substantial, studded throughout with visible pieces of bacon, cheese, and herbs. Some streaks of ingredients are actually desirable, as they create interesting flavor distribution in the finished muffins. Work quickly during this step to ensure the batter doesn't sit too long before baking, which could cause some deflation in the final rise.
- Step 7:
- Fill muffin cups with proper technique - Using a large spoon or ice cream scoop (a #20 scoop, which holds about 3 tablespoons, is ideal), distribute the batter evenly among the prepared muffin cups. The scoop ensures consistent sizing, which promotes even baking. Fill each cup approximately ¾ full—this gives the batter room to rise without overflowing. If you have extra batter, resist the urge to overfill the cups; instead, prepare a few additional muffin cups in another pan. For the most attractive appearance, smooth the tops slightly with the back of a spoon, then sprinkle each with a small amount of additional shredded cheese (about ½ teaspoon per muffin). This creates a beautiful golden, slightly crisp cheese top during baking. Work efficiently at this stage to get the batter into the oven quickly while the leavening agents are still active. The filled muffin tin should show evenly distributed batter with visible cheese and bacon pieces throughout.
- Step 8:
- Bake to golden perfection - Place the filled muffin tin on the center rack of your preheated oven. Bake for 18-22 minutes, until the tops are golden brown and spring back lightly when touched in the center. The exact timing will depend on your particular oven, so begin checking at the 18-minute mark. For the most accurate test of doneness, insert a toothpick into the center of a middle muffin—it should come out clean or with a few moist crumbs, but no wet batter. Avoid opening the oven during the first 15 minutes of baking, as this can cause the muffins to collapse. Once fully baked, remove the tin from the oven and place it on a wire cooling rack. Allow the muffins to cool in the tin for exactly 5 minutes—this brief rest allows the structure to set while still in the supportive cups. After 5 minutes, carefully remove each muffin from the tin and place directly on the wire rack to cool completely. This prevents condensation from making the bottoms soggy. The perfectly baked muffins should have domed tops with golden-brown peaks, visible cheese and bacon pieces, and a wonderful savory aroma.
Perfect for Meal Prep and Busy Mornings
These Turkey Bacon & Cheddar Cheese Muffins have revolutionized my approach to hectic weekday mornings. Unlike many breakfast options that require last-minute preparation, these savory muffins can be made entirely in advance, providing grab-and-go nourishment that actually sustains energy levels throughout the morning. Their combination of protein from the turkey bacon, eggs, cheese, and Greek yogurt creates lasting satisfaction that prevents the mid-morning energy crash often experienced after carbohydrate-heavy breakfasts.
What particularly impresses me about these muffins is their remarkable shelf life. When stored properly in an airtight container, they maintain their moisture and flavor for up to four days at room temperature—though they rarely last that long in my household before being devoured. For extended storage, they freeze beautifully for up to three months, allowing for genuine batch cooking that serves you well beyond a single week.
The reheating versatility further enhances their practical appeal. On rushed mornings, 20-30 seconds in the microwave transforms a refrigerated or thawed muffin back to its fresh-baked glory. For those with a few extra minutes, 5-7 minutes in a toaster oven not only warms the muffin through but also recreates that slightly crisp exterior that makes the first bite so satisfying. I've even discovered that they're quite delicious at room temperature when packed for lunches, making them perfect for school lunchboxes or office meals when microwave access might be limited. This exceptional versatility is what elevated these muffins from occasional treat to weekly staple in our household meal planning.
Creative Variations and Serving Suggestions
While the classic combination of turkey bacon and cheddar creates a consistently delicious result, this recipe's framework welcomes endless variations to suit different tastes and dietary needs. I regularly adjust the add-ins based on what's available in my refrigerator, creating new flavor profiles while maintaining the same reliable muffin base.
For a Mediterranean twist, I sometimes substitute feta cheese for the cheddar, add chopped sun-dried tomatoes instead of bacon, and incorporate fresh basil and oregano. This variation pairs beautifully with a simple Greek salad for a light yet satisfying lunch. When serving these to guests, I often add a small dish of olive tapenade on the side for spreading on the warm muffins—the combination is surprisingly sophisticated for such a simple preparation.
A Southwestern variation has become another family favorite, using pepper jack cheese, crumbled chorizo in place of the turkey bacon, and adding diced roasted poblano peppers and fresh cilantro to the batter. These spicier muffins make an excellent accompaniment to chili or tortilla soup, creating a complete meal with minimal effort. For brunch gatherings, I serve these alongside a simple avocado crema for dipping, which balances the heat perfectly.
For more substantial meals, these savory muffins transcend their breakfast origins to become perfect accompaniments to soups and stews. The classic version particularly complements tomato soup, creating a grown-up version of the grilled cheese and tomato soup combination that brings comfort on chilly evenings. During summer months, I've even been known to split them horizontally, toast the cut sides, and use them as the base for egg sandwiches, creating a portable breakfast that holds up remarkably well for picnics or road trips.
 Pin it
Storage and Reheating Tips
Through considerable experimentation, I've developed foolproof methods for storing and reheating these muffins without sacrificing their wonderful texture and flavor. The key to successful storage begins the moment they come out of the oven—allowing them to cool completely on a wire rack before placing them in any container prevents condensation that could make them soggy. For room temperature storage lasting up to four days, I place them in a container lined with paper towels, which absorb any excess moisture that might develop.
For longer-term storage, freezing offers excellent results when done properly. I initially freeze the completely cooled muffins in a single layer on a baking sheet for about two hours until solid, then transfer them to a zip-top freezer bag with as much air removed as possible. This two-stage freezing prevents them from sticking together, allowing you to take out just the number you need at a time. They maintain perfect quality for up to three months this way.
When it comes to reheating, different methods offer different advantages. For the quickest option, microwave a refrigerated muffin for 15-20 seconds or a frozen one for 30-40 seconds at 70% power. This gentle reheating prevents the exterior from becoming tough while ensuring the center warms through completely. For the best texture revival, I wrap refrigerated muffins in foil and place them in a 325°F oven for 7-10 minutes, which gently restores their original texture without drying them out.
I've discovered that these muffins also make excellent toast when halved horizontally and placed cut-side up under the broiler for 1-2 minutes. The cheese on top re-melts beautifully, and the edges become slightly crisp, creating an entirely new texture experience from the same basic recipe. This toasting method is particularly wonderful when serving the muffins as an accompaniment to soups or salads.
I learned about the importance of bacon crispness through an unfortunate baking experiment. Rushing one morning, I undercooked the turkey bacon, reasoning that it would continue cooking in the oven as part of the muffins. When my family bit into the finished muffins, they encountered unpleasantly chewy, almost rubbery bacon pieces that contrasted jarringly with the tender muffin crumb. My daughter, never one to mince words, described it as "like finding bits of bacon-flavored gum hidden in perfectly good muffins." That vivid and somewhat horrifying description ensured I never skimped on bacon-cooking time again. The extra few minutes required to get the bacon properly crisp before incorporating it makes all the difference between a muffin people politely eat and one they enthusiastically request again. Sometimes shortcuts in cooking simply aren't worth the time saved, particularly when they compromise the eating experience so dramatically—a lesson I've applied to many recipes beyond just these muffins.
After making these Turkey Bacon & Cheddar Cheese Muffins countless times over the years, I'm still amazed by how such a straightforward recipe manages to satisfy so completely. There's something deeply rewarding about creating a homemade breakfast option that rivals commercial alternatives in convenience while surpassing them in nutrition and flavor. I particularly appreciate how these muffins represent practical home cooking at its best—no fancy equipment or obscure ingredients, just good technique applied to quality basics. When my now-adult daughter calls from her own apartment asking for this recipe because "store-bought muffins just don't cut it anymore," I'm reminded that perhaps the most valuable cooking lessons aren't about elaborate techniques but rather about creating simple, reliable foods that nourish both body and spirit. These humble muffins have earned their place in our family recipe collection not through flashiness or trends, but through the consistent comfort and satisfaction they provide—the true measure of any recipe's worth.
Frequently Asked Questions
- → Can I make these muffins ahead of time?
- Yes! These muffins store well in an airtight container at room temperature for 2 days, in the refrigerator for up to 5 days, or frozen for up to 3 months.
- → Can I substitute regular bacon for turkey bacon?
- Absolutely. Regular bacon works perfectly in this recipe. Just make sure to cook it until crispy and drain well on paper towels before adding to the batter.
- → What can I use instead of Greek yogurt?
- Sour cream is the best substitute. In a pinch, you could also use buttermilk, though the muffins might be slightly less tender.
- → Can I make these muffins gluten-free?
- Yes, simply substitute the all-purpose flour with a 1:1 gluten-free flour blend. The texture may be slightly different, but they'll still be delicious.
- → What would pair well with these muffins?
- These savory muffins pair perfectly with tomato soup, vegetable-based soups, chili, or a fresh green salad. They also make a great breakfast alongside scrambled eggs.